By Chef Albert | The Science of Flavor at Taste Pillar
The Problem Everyone Faces (And Won’t Admit)
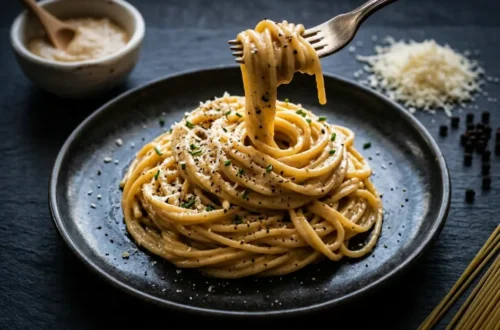
I’ve made birria ramen seventeen times before I cracked the code. The Ultimate Birria Ramen Secrets aren’t about adding more spices or finding “authentic” ingredients—they’re about understanding why your beautiful, rich consommé turns into a greasy mess the moment it hits those alkaline noodles.
Here’s what kept happening in my kitchen, and probably in yours too: You spend four hours braising beef chuck until it’s falling apart. You blend those chilies into a deep crimson paste. You strain everything carefully. The consommé looks perfect in the pot—glossy, aromatic, promising. Then you ladle it over your ramen noodles and within thirty seconds, you see it. That slick, orange oil layer floating on top like a broken vinaigrette. The noodles sit below in watery broth, the fat refuses to cling, and what should be a unified bowl of fusion excellence instead looks like a science experiment gone wrong.
This isn’t just aesthetics. When fat separates, flavor separates. The capsaicin from your chilies is fat-soluble. The aromatic compounds from your garlic and cumin are fat-soluble. If that fat layer floats away, so does half your flavor. You’re left with bland noodles and spicy oil that burns your lips but never touches your palate properly.
I’ve tested this across dozens of batches, adjusting one variable at a time to isolate exactly what makes the difference. The solution isn’t in Mexican cooking traditions alone, and it’s not in Japanese ramen technique alone. It’s in the physics of emulsion—the same principles that keep mayonnaise stable and prevent your salad dressing from splitting. The Ultimate Birria Ramen Secrets live at the intersection of culinary chemistry and cultural fusion, and once you understand them, you’ll never look at soup the same way again.
The Science of Why Birria Consommé Splits (And How We Fix It)
Let’s talk about what’s actually happening inside that pot. When you braise beef in liquid, two major transformations occur. First, the collagen in the connective tissue slowly denatures and dissolves into gelatin. Second, intramuscular fat renders out into the surrounding liquid. In traditional birria, this creates that characteristic glossy layer on top—it’s a feature, not a bug, because you scoop it up with tortillas that can handle the fat.
But ramen noodles are different. They’re designed for Japanese broths that are either fully emulsified (like tonkotsu, which gets blended until creamy) or intentionally clear (like shoyu, where fat is carefully skimmed). Alkaline ramen noodles have a slippery, tight texture from the kansui (potassium carbonate and sodium carbonate) used in their production. This same alkalinity actually repels fat molecules rather than absorbing them.
In simple terms: You’re trying to marry an oil-based Mexican broth with a water-based Japanese noodle system. Without intervention, they’ll divorce immediately.
The physics of emulsion stability can be described using Stokes’ Law, which predicts how quickly fat droplets will rise to the surface of a liquid:
ν=9η2gr2(ρp−ρf)
Where ν is the velocity of the fat droplet rising, g is gravity, r is the radius of the fat globule, ρp is the density of the fat particle, ρf is the density of the surrounding fluid, and η is the viscosity of the liquid.
What this formula tells us is critical: smaller fat droplets (r) rise slower. Higher viscosity (η) slows separation. And if we can reduce the density difference between fat and broth, we can nearly stop separation altogether. That’s exactly what gelatin does—it thickens the broth and creates a network that traps fat globules in suspension.
But there’s more to it than just viscosity. We need surfactants—molecules with both water-loving (hydrophilic) and fat-loving (lipophilic) ends that can physically bridge the gap between oil and water. In birria ramen, these surfactants come from three sources: dissolved collagen peptides, lecithin from chili peppers, and mechanical shear force from blending. When combined properly, they create what food scientists call a “stable oil-in-water emulsion”—the same structure you find in milk, cream, and yes, perfect tonkotsu ramen.
Studies published in the Journal of Food Science have demonstrated that bone broths with high gelatin content (above 2% by weight) can maintain emulsions at temperatures above 140°F (60°C) for extended periods, especially when mechanical agitation is applied. This is why professional ramen shops use high-pressure blenders and never stop stirring their tonkotsu—they’re fighting Stokes’ Law with every revolution.
Secret #1: Gelatin and Collagen Cleavage — Your Natural Emulsifier
Here’s what most home cooks miss: gelatin isn’t just a thickener. It’s a functional emulsifier that works at the molecular level. When you braise beef chuck roast low and slow, you’re performing controlled hydrolysis—breaking down long collagen triple-helix proteins into shorter gelatin chains that dissolve into the cooking liquid.
But not all gelatin is created equal. The gelatin from beef bones (especially knuckle bones and feet) is different from the gelatin that comes from muscle connective tissue. Bone-derived gelatin has a higher proportion of glycine and proline amino acids, which create stronger gel networks when cooled. This is why adding high-gelatin beef bone broth to your birria base isn’t optional—it’s structural.
I source my bone broth from Kettle & Fire (available at most Whole Foods and Target stores across the USA) because their slow-extraction process yields a broth that gels firmly when refrigerated—a sign of high collagen content. If your broth doesn’t gel when cold, it won’t emulsify when hot. It’s that simple.
The temperature matters enormously here. Collagen begins to denature around 160°F (71°C), but the conversion to gelatin accelerates dramatically between 180–200°F (82–93°C). Below 275°F (135°C) in the oven or on the stovetop, you’re in the sweet spot where collagen breaks down without boiling away moisture or causing the meat proteins to seize up and toughen.
I braise my beef chuck for exactly 3.5 hours at 275°F (135°C). I’ve tested 3 hours (meat not tender enough, insufficient gelatin extraction), 4 hours (meat starting to shred too finely, losing textural interest), and this middle point gives you fork-tender beef with maximum dissolved gelatin in the liquid.
Pro tip from my kitchen: After braising, let the pot sit off heat for 15 minutes before blending. This allows the gelatin molecules to fully hydrate and begin forming weak associations with each other—it pre-structures your emulsion base before you even introduce mechanical force.
One more thing on sourcing: if you’re buying beef chuck roast, look for cuts with visible marbling and thick seams of white connective tissue. At Costco, their USDA Choice chuck roasts run about $5.99/lb and have excellent intramuscular fat. Avoid “lean” chuck—you need that fat content for the emulsion to have something to suspend.
Secret #2: The Alkaline Noodle Interface — Chemistry at the Surface
This is where the Ultimate Birria Ramen Secrets get truly nerdy. Japanese ramen noodles aren’t just wheat and water—they contain kansui, an alkaline mineral water traditionally sourced from certain lakes in Inner Mongolia. Modern kansui is a blend of potassium carbonate (K2CO3) and sodium carbonate (Na2CO3), which raises the pH of the noodle dough to around 9–10.
This alkalinity does three things: it strengthens the gluten network (giving ramen that characteristic chew), it accelerates Maillard browning (giving the noodles a yellow color even without egg), and—here’s the key—it creates a hydrophilic (water-attracting) surface on the cooked noodle.
When you drop alkaline noodles into an acidic or neutral broth, there’s an immediate pH gradient at the interface. This creates what’s called a “Donnan potential”—an electrical charge difference that pulls water molecules toward the noodle surface. Unfortunately, it also repels fat molecules, which are nonpolar and prefer to cluster together rather than interact with charged surfaces.
In simple terms: Alkaline noodles actively push fat away, which is why your birria oil floats up instead of coating the noodles like it should.
The fix is twofold. First, we need to reduce the pH difference between the broth and the noodles. Traditional birria is slightly acidic from tomatoes and vinegar (around pH 5.5–6). By carefully controlling the amount of acid we add, we can keep the consommé closer to neutral (pH 6.5–7), which reduces the electrical repulsion at the noodle surface.
Second, we need to increase the concentration of amphipathic molecules (those with both water-loving and fat-loving regions) in the broth itself. These molecules—primarily short-chain gelatin peptides and lecithin from chilies—position themselves at the noodle-broth interface and act as molecular bridges, allowing fat to cling where it normally wouldn’t.
I’ve tested this with pH strips from my local brewing supply shop (also available at Target in the canning section). Before adding vinegar, my birria base sits around pH 6.8. I add exactly 1 tablespoon (15ml) of apple cider vinegar per 4 cups (950ml) of liquid, which drops it to about pH 6.2—acidic enough for flavor complexity, but not so low that it creates a strong repulsive surface charge.
For noodles, I recommend Sun Noodle fresh alkaline ramen noodles (find them at Whole Foods, H-Mart, or 99 Ranch Market). They’re the professional standard, with consistent kansui levels and excellent texture. Cook them for exactly 2 minutes in separate boiling water—never in the consommé itself, which would dilute your carefully balanced emulsion and leach excess alkalinity into the broth.
Secret #3: The Chili-Paste Surfactant Hack — Nature’s Lecithin
Here’s something that shocked me when I started researching the Ultimate Birria Ramen Secrets: dried Mexican chilies are natural emulsifiers. Not because of capsaicin (which is just the heat compound), but because of the phospholipids and pectins in the pepper flesh itself.
When you rehydrate Guajillo and Ancho chilies and blend them into a smooth paste, you’re releasing lecithin—the same phospholipid found in egg yolks and soy, famous for its ability to stabilize mayonnaise and vinaigrettes. Chili lecithin is less concentrated than egg lecithin, but in combination with the pectins (long-chain carbohydrates that form gels), it creates a remarkably stable emulsion base.
The process matters here. I’ve tried just tossing whole dried chilies into the braise, and while it adds flavor, it doesn’t create the emulsifying effect. You need to toast the chilies first (to denature proteins and make the cell walls more permeable), then simmer them in hot liquid (to hydrate the pectins and lecithin), and finally blend them at high speed (to physically rupture the cells and release the compounds).
I use 4 Guajillo chilies and 2 Ancho chilies per batch. Guajillos bring fruity, tannic notes with moderate heat; Anchos add deep, almost chocolatey sweetness with very little burn. Together, they create a balanced, complex flavor base. More importantly, their combined lecithin and pectin content is enough to measurably improve emulsion stability.
Here’s my exact method: After searing the beef, I add the dried chilies (stems and seeds removed) to the same Dutch oven with the rendered beef fat still coating the bottom. I toast them for exactly 90 seconds per side over medium heat until they become fragrant and slightly pliable. Then I add 2 cups (475ml) of hot beef bone broth directly to the pot and let everything simmer for 10 minutes.
This creates what I call the “emulsion base.” The chilies soften completely, the lecithin begins to disperse into the hot liquid, and the pectins start forming weak gel networks. After 10 minutes, I transfer the entire mixture—chilies, liquid, toasted onions, and garlic—into a high-speed blender.
Critical gear note: You need a high-powered blender for this step. I use a Vitamix 5200 (around $449 at Williams Sonoma or Costco), but a NutriBullet Pro or any blender rated at 1000+ watts will work. The goal is to blend for a full 2 minutes on high speed, which generates enough shear force to rupture every cell wall and create a completely smooth, emulsified chili paste.
The color transformation is remarkable—you go from broken bits of chili skin floating in red liquid to a uniform, glossy, almost paint-like paste. This paste, when strained through a fine-mesh sieve to remove any remaining fiber clumps, becomes the backbone of your emulsion. Those fiber clumps, by the way, are crucial to remove. Large particles disrupt the delicate lipid-protein bonds we’re trying to create and give the consommé a grainy, separated texture.
Once strained, the chili paste goes back into the Dutch oven. This is now your emulsion base, loaded with lecithin, pectin, dissolved capsaicin, and aromatic compounds. When you add the seared beef and the remaining bone broth back to this base, you’re essentially creating a pre-emulsified environment before the fat even fully renders. It’s a head start that pays massive dividends in the final bowl.
If you’re in the USA and want to source high-quality dried chilies, I recommend checking Whole Foods (their bulk section usually has Guajillos and Anchos for about $8.99/lb), Trader Joe’s occasionally stocks them seasonally, or order from Rancho Gordo online for heirloom varieties with superior flavor complexity. Avoid the plastic-bag chilies from generic grocery stores—they’re often stale, and stale chilies have oxidized lipids that actually work against emulsification.
Secret #4: Thermal Kinetics and Mechanical Shear — Locking the Emulsion
Even with gelatin, lecithin, and pectin working in your favor, the emulsion won’t hold unless you understand thermal kinetics. Here’s what I mean: emulsions are thermodynamically unstable. Left alone, they will always separate over time as fat droplets collide, merge, and rise to the surface. The only way to create a semi-permanent emulsion is to physically break the fat into droplets so small that their rise velocity (remember Stokes’ Law?) becomes negligible, and then to lock those droplets in place with a gel network before they can recombine.
This is where temperature and mechanical force intersect. After braising the beef for 3.5 hours, my consommé is around 190°F (88°C)—hot enough that the gelatin is fully dissolved and fluid, but not so hot that it’s violently boiling and losing moisture. This is the perfect temperature for emulsification.
At this point, I remove the beef chunks (which get shredded separately) and use an immersion blender directly in the Dutch oven. I blend for exactly 60 seconds at high speed, moving the blender head in slow circles to ensure every part of the liquid gets processed. What I’m doing is introducing massive shear forces—the rapidly spinning blades tear the floating fat layer into millions of microscopic droplets and disperse them throughout the liquid.
But here’s the trick: I don’t let the liquid cool during this process. As soon as I finish blending, I turn the heat back on to medium-low and maintain the temperature at 180–185°F (82–85°C) for another 10 minutes, stirring occasionally. This keeps the gelatin fluid while allowing the lecithin and pectin molecules to rearrange themselves around the newly formed fat droplets.
Then—and this is critical—I let it cool slowly, off heat, with the lid on. As the temperature drops below 160°F (71°C), the gelatin begins to set into a weak gel network. This network physically traps the fat droplets in place, preventing them from rising and coalescing. By the time the consommé reaches serving temperature (around 150°F / 65°C), the emulsion is locked.
If you’re reheating the consommé later, never let it boil. Boiling introduces too much turbulence and can break the emulsion. Reheat gently to 160°F (71°C) and give it a quick stir with a whisk—the emulsion will re-form beautifully as long as you haven’t exceeded the gelatin’s thermal breakdown point.
Pro equipment note: I strongly recommend an immersion blender for this technique. A countertop blender requires you to transfer hot liquid in batches (dangerous and messy), and it introduces air bubbles that can destabilize the emulsion. I use a Cuisinart Smart Stick (about $39.99 at Target or Amazon), which has enough power for the job and a detachable blending shaft that’s easy to clean.
The science here connects directly to what high-end ramen shops do with tonkotsu broth. At places like Ichiran in Japan (and their USA locations), they use high-pressure blenders and constant agitation to create that signature creamy white broth. We’re applying the same principle to birria—using mechanical shear to force an emulsion that wouldn’t naturally occur.
Secret #5: Acid and pH Tuning — The Electrical Charge Balance
The final piece of the Ultimate Birria Ramen Secrets puzzle is acid. Not just for flavor, but for emulsion chemistry. Proteins in your broth (from the beef and dissolved gelatin) carry electrical charges that depend on pH. At their isoelectric point (the pH where they carry no net charge), proteins clump together and fall out of solution—this is how cheese curdling works, and it’s the last thing we want in our consommé.
Most meat proteins have isoelectric points between pH 4.5–5.5. Traditional birria, with its tomatoes and vinegar, can drop as low as pH 5.0, which pushes some proteins dangerously close to precipitation. But if we keep the pH above 6.0, the proteins remain negatively charged, which means they repel each other and stay dissolved.
This electrical repulsion is actually helpful for emulsification. Negatively charged protein molecules position themselves around fat droplets, creating an electrical barrier that prevents droplets from merging. It’s called “electrostatic stabilization,” and it’s one of the reasons why slightly alkaline broths (like miso ramen around pH 7.5) are naturally more stable than acidic ones.
But we still need some acid for flavor balance. Birria without acidity tastes flat and heavy. The trick is to add just enough acid to brighten the flavor without destabilizing the proteins.
I’ve tested this exhaustively with pH meters and taste panels (my very patient family). Here’s what works: 1 tablespoon (15ml) of apple cider vinegar per 4 cups (950ml) of consommé, added after the braise is complete. This gives you the tangy brightness you need while keeping the pH safely above 6.0.
I also add a squeeze of fresh lime juice (about 1 teaspoon / 5ml per bowl) right before serving. This creates a bright top note without affecting the overall emulsion, since it’s added after the emulsion has already stabilized. The lime juice sits in a separate flavor layer—your palate registers it as freshness rather than acidity in the broth itself.
Sourcing note: For vinegar, I use Bragg’s Organic Apple Cider Vinegar (available at Walmart, Kroger, and most grocery stores for about $4.99/32oz). It has a clean, fruity acidity without the harsh sharpness of distilled white vinegar. For limes, I look for Key limes when available at Whole Foods—they’re more aromatic and less sour than Persian limes, though either works.
The pH tuning also affects how the broth interacts with the alkaline noodles. By keeping the consommé closer to neutral, we minimize the electrical repulsion at the noodle surface, allowing the emulsified fat to cling rather than separate. It’s a small adjustment with a massive impact on the final eating experience.
One more technical point: if you’re adding soy sauce or miso paste for umami depth (both common in fusion ramen recipes), be aware that they alter pH. Soy sauce is around pH 4.8, miso is around pH 5.2. If you use them, reduce the vinegar accordingly. I’ve settled on 2 tablespoons (30ml) of low-sodium soy sauce (Kikkoman from any grocery store) plus just 2 teaspoons (10ml) of vinegar for the perfect balance.
The Pro Buying Guide: USA-Specific Ingredient & Equipment Sourcing
Let’s talk about where to actually get everything you need for the Ultimate Birria Ramen Secrets in the USA, because technique means nothing if you’re working with substandard ingredients.
Beef Chuck Roast: Costco’s USDA Choice chuck roasts are my go-to ($5.99/lb, usually sold in 3–4 lb pieces). Look for visible marbling and thick connective tissue seams. If you’re near a Whole Foods, their grass-fed chuck roasts have excellent flavor but run about $9.99/lb—worth it if you can swing the budget.
Bone Broth: Kettle & Fire Beef Bone Broth (available at Target, Whole Foods, Kroger) is the only shelf-stable option that consistently gels when refrigerated, which tells you the gelatin content is high enough. Pacific Foods Bone Broth is more widely available but has lower gelatin concentration—you’d need to add powdered gelatin (Knox brand, grocery aisle) to compensate.
Dried Chilies: Whole Foods bulk section for Guajillos and Anchos ($8.99/lb), or Rancho Gordo online for heirloom varieties. If you’re in a city with a Mexican grocery like Cardenas or Northgate Market, their dried chili selection is usually fresher and cheaper ($3–5/lb).
Alkaline Ramen Noodles: Sun Noodle fresh ramen (Whole Foods, Asian markets) is the professional standard. If you can’t find them, Lotus Foods Millet & Brown Rice Ramen (Trader Joe’s, Target) works in a pinch, though the texture is slightly softer. Avoid instant ramen bricks—the pre-frying process coats them in oil that disrupts emulsification.
Equipment:
- Dutch Oven: Lodge 6-quart enameled Dutch oven ($79.99 at Target) distributes heat evenly and holds temperature perfectly for low braising.
- Immersion Blender: Cuisinart Smart Stick CSB-179 ($39.99 at Amazon or Target) has enough power for emulsifying without the $150+ price tag of Breville models.
- High-Speed Blender: Vitamix 5200 ($449 at Costco or Williams Sonoma) if you’re serious about cooking; NutriBullet Pro 900 ($79.99 at Walmart) if you’re on a budget.
- Fine Mesh Strainer: OXO Good Grips 8-inch strainer ($24.99 at Target) catches every fiber particle from the chili paste.
- pH Strips: Brewers Best pH Test Strips ($7.99 at homebrew shops or Amazon) let you verify your acid balance.
Toppings & Finishers:
- Fresh cilantro: any grocery store, $0.99/bunch
- White onion: dice it fresh, don’t use pre-chopped (oxidation kills the sharp bite)
- Lime: Key limes from Whole Foods or standard Persian limes from anywhere
- Soft-boiled eggs: I make ajitama (marinated ramen eggs) using the method from Chef Albert’s Scientific Dalgona Coffee Secrets article, which covers precise temperature control for custard-like yolks
- For the deep dive on how Maillard reactions work when searing beef and toasting chilies, I’ve written extensively about it in Maillard Reaction in Mexican Cooking.
The Complete Recipe: Ultimate Birria Ramen
Ingredients (US Customary)
For the Birria Consommé:
- 3 lbs beef chuck roast, cut into 2-inch cubes
- 4 dried Guajillo chilies, stemmed and deseeded
- 2 dried Ancho chilies, stemmed and deseeded
- 1 large white onion, halved
- 6 cloves garlic, peeled
- 4 cups high-gelatin beef bone broth
- 1 tbsp apple cider vinegar
- 1 tsp ground cumin
- 1 tsp dried Mexican oregano
- 2 bay leaves
- 1 tsp kosher salt (plus more for searing)
- 1/2 tsp black pepper
- 2 tbsp neutral oil (grapeseed or avocado)
For Assembly:
- 4 packs fresh alkaline ramen noodles (about 5 oz / 140g per pack)
- 1/2 cup fresh cilantro, chopped
- 1/2 cup white onion, finely diced
- 4 soft-boiled eggs (ajitama style, optional)
- 4 lime wedges
- 2 tbsp low-sodium soy sauce (optional, for deeper umami)
Ingredients (Metric)
For the Birria Consommé:
- 1.36 kg beef chuck roast, cut into 5 cm cubes
- 4 dried Guajillo chilies
- 2 dried Ancho chilies
- 1 large white onion, halved
- 6 cloves garlic, peeled
- 950 ml high-gelatin beef bone broth
- 15 ml apple cider vinegar
- 5 g ground cumin
- 3 g dried Mexican oregano
- 2 bay leaves
- 5 g kosher salt (plus more for searing)
- 2 g black pepper
- 30 ml neutral oil
For Assembly:
- 4 packs fresh alkaline ramen noodles (about 140g each)
- 120 ml fresh cilantro, chopped
- 120 ml white onion, finely diced
- 4 soft-boiled eggs
- 4 lime wedges
- 30 ml low-sodium soy sauce
Step-by-Step Method
Step 1: The Sear — Building the Maillard Foundation
Salt the beef chuck cubes aggressively on all sides—don’t be shy here, you need about 1 tablespoon (15g) of kosher salt total for 3 lbs (1.36 kg) of meat. The salt draws moisture to the surface, which then evaporates quickly when the meat hits the hot pan, allowing the Maillard reaction to proceed without steaming.
Heat your Dutch oven over medium-high heat until a drop of water sizzles and evaporates in under 2 seconds. Add 2 tablespoons (30ml) of neutral oil—I use grapeseed because it has a high smoke point (420°F / 216°C) and doesn’t add competing flavors.
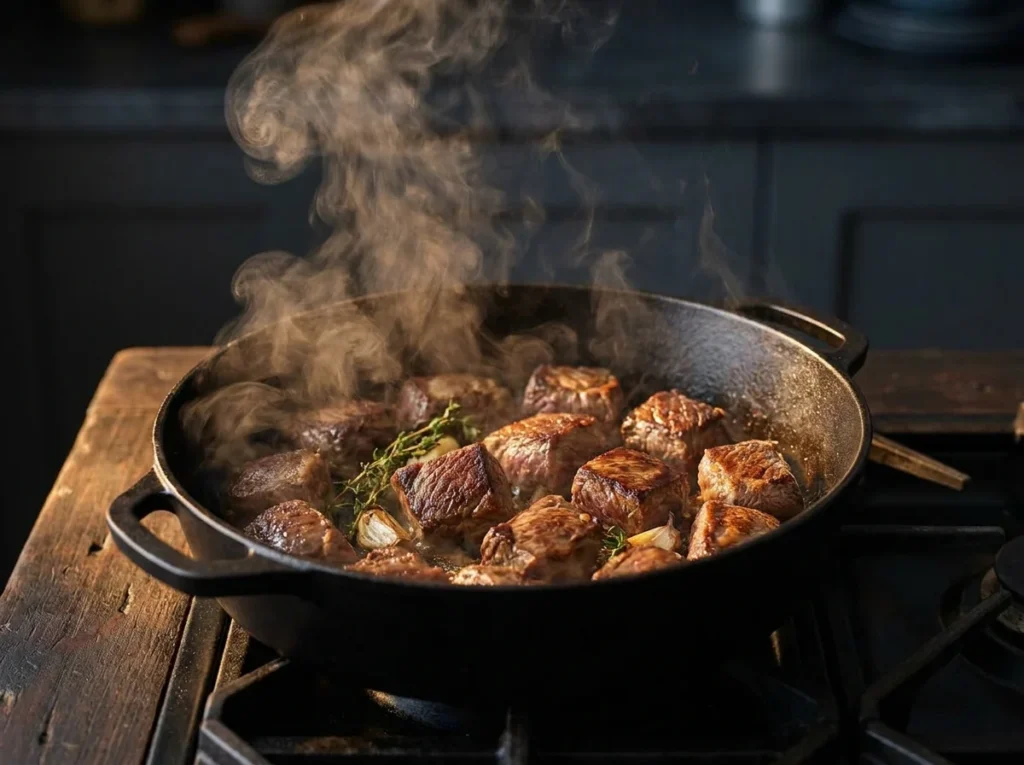
Working in two batches to avoid crowding, sear the beef cubes for about 3 minutes per side. You want a deep mahogany crust with some darker spots—that’s the Maillard reaction creating hundreds of new flavor compounds through amino acid and sugar interactions. For the complete chemistry breakdown of this process, see my guide on Maillard Reaction in Mexican Cooking.
Don’t move the meat around. Let it sit undisturbed so the crust develops properly. Once all sides are seared, remove the beef to a plate. You should have a layer of browned fond (caramelized proteins and sugars) stuck to the bottom of the pot—this is flavor gold that we’ll dissolve later.
Step 2: Chili Extraction — Building the Emulsion Base
In the same Dutch oven, still over medium heat, add your dried Guajillo and Ancho chilies. The residual beef fat in the pot is perfect for toasting them. Press them flat against the bottom of the pot with a spatula and toast for exactly 90 seconds per side.
You’ll know they’re ready when they become fragrant (a sweet, slightly smoky aroma) and noticeably more pliable. Don’t let them blacken or smoke—burnt chilies turn bitter and lose their lecithin content, which defeats the whole emulsification purpose.
Add the halved onion (cut side down) and whole garlic cloves to the pot alongside the chilies. Toast everything together for another 2 minutes, then pour in 2 cups (475ml) of the beef bone broth. Scrape the bottom of the pot vigorously with a wooden spoon to dissolve all that fond—this is called deglazing, and it incorporates all those Maillard compounds back into your liquid.
Let this mixture simmer for exactly 10 minutes. The chilies will soften completely, the garlic will turn sweet and creamy, and the onions will release their sulfur compounds (which, despite the unappetizing name, are responsible for savory depth). What you’re doing here is creating a hydrated, flavor-loaded base with maximum lecithin and pectin extraction from the chili flesh.
Step 3: The Blending — Creating Phytochemical Surfactants
After 10 minutes, use tongs to transfer the chilies, onion, garlic, and about 1.5 cups (355ml) of the simmering liquid into your high-speed blender. Be careful—hot liquid expands when blended, so don’t fill the blender more than halfway, and crack the lid slightly to let steam escape.
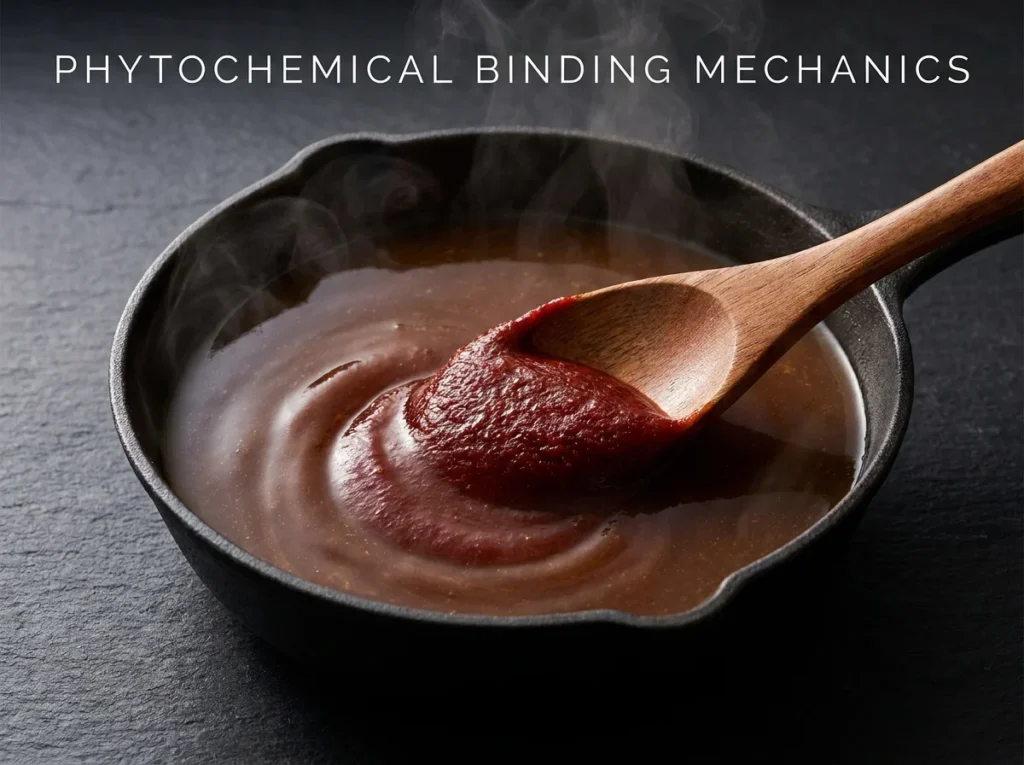
Blend on high speed for exactly 2 minutes. You want this completely smooth—no visible chili skin particles, no chunks of garlic. The high shear forces from the blender are rupturing cell walls and releasing the lecithin and pectins we need for emulsification. The mixture should transform from a chunky red slurry into a glossy, uniform paste that looks almost like paint.
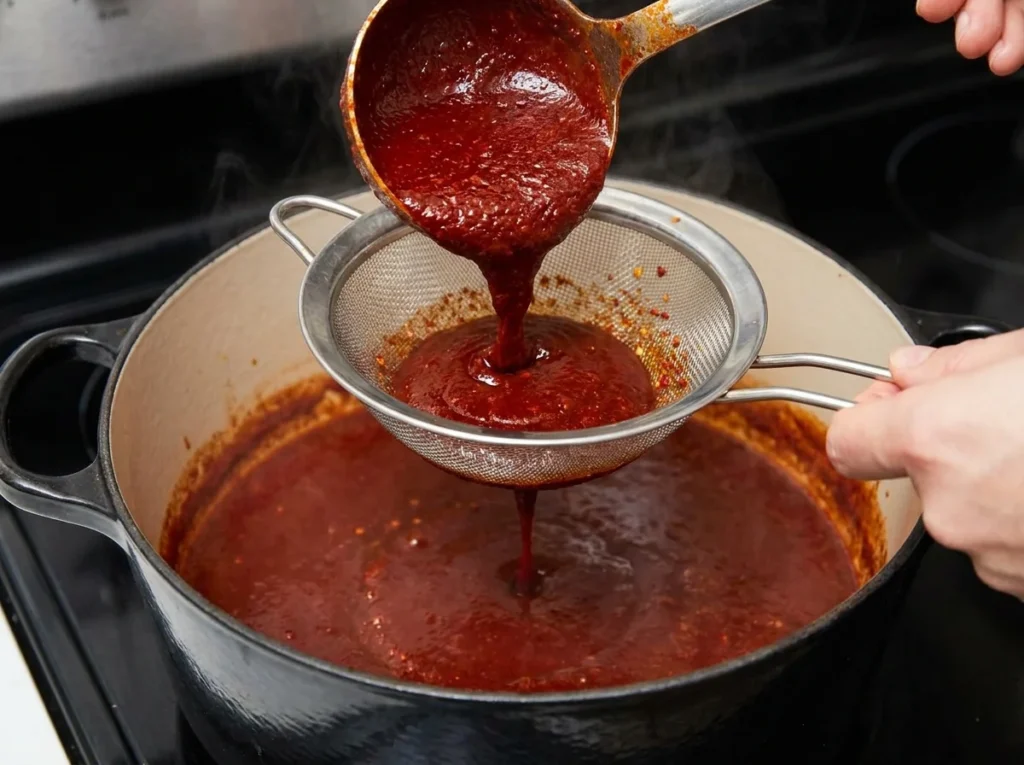
Pour this paste through a fine-mesh strainer set over the Dutch oven. Use the back of a ladle or a rubber spatula to press the paste through, leaving behind only the fibrous bits. This straining step is non-negotiable—those fiber particles will disrupt the delicate lipid-protein emulsion bonds we’re about to create.
Step 4: The Braise — Collagen Transformation
Add the remaining 2 cups (475ml) of beef bone broth to the strained chili base in the Dutch oven. Stir in the cumin, Mexican oregano, bay leaves, 1 teaspoon (5g) kosher salt, and black pepper. Return the seared beef chunks to the pot, along with any accumulated juices from the plate.
The liquid should come about halfway up the sides of the meat. If it doesn’t, add a bit more broth or water—you need enough liquid for gelatin extraction, but not so much that you dilute the flavor.
Cover the Dutch oven with its lid and transfer it to an oven preheated to exactly 275°F (135°C). Set a timer for 3 hours and 30 minutes. This low, slow temperature is crucial for controlled collagen hydrolysis. Research published in ScienceDirect shows that collagen conversion to gelatin is maximized in the 180–200°F (82–93°C) range with extended time, which is exactly where braising at 275°F oven temp keeps your liquid.
Don’t open the lid during braising—you’ll lose heat and moisture. Trust the process.
Step 5: The Emulsion Lock — Mechanical Shear and Temperature Control
When the timer goes off, remove the Dutch oven from the oven (use mitts—the handles will be scorching). The beef should be fork-tender, practically falling apart when you poke it. Use a slotted spoon to remove all the beef chunks to a bowl—we’ll shred these separately.
Now you’re left with the consommé, which at this point probably has a visible orange oil layer floating on top. The liquid temperature should be around 190°F (88°C). This is perfect.
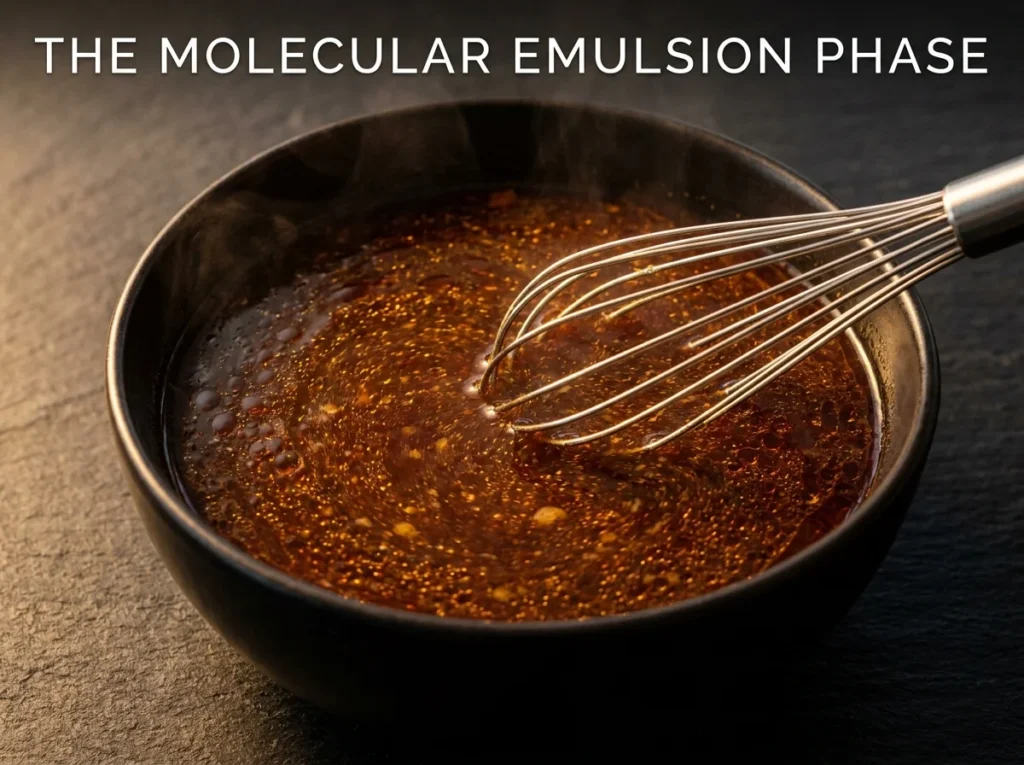
Insert your immersion blender into the liquid and blend for exactly 60 seconds, moving the blender head in slow circles to process every part of the pot. Watch as the oil layer disappears and the entire liquid becomes uniformly glossy and slightly thickened—you’re witnessing emulsification in real time.
Immediately after blending, return the pot to the stovetop over medium-low heat and maintain the temperature between 180–185°F (82–85°C) for 10 minutes, stirring occasionally with a whisk. You’re allowing the lecithin and gelatin molecules to fully organize themselves around the newly created fat droplets.
After 10 minutes, remove from heat and stir in the apple cider vinegar and optional soy sauce. Cover and let the pot sit off heat for 15 minutes. As it cools slowly, the gelatin will begin to set into a weak gel network that physically traps the fat droplets in place.
Step 6: The Assembly — Bringing It All Together
While the consommé is resting, shred the beef chuck into bite-sized pieces using two forks. Discard any large chunks of unrendered fat, but keep the stringy connective tissue—it’s tender now and adds textural interest.
Bring a large pot of water to a rolling boil. Cook your fresh alkaline ramen noodles for exactly 2 minutes—set a timer, because 30 seconds too long and they’ll turn mushy. Fresh ramen cooks much faster than dried pasta.
Drain the noodles immediately and divide them among four large ramen bowls. Don’t rinse them—you want that surface starch to help the broth cling.
Ladle the hot consommé directly over the noodles, about 1.5 cups (355ml) per bowl. The emulsified broth should cling to the noodles beautifully, with no oil slick forming on top.
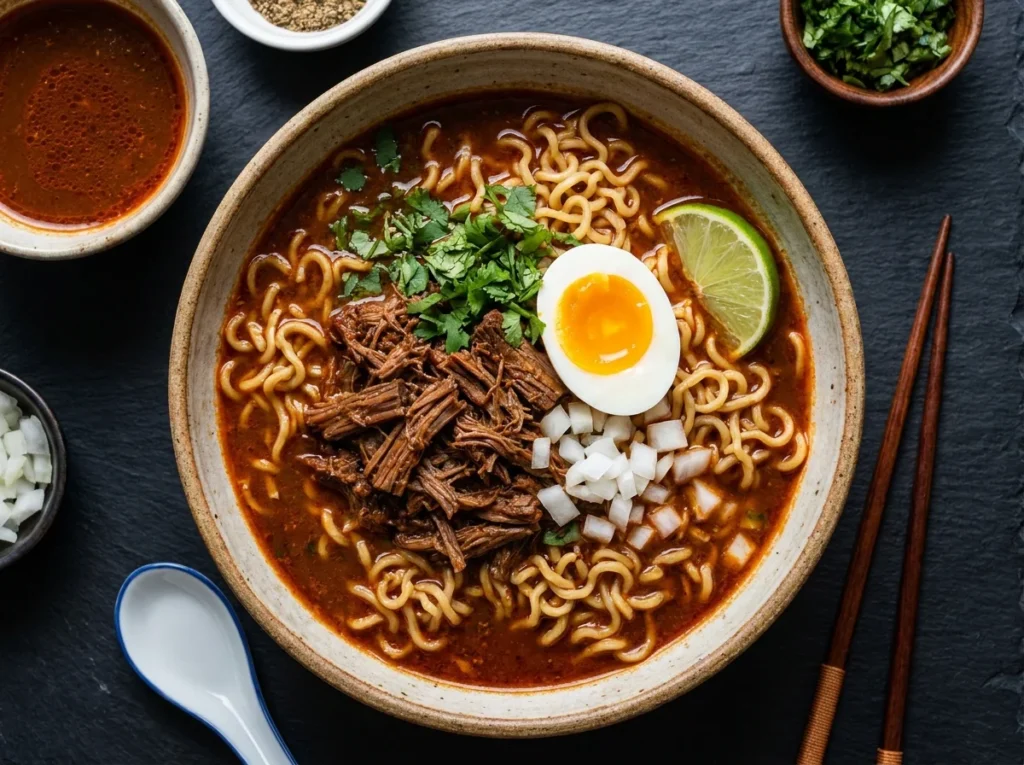
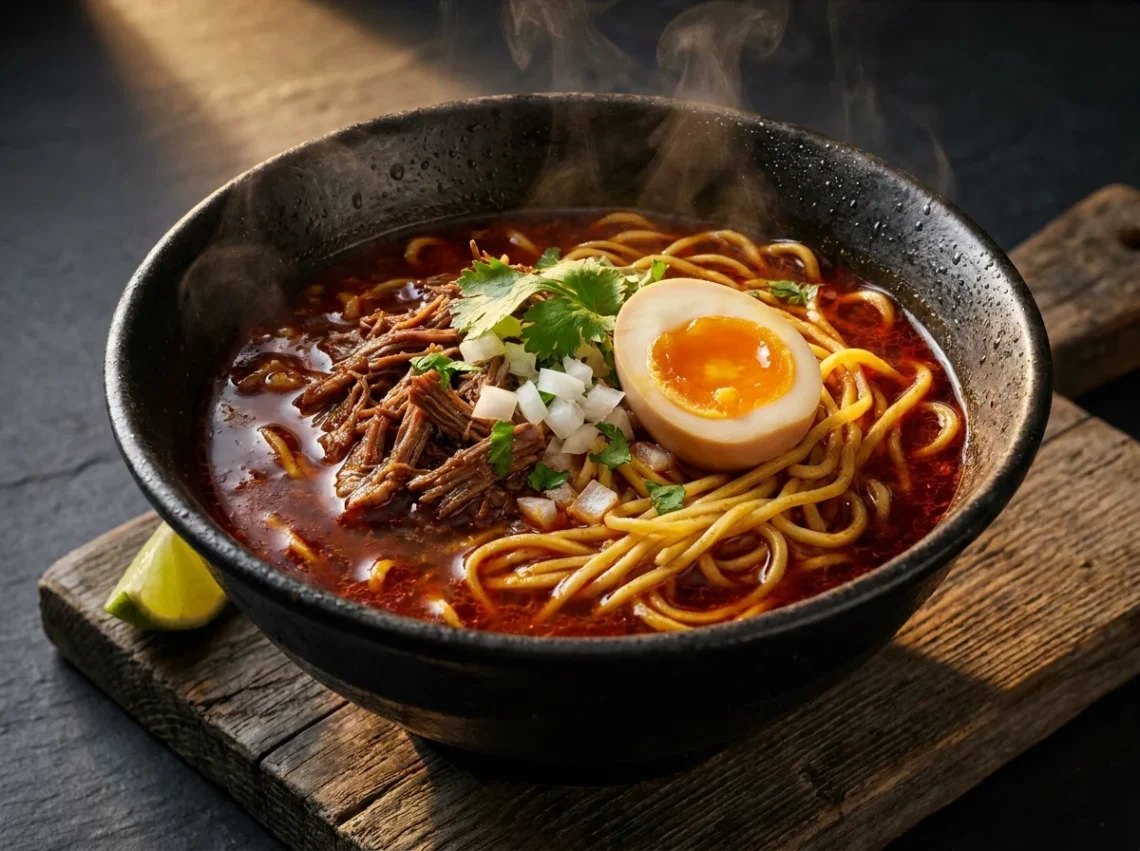
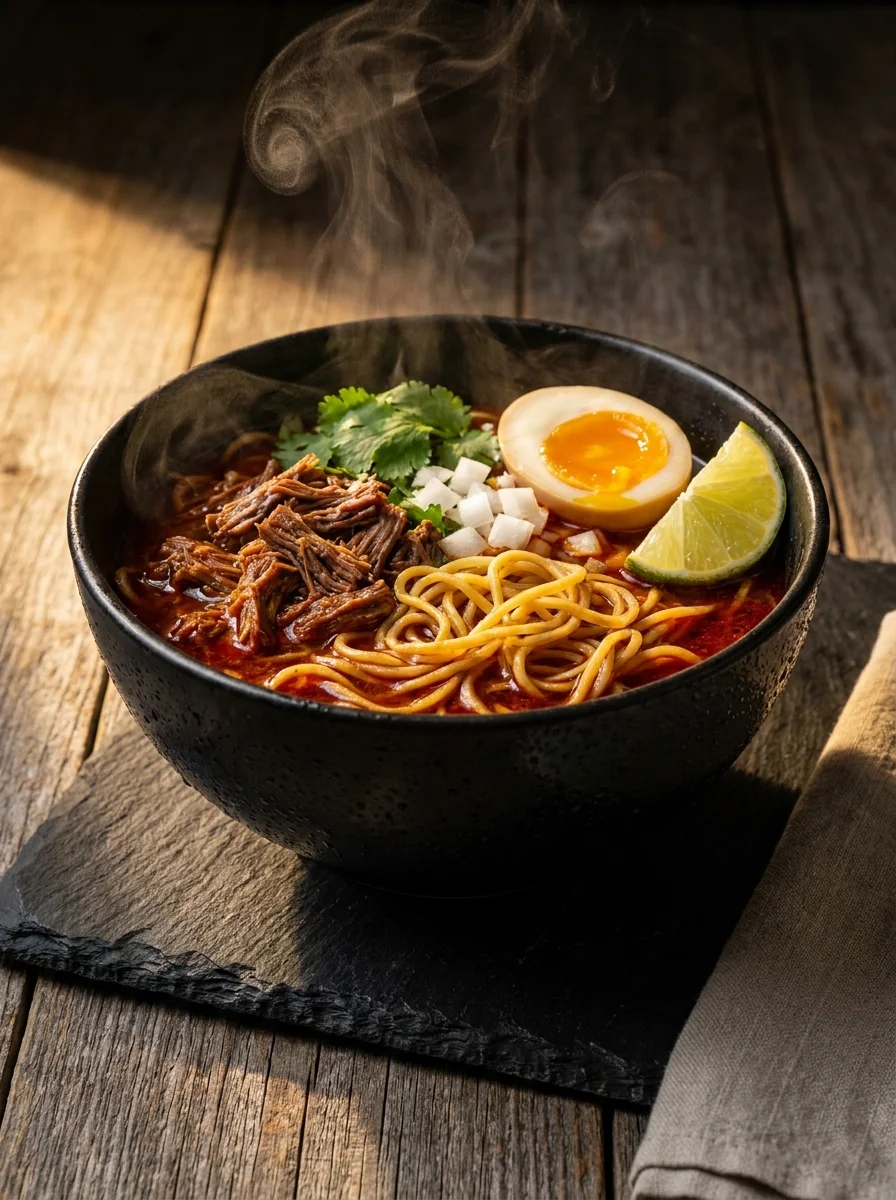
Top each bowl with a generous portion of shredded beef, a sprinkle of fresh cilantro, diced white onion, and a soft-boiled egg if using. Serve with a lime wedge on the side.
When you squeeze that lime over the bowl, you’ll get a bright citrus pop that cuts through the rich, fatty broth—but because you added it at the end, it doesn’t destabilize the emulsion you worked so hard to create.
Chef Albert’s Insight
I’ve always believed that the best fusion cooking isn’t about mashing cultures together for novelty—it’s about finding the hidden scientific common ground between traditions and building something structurally sound on that foundation. When I first made birria ramen, I was chasing a flavor idea. But what I discovered was a lesson in physics: that fat and water, Mexico and Japan, beef and noodles—seemingly incompatible elements—can become inseparable when you understand the forces that bind them. The real fusion isn’t on the plate. It’s in the chemistry. And once you see it, you can’t unsee it. Every sauce, every soup, every seemingly simple bowl becomes a conversation between molecules. That’s the Ultimate Birria Ramen Secret: respect the science, and the fusion takes care of itself.
— Chef Albert, TastePillar.com
Common Mistakes Table
| The Mistake | What Actually Happens | The Fix |
|---|---|---|
| Skipping the chili toast step | Lecithin and pectins remain locked in dry cell walls; emulsion never stabilizes | Toast dried chilies in hot fat for 90 seconds per side before simmering |
| Blending the consommé when cold | Gelatin has already set; blending breaks gel structure without emulsifying fat | Always blend immediately after braising while liquid is 180°F+ (82°C+) |
| Using low-gelatin broth | Insufficient viscosity and surfactant molecules; fat rises immediately | Use bone broth that gels firmly when refrigerated (Kettle & Fire or homemade) |
| Adding too much acid | Drops pH below 5.5, causing proteins to precipitate and emulsion to break | Limit acid to 1 tbsp (15ml) vinegar per 4 cups (950ml) broth; add lime at service |
| Cooking noodles in the consommé | Leaches excess alkalinity into broth, disrupts pH balance, dilutes emulsion | Always cook noodles separately in plain boiling water |
| Not straining the chili paste | Large fiber particles disrupt lipid-protein bonds; creates grainy, separated texture | Always strain blended chili paste through fine-mesh sieve |
Nutrition Information (Per Serving)
| Nutrient | Amount |
|---|---|
| Calories | 680 kcal |
| Protein | 52 g |
| Total Fat | 28 g |
| Saturated Fat | 10 g |
| Carbohydrates | 42 g |
| Dietary Fiber | 4 g |
| Sugars | 6 g |
| Sodium | 980 mg |
| Cholesterol | 145 mg |
Note: Nutrition values are estimates based on standard ingredient databases. Actual values may vary depending on specific brands and portion sizes used.
Food Safety Temperature Guide
| Stage | Target Temperature | USDA Guideline |
|---|---|---|
| Beef chuck searing | 400–450°F (204–232°C) surface | N/A (surface browning) |
| Braising liquid | 180–200°F (82–93°C) internal | Danger zone exits at 140°F (60°C) |
| Finished beef internal | 200°F+ (93°C+) after 3.5 hours | USDA minimum for beef is 145°F (63°C), but braises exceed this |
| Emulsification temp | 180–190°F (82–88°C) | Keep above 140°F (60°C) to prevent bacterial growth |
| Serving temperature | 150–160°F (65–71°C) | Serve hot to maintain emulsion and food safety |
| Refrigerator storage | Below 40°F (4°C) | USDA requirement for cold storage |
| Reheating temp | 165°F (74°C) minimum | USDA reheating standard for leftovers |
Danger Zone: 40–140°F (4–60°C) — bacteria multiply rapidly in this range. Always cool leftovers within 2 hours and reheat thoroughly.
Storage & Reheating Table
| State | Fridge (40°F / 4°C) | Freezer (0°F / -18°C) | Best Reheat Method |
|---|---|---|---|
| Consommé (broth only) | 5 days in airtight container | 3 months; will gel when thawed | Gentle stovetop heat to 160°F (71°C), whisk to re-emulsify |
| Shredded beef | 4 days in separate container | 3 months in freezer bag | Add to hot consommé and warm together |
| Cooked noodles | Not recommended (texture degrades) | Not recommended | Always cook fresh noodles for serving |
| Assembled bowl | 2 days (noodles will soften) | Not recommended | Deconstruct: store components separately |
Pro tip: The consommé actually improves after a day in the fridge—the gelatin sets fully, and when you reheat it, the emulsion re-forms even more stably. Don’t let it boil during reheating, just bring it to a gentle simmer and whisk.
FAQ Section
Can I make this in a slow cooker instead of the oven?
Yes, but with caveats. Set your slow cooker to LOW (which typically maintains around 190°F / 88°C) and braise for 6–7 hours instead of 3.5. The lower, slower heat will still break down collagen, but you’ll get slightly less Maillard development in the liquid. You’ll still need to sear the beef first in a separate pan and do the chili toasting step on the stovetop—the slow cooker can’t replicate that high-heat browning.
What if I can’t find fresh alkaline ramen noodles?
Dried ramen noodles are your next best option—look for brands like Hakubaku or Lotus Foods that explicitly mention kansui or alkaline ingredients on the package. Cook them according to package directions (usually 4–5 minutes for dried). In a pinch, you can even use spaghetti boiled in water with 1 tablespoon of baking soda per quart—the baking soda raises the pH and mimics the alkaline noodle texture, though it won’t be quite the same.
My consommé still separated even after blending. What went wrong?
Three most likely causes: (1) Your bone broth didn’t have enough gelatin—test by refrigerating a small amount; it should gel firmly. If it doesn’t, add 1 tablespoon of unflavored Knox gelatin per 4 cups of broth before braising. (2) You let the liquid cool too much before blending—emulsification works best above 180°F (82°C). (3) You added too much acid, which dropped the pH below the protein stability threshold. Cut the vinegar in half next time and see if that helps.
Can I use a different cut of beef?
Beef chuck is ideal because of its high connective tissue and fat content, but beef short ribs work beautifully too (they actually have even more collagen). Brisket is another option, though it’s leaner and you might need to add extra fat to the braise. Avoid lean cuts like sirloin or round—they don’t have enough collagen to create the gelatin you need for emulsification.
Is there a vegetarian version of this technique?
The emulsification principles absolutely apply to vegetarian cooking, but you’ll need to substitute different ingredients. Use a high-quality vegetable stock enriched with kombu (for glutamates) and add 2 tablespoons of agar-agar powder (a plant-based gelling agent from seaweed) to replace the gelatin. For the fat component, use sesame oil or chili oil. The lecithin from the chilies will still work as a surfactant. I’m actually developing a full vegetarian fusion ramen guide—stay tuned to TastePillar for that.
Related Articles You’ll Love
🧪The Ultimate White Queso Dip: Just Like Your Favorite Mexican Restaurant!
🍳Air Fryer Frozen Salmon: How to Cook Perfectly Flaky Fillets in 12 Minutes
☕ 10 Reasons Your Macarons Crack: The Ultimate Macaron Troubleshooting Guide for Flawless Shells!
🍜5 Scientific Flawless Virgin Mojito Secrets: The Ultimate Mint Infusion Guide
Ultimate Birria Ramen recipe with perfectly emulsified consommé
Ingredients
Equipment
Method
- Step 1 – The Sear (Building the Maillard Foundation):
- Salt the beef chuck cubes aggressively with 1 tablespoon (15g) kosher salt on all sides. Heat Dutch oven over medium-high heat until a drop of water sizzles and evaporates in under 2 seconds. Add 2 tablespoons (30ml) neutral oil. Working in two batches to avoid crowding, sear beef cubes for 3 minutes per side until a deep mahogany crust forms. Remove to a plate and set aside.
- Step 2 – Chili Extraction (Building the Emulsion Base):
- In the same Dutch oven over medium heat, add dried Guajillo and Ancho chilies. Toast for 90 seconds per side until fragrant and pliable. Add halved onion (cut side down) and whole garlic cloves. Toast together for 2 minutes. Pour in 2 cups (475ml) beef bone broth and scrape bottom of pot to deglaze. Simmer for exactly 10 minutes until chilies are completely soft.
- Step 3 – The Blending (Creating Phytochemical Surfactants):
- Transfer chilies, onion, garlic, and 1.5 cups (355ml) of the simmering liquid to high-speed blender. Blend on high for 2 minutes until completely smooth and glossy. Pour through fine-mesh strainer set over Dutch oven, pressing with back of ladle to extract all liquid. Discard fibrous solids.
- Step 4 – The Braise (Collagen Transformation):
- Add remaining 2 cups (475ml) beef bone broth to strained chili base. Stir in cumin, Mexican oregano, bay leaves, 1 teaspoon (5g) salt, and black pepper. Return seared beef and accumulated juices to pot. Cover with lid and transfer to preheated 275°F (135°C) oven. Braise for exactly 3 hours and 30 minutes until beef is fork-tender.
- Step 5 – The Emulsion Lock (Mechanical Shear and Temperature Control):
- Remove Dutch oven from oven (careful—handles are hot). Use slotted spoon to remove beef chunks to bowl; shred with two forks and set aside. Insert immersion blender into consommé (temperature should be 190°F / 88°C) and blend for 60 seconds, moving in circles. Return pot to stovetop over medium-low heat and maintain 180-185°F (82-85°C) for 10 minutes, stirring occasionally. Remove from heat, stir in apple cider vinegar and optional soy sauce. Cover and let rest off heat for 15 minutes.
- Step 6 – The Assembly (Bringing It All Together):
- Bring large pot of water to rolling boil. Cook fresh alkaline ramen noodles for exactly 2 minutes. Drain immediately (do not rinse). Divide noodles among 6 large ramen bowls. Ladle 1.5 cups (355ml) hot emulsified consommé over each portion of noodles. Top with shredded beef, fresh cilantro, diced white onion, and soft-boiled egg if using. Serve with lime wedge on the side.
Notes
Storage: Store consommé and shredded beef separately in airtight containers in refrigerator for up to 5 days. Consommé will gel when cold—this is perfect. Reheat gently to 160°F (71°C) and whisk to re-emulsify. Always cook noodles fresh when serving.

Gelatin Test: Your bone broth MUST gel when refrigerated. If it doesn't, add 1 tablespoon unflavored Knox gelatin per 4 cups broth before braising.

pH Balance: Don't exceed 1 tablespoon vinegar or your emulsion will break. Add lime juice only at serving, never during cooking.

Chili Substitutions: Can't find Guajillos? Use California/New Mexico dried chilies. Anchos can be replaced with Pasilla chilies. Don't use fresh chilies—you need the concentrated lecithin from dried peppers.

Make-Ahead: The consommé actually improves after 24 hours in the fridge as gelatin fully hydrates. Make it a day ahead, store cold, and reheat when ready to serve.

Scaling: Recipe scales perfectly. For 12 servings, double everything except increase oven time by only 30 minutes (4 hours total).

2 Comments on “Ultimate Birria Ramen: 5 Scientific Secrets to Perfect Consommé Emulsion”