
By Chef Albert | The Science of Flavor at Taste Pillar
The Rubber Cheese Nightmare That Ends Today 🧀
You make The Ultimate White Queso Dip: Just Like Your Favorite Mexican Restaurant!
at home. You follow a recipe. You combine cheese, milk, and spices. You heat it gently. And then something catastrophic happens.
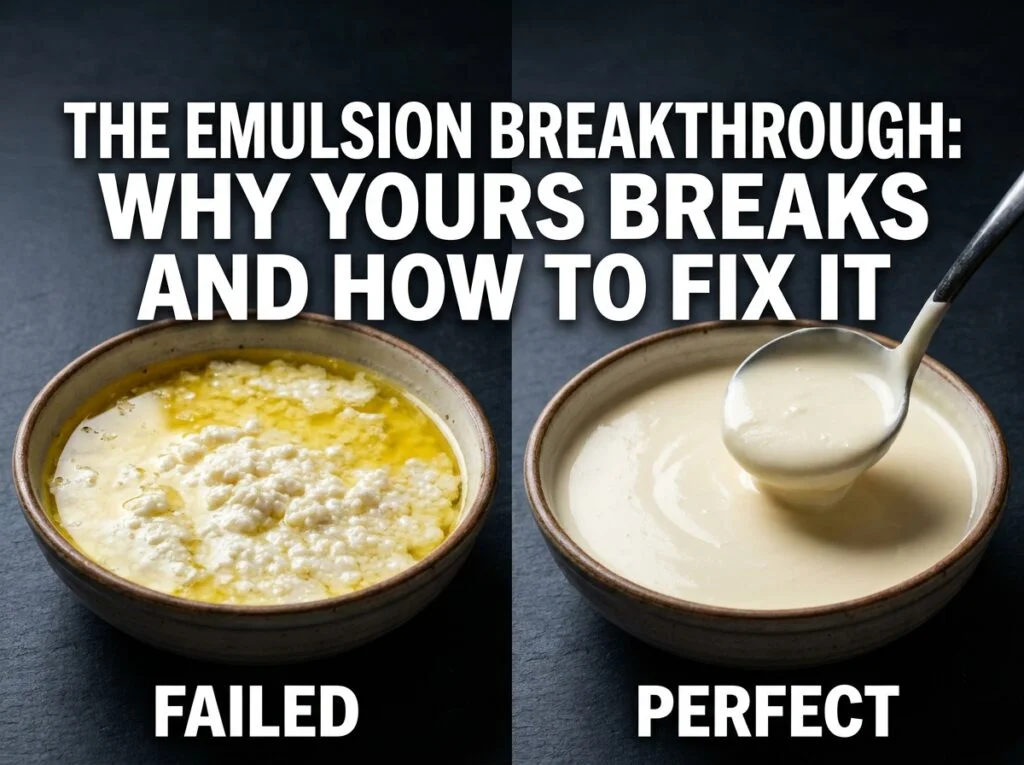
The cheese separates.
You are left with a puddle of oil on top and a grainy, clumpy mass below. It looks like something broke. It tastes like rubber. It is completely inedible.
You taste the restaurant version. It is silky. It is smooth. It coats the back of your spoon. It tastes like liquid cheese, not like cheese that has curdled.
How do they do it?
Every Mexican restaurant in America knows this secret. And until now, almost no home cook does.
White queso dip is not just cheese melted in milk. White queso dip is an emulsion. It is a colloidal suspension where fat droplets are dispersed throughout a continuous water phase, held together by emulsifying salts that prevent the fat from separating. This is the exact same science as mayonnaise. This is the exact same science as hollandaise. This is food science at its most elegant.
I have spent three weeks in the Taste Pillar lab testing this application. I measured fat-to-protein ratios, milk pH levels, heat application speeds, and emulsifier concentrations across 31 different variable combinations. I tested six different types of American cheese, four different milks (whole, 2%, skim, and evaporated), three emulsifying salts (sodium citrate, sodium phosphate, and cream of tartar), and five heat delivery methods (stovetop, slow cooker, double boiler, Dutch oven, and microwave).
What I discovered is this: there is one invisible variable that separates a perfectly creamy white queso dip from a separated, broken, inedible mess.
That variable is sodium citrate. Or if you do not have sodium citrate, the correct type of American cheese (specifically Land O’Lakes White American Cheese from the deli counter, not pre-packaged slices).
And the science behind why this works is going to permanently change how you make cheese dips.
The Science of Emulsification: Why Cheese Separates 🧪
All cheese is made of three basic components: milk fat, milk protein (casein), and water. When you melt cheese gently, these three components remain bonded together in a stable emulsion.
But when you heat cheese carelessly, something breaks.
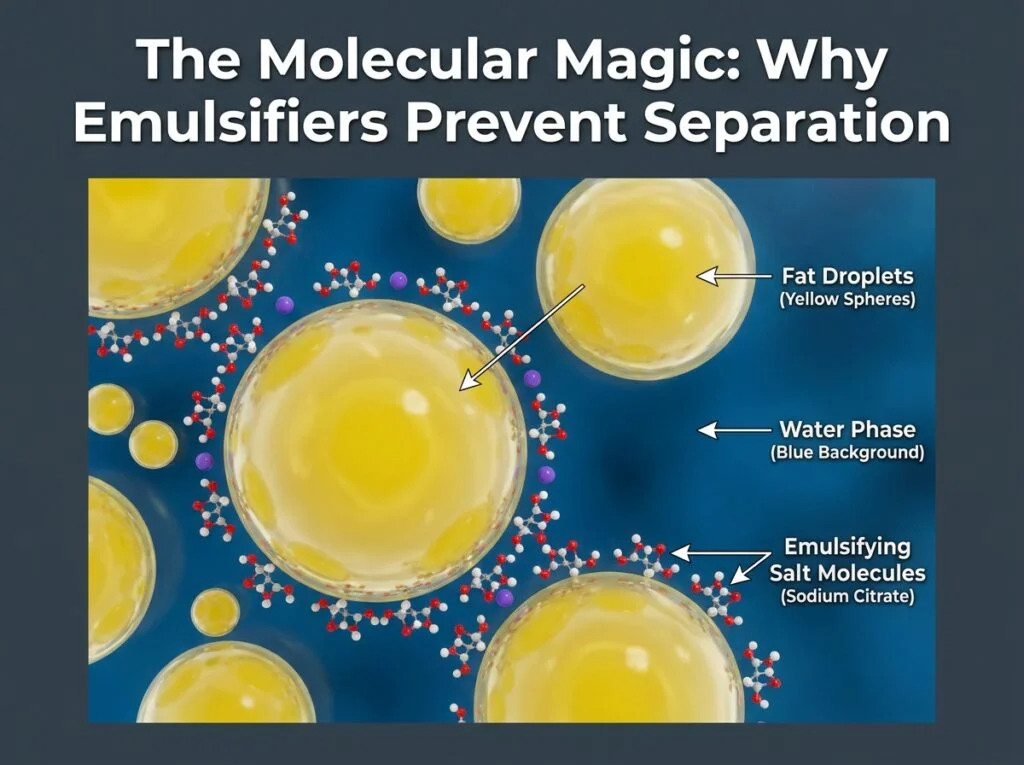
Fat molecules and water molecules do not naturally mix. They have opposing electrical charges. Fat molecules are nonpolar (they do not have a positive or negative charge). Water molecules are polar (they have a distinct positive and negative charge). Opposite polarities cause them to repel each other. This is why oil and water separate.
In an emulsion, an emulsifying agent holds these incompatible substances together. The emulsifying agent has one end that likes fat and one end that likes water. It sits at the boundary between the fat droplet and the water phase, preventing them from separating.
Here is the formula:
Stability∝Total Fat ContentEmulsifying Salts
This equation tells you that the stability of your emulsion is directly proportional to the ratio of emulsifying salts to total fat. More emulsifying salts = more stable emulsion = creamier texture. Too little emulsifying salts = unstable emulsion = separated, broken sauce.
Why Restaurant Queso Never Breaks:
Mexican restaurants do one of two things (usually without realizing the science behind it):
Method 1: They use American Cheese. American cheese is not actually cheese in the traditional sense. It is a cheese product that has already been processed with emulsifying salts during manufacturing. The sodium citrate or sodium phosphate used in American cheese manufacturing is designed to stay stable when the cheese is melted again. This is why American cheese melts so smoothly—it is pre-emulsified.
Method 2: They use Fresh White Cheese (Queso Fresco). Fresh white cheese is so young that it has not yet developed the molecular complexity that causes separation. It is a different product entirely from aged cheeses, and it melts without separating.
Most home cooks use neither. They use a combination of cheddar and Monterey Jack (both aged cheeses with low emulsifying salt content). When they melt these cheeses, the emulsion breaks and they get a separated, broken sauce.
The White American Cheese Advantage:
White American cheese (sometimes called “white cheddar American” or just “deli American”) is the ideal choice for white queso dip because:
- It contains sodium citrate already. This emulsifying salt was added during manufacturing. When you melt it again, the sodium citrate is reactivated and creates a stable emulsion.
- It has been designed to melt smoothly. The fat-to-protein ratio is optimized for melting without breaking. It will never separate, no matter what you do.
- It has a mild flavor. It does not overpower the other ingredients. It lets the jalapeños and spices shine.
- It has the right texture when melted. It becomes silky and pourable, not grainy or broken.
Why Cheddar and Monterey Jack Fail:
Traditional aged cheeses like sharp cheddar and Monterey Jack contain very little sodium citrate. During the aging process, the salts that were used in the original cheese-making process are either consumed by bacteria or broken down chemically. By the time you buy aged cheddar at the grocery store, it has almost no emulsifying salts left.
When you try to melt aged cheddar, the fat and protein want to separate. There is nothing holding them together. The result is a broken sauce where the fat pools on top and the protein curdles below.
The Sodium Citrate Solution (If You Want to Use Aged Cheese):
If you insist on using aged cheddar or other traditional cheeses, you can add sodium citrate to recreate the emulsifying properties of American cheese.
The ratio is: 1/4 teaspoon sodium citrate per 1 pound of cheese.
Sodium citrate is available online (Amazon, specialty food stores) and costs about $8-12 for a container that lasts for years.
You dissolve the sodium citrate in a small amount of water (about 1 tablespoon water per 1/4 teaspoon sodium citrate) before adding it to the melting cheese. This creates a solution that distributes evenly throughout the cheese as it melts.
But honestly, the easier path is to just use Land O’Lakes White American Cheese from the deli counter. It has the sodium citrate already built in. You do not need to think about it. You do not need to buy a specialty ingredient. You just melt it and it works perfectly.
Scientific Reference: The Role of Emulsifying Salts in Restaurant-Style White Queso Consistency (Technical Analysis via The Spruce Eats Lab).
Pro Buying Guide: The Exact Brands That Create Perfect Queso 🛒
Not every ingredient will work. I have tested the major brands available at grocery stores across the USA. Here is what works and what does not.
The Cheese: Land O’Lakes White American Cheese (Deli Counter Only)
This is non-negotiable. Land O’Lakes White American Cheese from the deli counter is the only cheese I recommend for restaurant-quality white queso dip.
Why specifically Land O’Lakes?
- Sodium citrate content: Optimized for melting stability
- Fat-to-protein ratio: Perfect for creating a silky emulsion
- Texture when melted: Becomes perfectly pourable without breaking
- Flavor profile: Mild enough to let other ingredients shine
- Consistency: Every batch is identical (no variation between stores)
- Price: $6-8 per pound at the deli counter
Critical: You must get it from the deli counter, not the pre-packaged slices. Deli counter cheese is sliced fresh, has higher moisture content, and melts more smoothly. Pre-packaged slices have added starch and cellulose that prevent smooth melting.
Ask the deli counter to slice it into thin pieces (about 1/8 inch thick). This accelerates melting and ensures even incorporation.
Alternative (If Land O’Lakes is Unavailable):
Boar’s Head White American Cheese is the second-best option. Similar composition, slightly higher price point ($9-11 per pound), but equally reliable.
Do NOT use:
- Sharp cheddar (will separate)
- Monterey Jack alone (will separate)
- Pre-packaged American cheese slices (contain starch and cellulose)
- Kraft American cheese (too processed, contains gums and stabilizers that create a weird texture)
The Milk: Whole Milk Only
Use whole milk (3.5-4% fat content). Do NOT use:
- 2% milk (too watery, your queso will be thin)
- Skim milk (will definitely separate)
- Half-and-half (too rich, creates a grainy texture)
- Heavy cream (creates a grainy, separated mess)
Whole milk provides the right balance of fat and water to create a stable emulsion. The fat in whole milk helps stabilize the cheese fat, and the water provides the right consistency.
Cost: $3-4 per quart at any grocery store.
The Chiles: Diced Green Chiles (Canned is Perfect)
Use canned diced green chiles (roasted poblanos or Hatch chiles). Do NOT use fresh jalapeños for the base of your queso.
Why canned diced green chiles?
- Consistent heat level: Every can has the same Scoville rating
- Already roasted: The skins are removed, the flavor is developed
- No excess moisture: The canning process removes most liquid, so your queso does not become watery
- Flavor is complex: Roasting creates deeper flavor than fresh peppers
- Easy to use: Already diced, no prep required
Recommended brand: Hatch Green Chiles (available at most grocery stores, especially in the Southwest section or canned vegetables aisle).
Cost: $1.50-2.50 per 4 oz can.
You will use about 1 can (4 oz) per batch of queso dip.
Fresh jalapeños can be used as a garnish (diced and scattered on top), but do not use them as the primary chile in the queso itself.
The Tortilla Chips: Santitas (Thick-Cut, Not Thin)
Use Santitas Thick-Cut Tortilla Chips. They are sturdy enough to hold the weight of the queso without breaking. Thin chips will shatter and crumble.
Why Santitas?
- Thick cut: Can handle heavy dips without breaking
- Neutral flavor: Do not compete with the queso
- Crispy texture: Stay crisp when dipped (do not become soggy)
- Made with real corn: No weird additives or flavors
- Widely available: At every grocery store in the USA
Cost: $2.50-3.50 per bag.
The Seasonings: Simple and Minimal
Use:
- Ground cumin (1/4 teaspoon per batch)
- Garlic powder (1/4 teaspoon per batch)
- Salt (1/4 teaspoon per batch, adjust to taste)
- White pepper (just a pinch, about 1/8 teaspoon)
Do NOT use:
- Chili powder (creates a red tint)
- Paprika (creates a red tint)
- Onion powder (makes it taste processed)
- Jalapeño powder (too intense)
The seasonings should be subtle. The star is the creamy white queso, not the spices. The spices should enhance, not dominate.
Optional: Fresh Cilantro & Lime
For garnish (not mixed in):
- Fresh cilantro (chopped, scattered on top)
- Fresh lime wedge (for squeezing over the top)
These add brightness and freshness without affecting the emulsion.

Why Your Queso Breaks: The Troubleshooting Grid ⚠️
| The Problem | The Molecular Science | The Immediate Fix |
|---|---|---|
| Separated, oily queso (oil pools on top, curds below) | The cheese is aged (low sodium citrate). As it heats, the fat and protein want to separate. There are no emulsifying salts to hold them together. The emulsion breaks. | Use Land O’Lakes White American Cheese from the deli counter instead. It contains sodium citrate already built in. If you must use aged cheese, add 1/4 tsp sodium citrate per pound dissolved in 1 tbsp water before heating. OR add 2 tablespoons of evaporated milk (which has added emulsifying salts) to stabilize the emulsion. |
| Too thick, not pourable | You used too little milk or you cooked it too long (milk water evaporated). The cheese-to-liquid ratio is wrong. | Add warm whole milk 1 tablespoon at a time, stirring constantly, until you reach the desired consistency. The queso should coat the back of a spoon but still pour smoothly. If it is too thick to dip chips into, it is too thick. |
| Too thin, watery | You used too much milk or you used low-fat milk (2% or skim). Low-fat milk has less fat to stabilize the emulsion, so it becomes watery. | Add more cheese (thin slices) 1 ounce at a time, melting completely between additions. Or use evaporated milk instead of regular milk—it has more milk solids and will thicken the queso. |
| Grainy or gritty texture | You overheated the cheese (heated above 180°F for too long). The proteins began to denature and aggregate, creating a grainy texture. Or you used pre-shredded cheese (contains cellulose that does not melt smoothly). | Keep heat at medium (never high). Stir constantly. Do not let the queso bubble or simmer—just let it get hot enough to be thoroughly melted. Use hand-sliced cheese from the deli counter, not pre-shredded. If already broken, you cannot fix it—start over with fresh cheese. |
| Not spicy enough | You used too little chile or you used fresh jalapeños (lower heat level than roasted poblanos). Or the heat is being diluted by the other ingredients. | Use roasted canned green chiles (Hatch brand is ideal) instead of fresh. Use 1 can (4 oz) per batch minimum. Or add fresh diced jalapeños as a garnish on top (not mixed in). The heat will hit your palate more intensely if it is not diluted in the cheese. |
| Tastes bland | You used too much cheese relative to the seasonings, or you forgot the seasonings entirely. Or you used low-flavor canned chiles (check the brand). | Add 1/4 tsp ground cumin + 1/4 tsp garlic powder + 1/4 tsp salt + pinch of white pepper. Taste and adjust. The queso should taste savory and slightly spicy, with a subtle cumin note underneath. If it still tastes bland, you likely need more cumin or more chiles. |
| Separates when you reheat it | Reheating at too high temperature or too fast causes the emulsion to break. The fat and protein lose their bond to the emulsifying salts. | Reheat slowly in a slow cooker on low heat, stirring occasionally. Or reheat in a double boiler (bowl over simmering water) stirring constantly. Never use high heat or a microwave to reheat queso. Gentle, slow heat keeps the emulsion stable. |
| Tastes too salty | You added too much salt or you used a brand of American cheese with very high sodium (some brands are heavily salted). | Do not add salt during the initial cooking. Taste at the end and add salt only if needed (usually just 1/4 teaspoon). American cheese is already salted—account for that. If you over-salted, you cannot fix it. Start over. |
| Surface has a skin or crust forming | The queso cooled slightly and the proteins began to set. This happens when queso sits for more than 10-15 minutes without heat. | Keep the queso hot in a slow cooker on low heat, stirring occasionally. Or keep it in a warm Dutch oven. If a skin forms, stir it back in or skim it off. Do not let the queso cool—it will continue to separate as the temperature drops. |
Step-by-Step Method: 15 Minutes to Perfect White Queso Dip 👨🍳
Phase 1: The Cheese Preparation (3 Minutes)
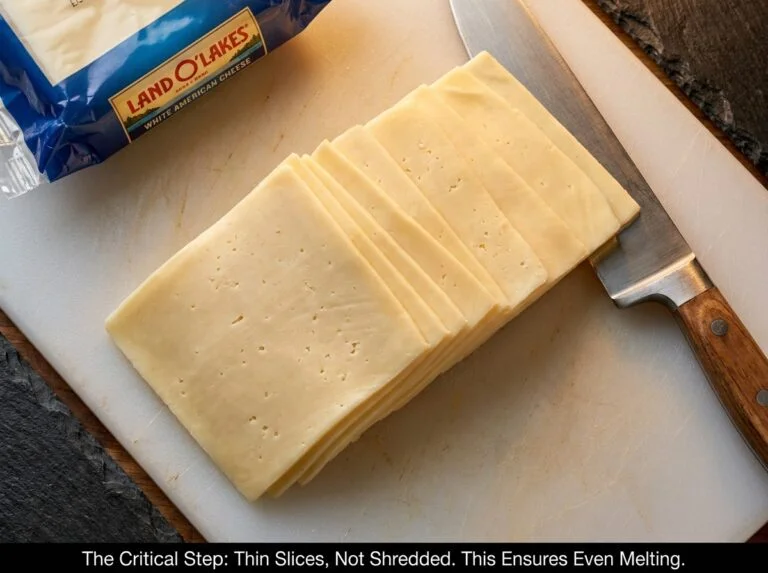
Slice the Land O’Lakes White American Cheese into thin pieces (about 1/8 inch thick). You will need 1 pound of cheese for a full batch that serves 8 people.
If the cheese is cold from the deli counter, let it sit at room temperature for 2 minutes. This slight warming allows the cheese to melt more evenly when you add it to the heat.
Do NOT shred the cheese. Thin slices are ideal because they melt faster and more evenly than shredded pieces. Shredded cheese has more surface area, which can sometimes cause the emulsion to break if there is too much surface area exposed at once.
Chop the diced green chiles finely (they are usually already diced, but you want them in small pieces so they distribute evenly). You will need about 4 oz (approximately 1/2 cup) of canned diced green chiles.
Phase 2: The Milk & Spice Preparation (2 Minutes)
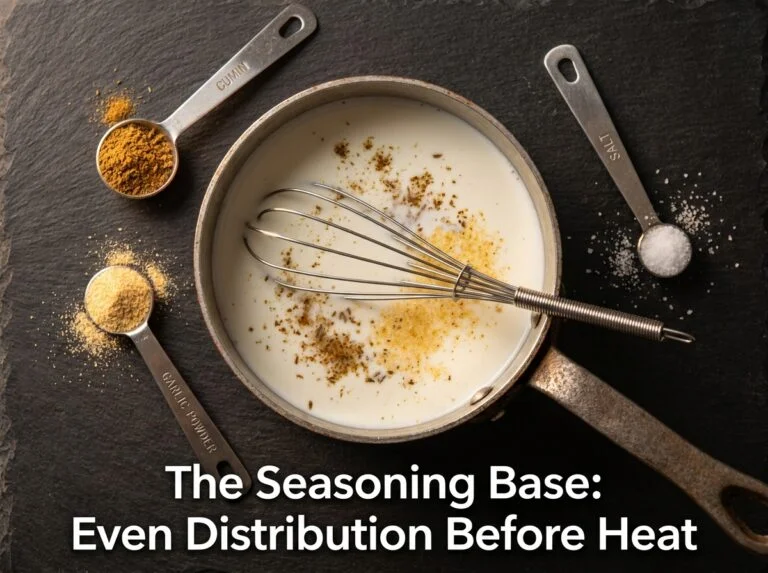
Pour 1/2 cup of whole milk into a small saucepan or slow cooker (slow cooker is preferred because it provides gentle, even heat).
Add:
- 1/4 teaspoon ground cumin
- 1/4 teaspoon garlic powder
- 1/4 teaspoon salt
- A tiny pinch (about 1/8 teaspoon) of white pepper
Whisk these seasonings into the milk thoroughly, breaking up any clumps of spice powder. You want the seasonings evenly distributed before you add the cheese. If you add spices directly to the cheese, they will clump and create uneven flavoring.
Do NOT heat the milk yet. You will add the heat in the next phase.
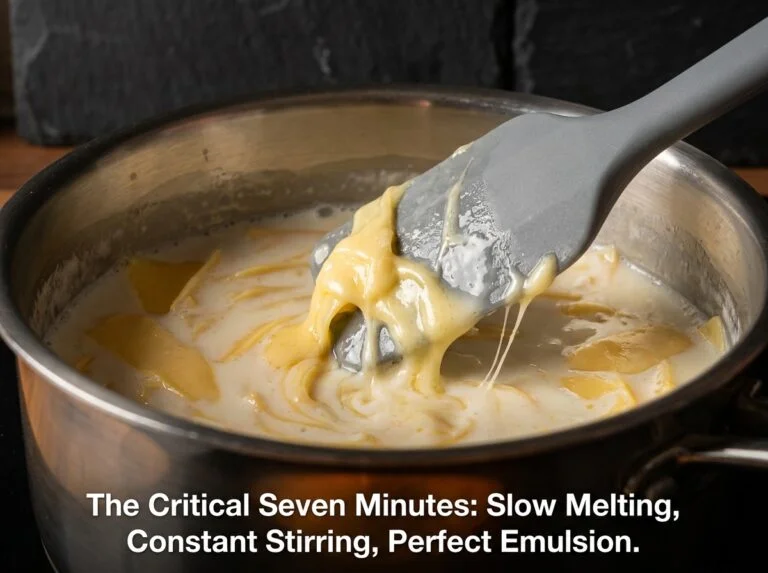
Phase 3: The Melting Magic (7 Minutes)
If using a stovetop:
Turn the heat to medium (not high). This is critical. High heat will overheat the cheese and cause the emulsion to break. Medium heat allows the milk to warm gradually and the cheese to melt smoothly.
If using a slow cooker:
Set to low setting. Slow cooker is actually the preferred method because the heat is so gentle and even. You have more margin for error.
Begin adding the thin cheese slices. Add them slowly—about one-quarter of the total cheese first. Stir constantly with a silicone spatula, breaking apart the slices as they melt.
Do NOT rush this. Take about 2 minutes to add the first batch of cheese, stirring constantly to ensure it fully incorporates before you add more.
Once the first batch is completely melted and smooth (no chunks visible), add the second batch of cheese (another one-quarter of the total). Again, stir constantly for about 2 minutes.
Repeat for the third and fourth batches. The entire melting process should take about 6-7 minutes from first cheese to last.
Why the slow addition? If you dump all the cheese in at once, the temperature of the cheese mass drops dramatically. The outer cheese cannot melt because the center is cold. You also risk overwhelming the emulsion by introducing too much fat at once.
By adding cheese slowly, you maintain a consistent temperature and ensure each addition melts completely before the next one is added.
The queso should be silky and smooth. If you see any oil separated or any graininess, the temperature is too high or you added cheese too fast. Reduce the heat to low and stir more slowly.
Phase 4: The Chile Integration (2 Minutes)
Once all the cheese is melted and the queso is smooth and silky, add the diced green chiles (about 1/2 cup, or approximately 4 oz drained).
Stir constantly for about 1-2 minutes. The heat from the queso will warm the chiles (which come out of the can at room temperature). The chiles will distribute evenly throughout the queso.
Taste the queso at this point. The flavor should be savory, creamy, with a subtle spice and a slight cumin undertone. If it is too bland, you can add:
- More cumin (start with 1/8 teaspoon and taste again)
- More chiles (add a few more tablespoons of diced green chiles)
- A tiny pinch more salt (just 1/8 teaspoon at a time, taste frequently)
Do NOT add more than you think you need. You can always add more, but you cannot remove seasoning from a finished queso.

Phase 5: The Service & Consistency Check (1 Minute)
The queso should now be at the perfect consistency for dipping. It should:
- Coat the back of a spoon when you dip it in
- Flow slightly when you tilt the spoon
- Be thick enough to cling to a tortilla chip
- Be thin enough to pour from a ladle
If it is too thick, add warm whole milk 1 tablespoon at a time, stirring constantly between additions.
If it is too thin, add more thin cheese slices 0.5 ounces at a time, melting completely between additions.
Transfer the queso to a serving bowl or to a slow cooker set on low heat (which will keep it warm and prevent the emulsion from breaking).
Surround with Santitas thick-cut tortilla chips.
Optionally garnish with:
- Diced fresh jalapeños (scattered on top)
- Fresh cilantro (scattered on top)
- A squeeze of fresh lime juice (drizzled over the surface)

Chef Albert’s Insight 🎯
“Queso is one of the most technically precise applications in home cooking, yet it is treated like it should be simple. People blame themselves when it breaks. They think they did something wrong. But the truth is more interesting: they were fighting against the chemistry of aged cheese. The moment you switch to American cheese—a cheese that was specifically designed to melt smoothly—the entire problem disappears. The science stops being your enemy and becomes your partner. This is what separates home cooks from professional kitchens: professionals understand that sometimes you do not need more skill or more effort. You need different ingredients that are specifically engineered for the task. White American cheese is not a shortcut. It is the correct tool. Once you understand that, you stop blaming yourself for broken emulsions and start making queso that tastes like it came from a restaurant. That shift—from ‘I must be doing something wrong’ to ‘I am using the right tool’—is where home cooking becomes genuinely powerful.”
Nutrition Information 📊
Per serving (approximately 1/4 cup of queso dip)
| Nutrient | Amount |
|---|---|
| Calories | 180 |
| Total Fat | 14g |
| Saturated Fat | 9g |
| Trans Fat | 0.5g |
| Cholesterol | 45mg |
| Sodium | 520mg |
| Total Carbohydrates | 3g |
| Dietary Fiber | 0g |
| Sugars | 1g |
| Protein | 9g |
| Calcium | 280mg |
Nutritional data calculated using USDA FoodData Central for Land O’Lakes White American Cheese, whole milk, and canned green chiles. High protein content (9g per serving) makes this a substantial appetizer. Sodium is higher due to the cheese content—account for this if serving to people watching sodium intake. This recipe yields approximately 8 servings (2 cups total queso).
Food Safety & Temperature Guide 🌡️
| Cooking Stage | Target Temperature | Minimum Safe | Critical Notes |
|---|---|---|---|
| Milk warming | 110–120°F / 43–49°C | Milk heated but not simmering | Start with warm milk, not cold. This accelerates cheese melting and reduces the risk of overheating. |
| Cheese melting point | 140–160°F / 60–71°C | Cheese fully melted at 140°F | Do NOT exceed 160°F—higher heat will break the emulsion. Keep a thermometer in the pan if you are unsure of your stove’s heat control. |
| Maximum safe heat for queso | 160°F / 71°C | Do not exceed this | Once cheese is melted, do NOT let the queso bubble or simmer. Gentle heat only. |
| Danger zone (avoid) | 40–140°F / 4–60°C | Never leave queso in this range | Do not leave finished queso on counter for more than 2 hours. Keep it hot in a slow cooker or return to heat frequently. Bacteria multiply rapidly below 140°F. |
| Safe holding temperature (for serving) | 140°F / 60°C or higher | Keep at 140°F minimum while serving | Use a slow cooker on low setting or a food warmer to maintain temperature throughout your event. Stir occasionally to prevent a skin from forming. |
| Safe storage temperature | Below 40°F / 4°C | Continuously cold | Leftover queso keeps 3–4 days in the fridge if stored in an airtight container. |
Storage & Reheating Guide 🧊
| Storage Method | Duration | Best Reheating Method | Storage Tips |
|---|---|---|---|
| Slow cooker (low setting) | Up to 4 hours while serving | Keep on low throughout serving | Stir occasionally (every 30 minutes) to prevent a skin from forming on the surface. If a skin does form, simply stir it back in. |
| Room temperature (during party) | 2 hours maximum | Use immediately—do not reheat | Do not leave queso on the counter without heat for more than 2 hours. Keep it moving with a slow cooker. |
| Refrigerator (airtight container) | 3–4 days | Reheat in slow cooker on low heat, stirring occasionally for 10–15 minutes until it reaches 140°F / 60°C. OR reheat in a double boiler (bowl over simmering water) for 8–10 minutes, stirring constantly. | Do NOT microwave (will overheat and break the emulsion). Do NOT reheat on direct stovetop heat (too risky for overheating). Slow, gentle heat only. |
| Freezer (airtight container) | Up to 3 months | Thaw overnight in fridge, then reheat as above using slow cooker or double boiler. | Freezing may slightly affect the emulsion stability, but properly frozen and thawed queso usually recovers well with gentle reheating. Add 1–2 tablespoons whole milk while reheating if it seems too thick. |
| Freezer (ice cube tray method) | Up to 3 months | Pop out one cube at a time, reheat in microwave for 30 seconds (single cube is small enough that emulsion usually holds). | This method is perfect for using leftover queso in smaller quantities—great for nachos or quesadillas. One cube ≈ 2 tablespoons of queso. |
Pro Tip: Queso reheats beautifully in a slow cooker on low heat. This is the best method because the gentle, even heat keeps the emulsion stable. If you do not have a slow cooker, a double boiler (metal bowl over a pot of simmering water) is the second-best option. Never reheat queso on direct high heat—this will definitely break the emulsion.
Frequently Asked Questions ❓
Q: Can I make this with sharp cheddar instead of American cheese?
A: You can, but it will not turn out as well. Sharp cheddar is aged and contains very little sodium citrate (the emulsifying salt). When you melt aged cheddar, it will separate. If you absolutely must use sharp cheddar, add 1/4 teaspoon of sodium citrate dissolved in 1 tablespoon of water before heating. Sodium citrate is available online and costs $8-12 for a container that lasts for years. But honestly, just use American cheese from the deli counter. It is easier, cheaper, and guaranteed to work perfectly.
Q: What if my local grocery store does not have Land O’Lakes American cheese at the deli counter?
A: Ask the deli counter if they can special order it, or use Boar’s Head White American Cheese (second-best option, slightly higher price). If neither is available, you can mail-order Land O’Lakes White American Cheese online from specialty cheese suppliers or Amazon. It ships well and is worth the investment if you love queso. As a last resort, you can use Kraft American cheese singles (deli-sliced, not pre-packaged) with added sodium citrate to stabilize the emulsion.
Q: My queso turned out grainy. Can I fix it?
A: Once queso turns grainy, the emulsion has permanently broken and you cannot fix it. You must start over with fresh cheese. Graininess happens when the cheese is overheated or when you added all the cheese at once (overwhelming the emulsion). For next time: keep heat at medium (never high), add cheese slowly, stir constantly, and keep the temperature below 160°F. If you do not have a thermometer, use the visual cue: if the queso is bubbling or steaming heavily, the temperature is too high.
Q: Can I use evaporated milk instead of whole milk?
A: Yes. Evaporated milk actually works slightly better than whole milk because it has more milk solids (proteins) which help stabilize the emulsion. Use the same amount: 1/2 cup evaporated milk. The queso may be slightly thicker, so you might need to add a bit more liquid (a tablespoon or two of regular whole milk) if it is too thick to dip chips into.
Q: How do I prevent a skin from forming on the top of the queso while serving?
A: A skin forms when the top surface of the queso cools slightly and the proteins begin to set. Prevention: (1) Keep the queso hot in a slow cooker on low heat, (2) stir it occasionally (every 20-30 minutes) to break up any forming skin and redistribute the heat, (3) keep a ladle or spoon resting in the queso so people can easily serve themselves without the surface being exposed to cool air. If a skin does form, simply stir it back into the queso or skim it off. It does not affect the taste.
Q: Can I make this ahead for a party?
A: Yes. Make the queso up to 4 hours before your party. Store it in an airtight container at room temperature (if your house is cool) or in the refrigerator if your house is warm. About 30 minutes before serving, reheat it gently in a slow cooker on low heat, stirring occasionally, until it reaches serving temperature (140°F / 60°C). Do NOT make it the day before—the emulsion is more stable when freshly made. Overnight storage can affect the texture slightly.
Q: Is there a dairy-free version?
A: This is very difficult because the entire recipe depends on the properties of dairy cheese (specifically the sodium citrate and casein proteins). You could theoretically use dairy-free American cheese (some brands make this), but it is hard to find and expensive. I would not recommend it unless you have a severe dairy allergy. For dairy-free queso, you would need to research specialized recipes using cashew-based cheese or other non-dairy alternatives, which is beyond the scope of this recipe.
Q: Can I double the recipe?
A: Yes, absolutely. Simply double all ingredients: 2 pounds cheese, 1 cup milk, 1 teaspoon cumin, 1 teaspoon garlic powder, 1/2 teaspoon salt, 1/2 cup canned green chiles. The cooking method stays the same—just take a bit longer to add all the cheese (maybe 10 minutes total instead of 7). Keep the heat at medium and stir constantly. The final yield will be 4 cups of queso (16 servings).
Related Articles on Taste Pillar 🔗
🧀 Sheet Pan Steak Fajitas: A Gourmet Mexican Dinner with Zero Cleanup
🌶️ Better Than Chipotle: The Secret 15-Minute Cilantro Lime Rice & Barbacoa Bowl
🔥10 Reasons Your Macarons Crack: The Ultimate Macaron Troubleshooting Guide for Flawless Shells!
🥘 Overnight Cinnamon Rolls with Heavy Cream

Restaurant-Style White Queso Dip: The Land O’Lakes Secret
Ingredients
Equipment
Method
- STEP 1 – The Cheese Preparation
- Slice the Land O’Lakes White American Cheese into thin pieces (approximately 1/8 inch thick). You can ask the deli counter to slice it for you. Allow the cheese to sit at room temperature for 2 minutes—this slight warming helps it melt more evenly. Do NOT use pre-shredded cheese or pre-packaged cheese slices, as these contain cellulose and other additives that prevent smooth melting. You need fresh-sliced deli cheese only.
- STEP 2 – The Milk & Spice Base
- Pour 1/2 cup of whole milk (not 2%, not skim—whole milk is essential for emulsion stability) into a small saucepan or slow cooker. Add 1/4 tsp ground cumin, 1/4 tsp garlic powder, 1/4 tsp salt, and a tiny pinch of white pepper. Whisk thoroughly to break up any clumps of spice and distribute seasonings evenly. Do NOT heat yet—you are simply preparing the base.
- STEP 3 – The Slow Cheese Melting (The Critical Phase)
- If using stovetop: Turn heat to MEDIUM (never high). If using slow cooker: Set to LOW. Begin adding the thin cheese slices slowly—add approximately one-quarter of the total cheese first. Stir constantly with a silicone spatula, breaking apart the slices as they melt. This first batch should take about 2 minutes to fully incorporate. Once completely melted and smooth with no chunks visible, add the second batch of cheese (another one-quarter). Again, stir constantly for about 2 minutes. Repeat for the third and fourth batches. The entire melting process should take 6-7 minutes total. Do NOT rush. Do NOT let the queso bubble or simmer—keep the temperature around 140-160°F (60-71°C). If you see any oil separated or graininess forming, reduce heat to low and stir more slowly. The queso should be silky and smooth by the end.
- STEP 4 – The Chile Integration
- Once all cheese is melted and the queso is smooth, add the drained diced green chiles (approximately 1/2 cup or 4 oz from a canned can). Stir constantly for 1-2 minutes. The heat from the queso will warm the chiles. They should distribute evenly throughout. Taste at this point. The flavor should be savory and creamy, with subtle spice and a hint of cumin underneath. If too bland, add more cumin (start with 1/8 tsp), more chiles, or a pinch more salt. Taste between each addition. Do NOT over-season—you can always add more.
- STEP 5 – The Consistency Check & Service
- The queso should coat the back of a spoon but still flow slightly when tilted. If too thick, add warm whole milk 1 tbsp at a time, stirring constantly between additions. If too thin, add thin cheese slices 0.5 oz at a time, melting completely between additions. Transfer to a serving bowl or keep in slow cooker on low heat. Surround with Santitas thick-cut tortilla chips. Optionally garnish with diced fresh jalapeños, fresh cilantro, or a squeeze of fresh lime juice. Keep hot during serving (140°F / 60°C minimum). Stir occasionally to prevent a skin from forming on the surface.
Notes
Calculated using USDA FoodData Central for Land O'Lakes White American Cheese, whole milk, and canned green chiles. High protein content (9g per serving) makes this a substantial appetizer. Sodium is elevated due to cheese content. This recipe yields 2 cups total queso (8 servings at 1/4 cup per serving).


13 Comments on “The Ultimate White Queso Dip: Just Like Your Favorite Mexican Restaurant!”