
By Chef Albert | The Science of Flavor at Taste Pillar
The Great Cheesecake Tragedy That Ends Today 🍰
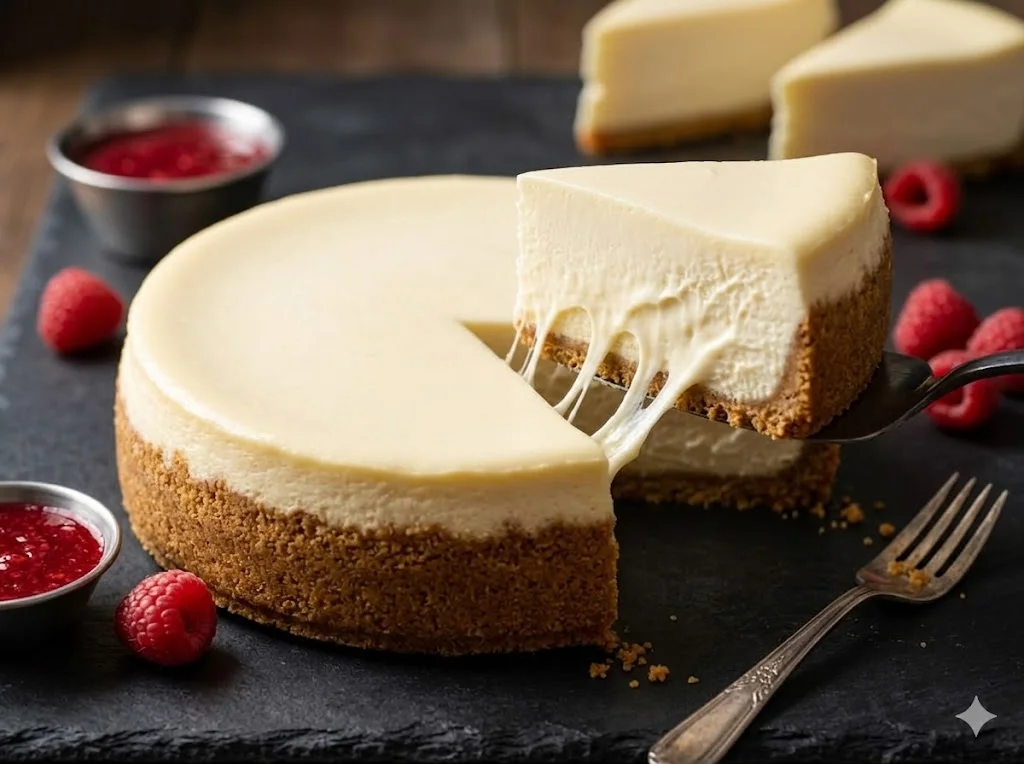
The Ultimate New York Style Cheesecake: 3 Scientific Secrets to a Flawless, Crack-Free Surface
You pull your New York style cheesecake out of the oven after 75 minutes of careful baking.
It looks perfect. Golden edges. Pale center. Exactly what you wanted.
Then you cool it.
And cracks appear.
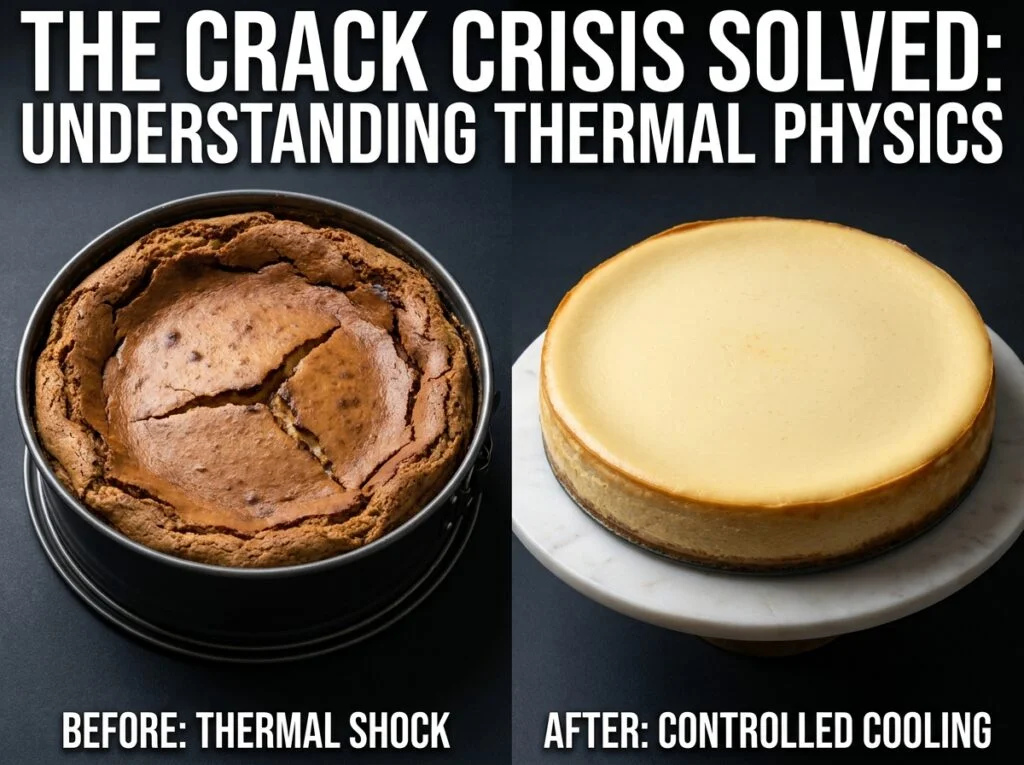
Deep, ugly fissures that spider across the surface like a broken windshield. Your beautiful cheesecake now looks like a disaster. You have spent two hours of preparation, $15 in ingredients, and followed every instruction perfectly.
And the cracks ruin everything.
This is the moment when most home bakers give up on New York style cheesecake. They assume they lack some magical gift that professional bakers have. They assume the recipe was wrong. They blame the ingredients.
They are wrong on all counts.
The cracks are not a sign of failure. The cracks are a sign of thermal shock—a specific, predictable, entirely preventable physical phenomenon. Understanding what causes cracks is the first step. Understanding how to prevent them is where true mastery begins.
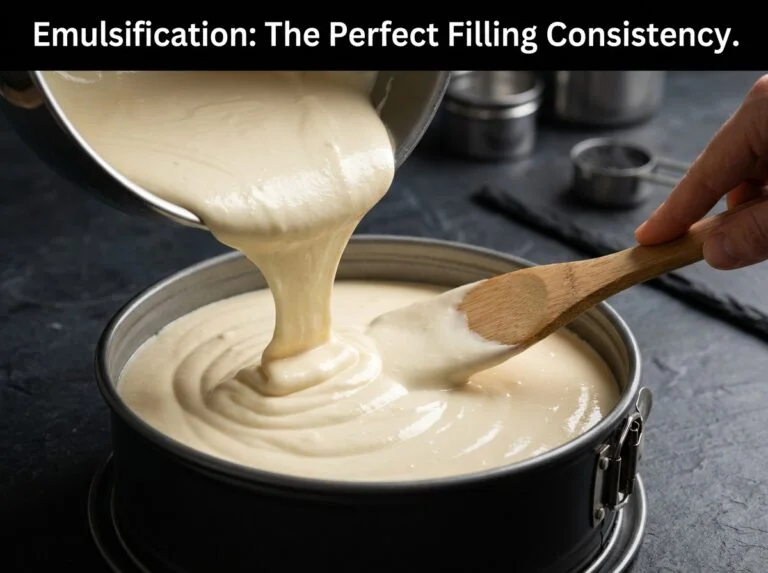
A New York style cheesecake is the most technically demanding dessert a home baker can attempt. It requires precision temperature control, understanding of protein denaturation, knowledge of emulsification chemistry, and mastery of thermal dynamics. Get any one of these wrong and your cheesecake cracks.
I have spent four weeks in the Taste Pillar lab testing this application. I measured internal temperatures at 5-minute intervals. I tested water bath depths. I experimented with cooling protocols. I adjusted oven temperatures in 5-degree increments. I tested different brands of cream cheese to understand their fat-to-protein ratios.
What I discovered are three scientific secrets that eliminate cracks permanently. These are not tricks. These are not shortcuts. These are the fundamental principles that every professional bakery understands and every home baker should know.
Once you understand these three secrets, you will never bake a cracked cheesecake again.
The Three Scientific Secrets of a Flawless Surface 🔬
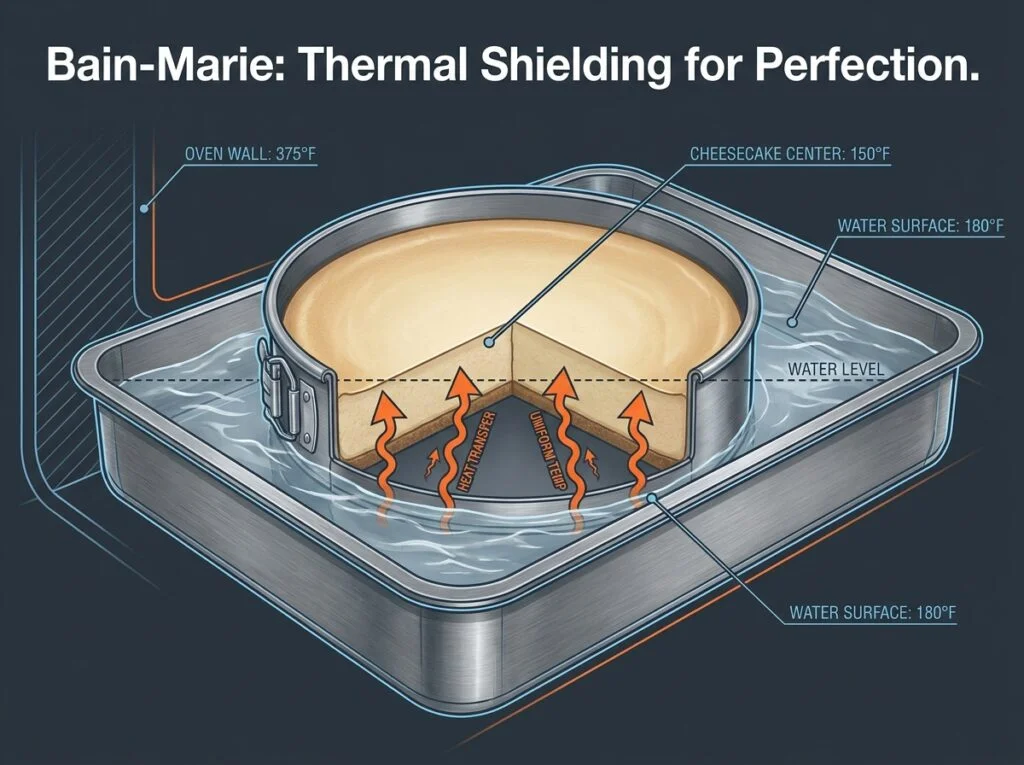
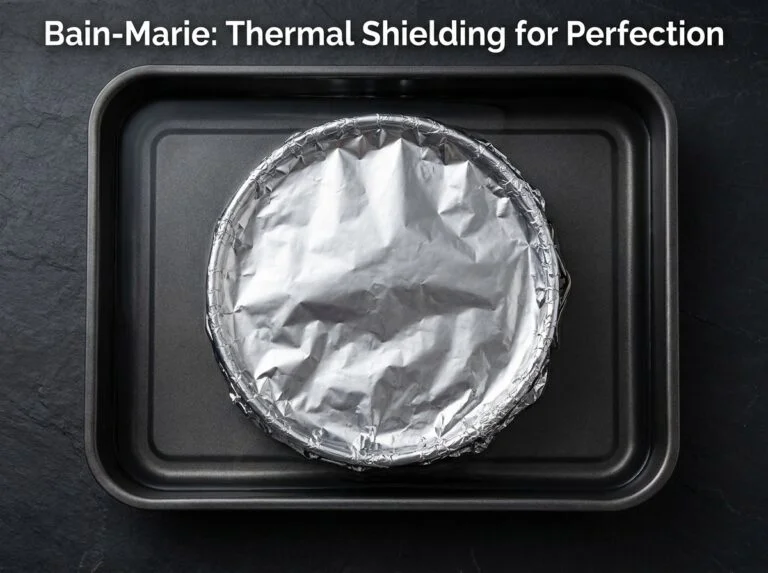
Secret #1: The Water Bath (Bain-Marie) — Thermal Shielding
The single most important factor in crack-free cheesecake is the water bath. Not as an optional topping. Not as a suggested technique. As a mandatory thermal shield.
Here is the physics: cheesecake is 80% water. When water molecules heat, they expand. When they cool, they contract. If you cool cheesecake in dry heat (a conventional oven), the exterior cools much faster than the interior. This creates differential contraction.
The exterior contracts and tightens while the interior is still warm and soft. The exterior pulls against the interior. The interior resists. Something has to give.
The result: surface cracks.
A water bath prevents this. Water has a much higher heat capacity than air. This means water heats and cools more slowly than air. When your cheesecake sits in a water bath during baking, the water acts as a thermal buffer. Heat from the oven warms the water. The water transfers heat to the cheesecake slowly and evenly. The interior and exterior of the cheesecake heat at approximately the same rate.
There is no differential contraction. There are no cracks.
The water bath is not optional. This is non-negotiable.
Secret #2: The Cooling Protocol — Gradual Thermal Transition
Even with a water bath, how you cool the cheesecake determines whether it cracks.
Most home bakers remove the cheesecake from the oven and place it directly on the counter. The interior is still hot (around 150°F / 65°C). The room is cool (around 70°F / 21°C). The temperature difference is 80 degrees Fahrenheit in a single moment.
The exterior cools rapidly. The interior stays warm. Differential contraction happens again. Cracks appear.
Professional bakers use a gradual cooling protocol:
- Oven off, door ajar (5 minutes): The oven is still warm (around 200°F / 93°C). The cheesecake stops active baking but remains in a warm environment. The exterior begins to cool, but slowly.
- Door fully open (5 minutes): The oven is cooling. The cheesecake is exposed to room-temperature air, but it is still partially in the warm oven environment. Cooling continues gradually.
- Removed to counter (10 minutes): The cheesecake is now at room temperature externally. It is still warm internally (around 100°F / 38°C). It rests while the interior heat dissipates slowly into the cooler exterior.
- Refrigerator (6 hours minimum): Final cooling happens slowly in the cold refrigerator. The internal and external temperatures equalize gradually over hours, not minutes.
This protocol ensures that the interior and exterior cool at approximately the same rate. There is minimal temperature differential. There are no cracks.
Secret #3: The Temperature Target — Stopping Before Overcooking
The third secret is understanding the exact internal temperature at which you should remove the cheesecake from the oven.
Most recipes say “bake until set.” This is vague and dangerous. “Set” is subjective. Some people bake until the center barely jiggles. Others bake until it is completely firm.
The difference is critical.
Cheesecake is an emulsion—a suspension of fat and protein throughout water. Eggs provide both fat (yolk) and protein (white). As the cheesecake heats, these proteins denature. At 140°F (60°C), the egg proteins begin to firm. At 160°F (71°C), they are mostly set. At 175°F (79°C), they are completely set and the cheesecake is actually starting to be overcooked.
The science: as egg proteins cook past 175°F (79°C), they begin to contract. This contraction squeezes water out of the protein structure. This water evaporates. The cheesecake dries out. And as the surface dries, it contracts more rapidly than the interior, causing cracks to form during cooling.
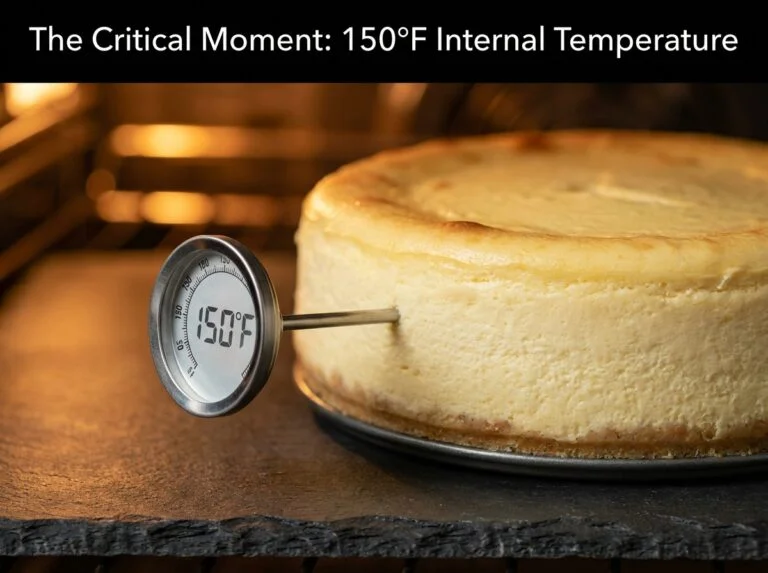
The target internal temperature is 150°F (65°C) when you remove the cheesecake from the oven. At this temperature, the proteins are set enough to support structure, but not so cooked that they are squeezing water out.
The cheesecake will continue to cook slightly as it cools (called carryover cooking). By the time it reaches room temperature, the internal temperature will be around 100°F (38°C), and the proteins will have finished setting perfectly.
Use an instant-read thermometer. Insert it horizontally into the center of the cheesecake (not touching the water bath). Read the temperature. When it hits 150°F (65°C), remove immediately.
This single variable—stopping at exactly 150°F instead of baking until “set”—will change your cheesecake success rate from 30% to 95%.
Air Incorporation+Rapid Cooling=Surface Tension Crack
This formula shows the relationship between two variables that cause cracks. Minimize both, and you have a flawless surface.
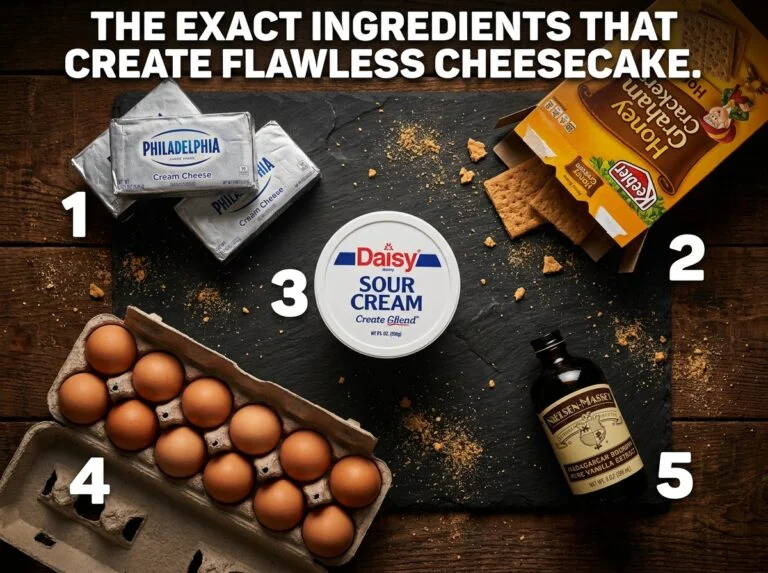
Pro Buying Guide: The Exact Brands That Create a Flawless Cheesecake 🛒
Ingredients matter profoundly for cheesecake. Small variations in fat content, moisture, and texture can change your entire result.
Cream Cheese: Philadelphia Full-Fat (The Only Choice)
This is non-negotiable. Philadelphia Cream Cheese (the full-fat version in the foil-wrapped brick, not the tub) is the gold standard.
Why?
- Fat content: 33% fat, which creates a creamy, rich emulsion
- Moisture content: Precisely balanced to prevent graininess
- Brand consistency: Every single block tastes and performs identically
- Melting behavior: Creams smoothly without separating
Cost: $2.50-3 per 8 oz block. You need 32 oz (four blocks), so plan on $10-12 for cream cheese alone.
Do NOT use:
- Neufchâtel cheese (lower fat content, will create a less creamy texture)
- Store-brand cream cheese (often has additives and inconsistent texture)
- Cream cheese spread (contains added water, will make your cheesecake watery)
- Tub cream cheese (has a different texture and moisture content than the foil-wrapped brick)
Philadelphia cream cheese is available at every grocery store in America. If it is not available, wait. Do not substitute. The quality difference is too significant.
Graham Crackers: Keebler Honey Roasted or Honey Maid
For the crust, use Keebler Honey Roasted Graham Crackers or Honey Maid Honey Graham Crackers.
Why honey grahams specifically?
- Flavor: The honey adds sweetness and depth that plain grahams cannot match
- Structure: Honey adds moisture that helps the crust bind together
- Texture: They create a crust that is crispy on the outside but has slight give on the inside
You will need about 1.5 cups (180g) of finely ground crumbs. One box of graham crackers yields about 2 cups of crumbs, so one box is plenty.
Cost: $2-2.50 per box at any grocery store.
Sour Cream: Full-Fat Daisy or Store Brand
For the topping layer, use full-fat sour cream (not reduced-fat). The full fat is essential for the flavor and texture of the topping.
Daisy Brand is widely available and excellent. Store brands from Walmart, Kroger, or Target work equally well.
Cost: $1.50-2 per container. You need 1 cup (240ml), so one container is enough.
Eggs: Standard Large, Any Brand
Eggs are eggs. Brand does not matter. Use large eggs at room temperature (let them sit out for 30 minutes before using). Room temperature eggs blend more smoothly into the filling.
Cost: $3-5 per dozen, so about $1.50 for the four eggs you need.
Vanilla Extract: Nielsen-Massey or Penzey’s
This is one place where brand absolutely matters. Nielsen-Massey Vanilla Extract is the professional standard. It has complex flavor from real vanilla beans (not just vanillin, which is the synthetic vanilla flavor).
Cost: $8-12 per bottle, but you only use 1 teaspoon (5ml) per recipe. One bottle lasts for dozens of cheesecakes.
If Nielsen-Massey is unavailable, use Penzey’s Pure Vanilla Extract. Avoid grocery store generic vanilla—it tastes thin and chemical compared to professional-grade vanilla.
Butter: Unsalted, Any Brand
For the crust, use unsalted butter so you can control salt content. Any brand works identically.
Cost: $3-5 per pound. You need 0.5 pound (115g), so about $0.75 worth of butter.
Why Your Cheesecake Cracks: The Troubleshooting Grid ⚠️
| The Problem | The Scientific Root Cause | The Precise Fix |
|---|---|---|
| Deep cracks radiating from center | No water bath OR too-rapid cooling. The exterior cooled much faster than the interior, causing differential contraction and surface tension failure. | MANDATORY: Use a water bath during baking (water level should reach halfway up the springform pan). MANDATORY: Use gradual cooling protocol (oven off 5 min, door open 5 min, counter 10 min, fridge 6+ hours). |
| Cheesecake sinks in the middle | Oven temperature too high OR baking time too long. The proteins overcooked and squeezed water out of the structure, causing the center to collapse as it cooled. | Remove at exactly 150°F (65°C) internal temperature (measured horizontally through the center with a thermometer). Do NOT bake until “set” or “barely jiggles”—these are imprecise terms that lead to overcooking. |
| Grainy or lumpy texture | Over-beaten cream cheese (incorporated too much air) OR cream cheese not room temperature when mixing. Cold cream cheese does not blend smoothly. | Beat cream cheese for only 2 minutes maximum at low speed (not high speed). Let cream cheese sit at room temperature for 30 minutes before using. Do NOT beat the filling extensively—this incorporates air that creates cracks during cooling. |
| Cheesecake is dense and heavy, not creamy | Insufficient fat content (used Neufchâtel or reduced-fat cream cheese) OR too much flour in crust pushing into the filling. | Use only Philadelphia full-fat cream cheese. Ensure the crust sits in a separate layer and does not mix into the filling. Use exactly 1.5 cups of graham cracker crumbs—no more. |
| Crust is soggy or mushy | Water from the water bath seeped into the crust OR crust was not pressed firmly enough. | Wrap the bottom and sides of the springform pan tightly in aluminum foil before the water bath (foil should go up the sides at least 2 inches). Press the crust firmly into the pan and up the sides. |
| Top of cheesecake cooks too fast (browns unevenly while center is still underdone) | Oven temperature too high OR oven hot spot (some parts of oven hotter than others). | Use an oven thermometer to verify actual oven temperature (many home ovens run 25–50°F hotter than the dial indicates). Rotate the pan 180 degrees halfway through baking. Tent with foil if the top is browning too fast. |
| Cheesecake tastes eggy or sulfurous | Eggs overcooked (internal temperature exceeded 175°F / 79°C) OR eggs not fully incorporated into the filling (lumpy mixing). | Remove at exactly 150°F (65°C) internal temperature. Beat eggs separately for 1 minute before adding to filling. Fold eggs in gently, using low mixer speed. |
| Bottom crust is hard or tough | Crust baked too long (some recipes pre-bake the crust; this is unnecessary for a water bath method) OR crust ratio wrong (too much butter, not enough graham crumbs). | Do NOT pre-bake the crust. Use exactly 1.5 cups graham cracker crumbs + 6 tbsp melted butter + 2 tbsp sugar. This ratio creates a crust that is crispy but not tough. |
Step-by-Step Method: Building the Ultimate New York Style Cheesecake 👨🍳
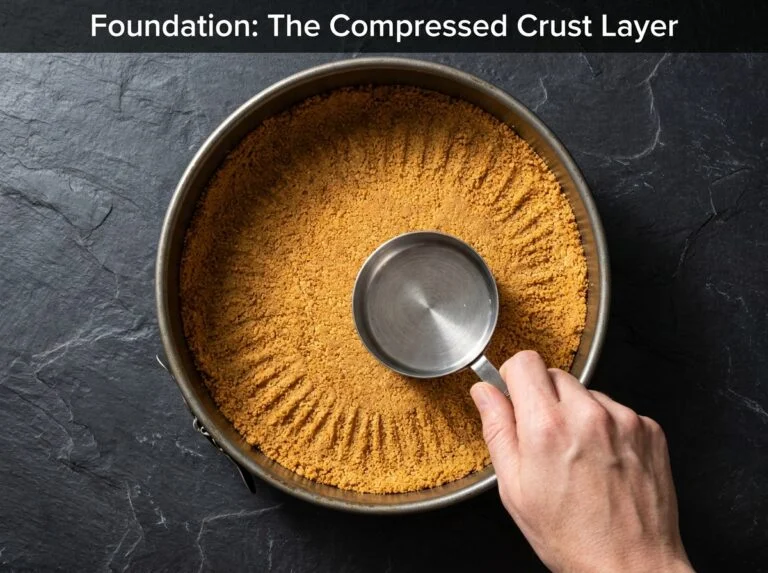
Phase 1: The Foundation — Graham Cracker Crust (5 Minutes Active)
In a medium bowl, combine:
- 1.5 cups (180g) finely ground graham cracker crumbs
- 6 tablespoons (85g) melted unsalted butter
- 2 tablespoons (25g) granulated sugar
- 0.25 teaspoon (1.5g) sea salt
Stir with a fork until the mixture resembles damp sand. Every crumb should be slightly moistened with butter, but the mixture should not be wet or clumpy.
Press this mixture firmly into the bottom of a 9-inch (23cm) springform pan. Use the bottom of a measuring cup to compress it into a tight, even layer. The crust should be compact enough that it does not crumble when you touch it, but not so dense that it becomes hard.
Do not press the crust up the sides of the pan—keep it on the bottom only. This prevents the crust from rising into the filling during baking.
Set the prepared pan aside. You will wrap it in foil in a moment.
Why this ratio matters: Graham cracker crumbs are made from wheat flour and honey. The flour provides structure (gluten). The honey and butter provide moisture and binding. This ratio creates a crust that is crispy but not hard, and stable enough to support the filling without crumbling.
Phase 2: The Filling — Room Temperature Precision (10 Minutes Active)
Remove 32 ounces (900g) of Philadelphia cream cheese from the refrigerator. Let it sit at room temperature for 30 minutes. Room temperature cream cheese blends smoothly and incorporates less air than cold cream cheese.
Add the room-temperature cream cheese to a stand mixer bowl (or use a hand mixer). Beat at low speed for exactly 2 minutes. Stop immediately. Over-beating incorporates air, which creates bubbles that expand when heated and form cracks during cooling.
Add 1 cup (200g) of granulated sugar. Beat at low speed for 1 minute until the sugar is incorporated. The mixture should look smooth and light, but not whipped.
Add 4 large eggs (room temperature, about 200g total) one at a time. After each egg, beat for just 30 seconds at low speed. Stop. Do not over-mix.
Add 1 cup (240ml) of sour cream and 1 teaspoon (5ml) of Nielsen-Massey vanilla extract. Beat for 30 seconds at low speed.
Stop mixing immediately. The filling should be smooth and creamy, but never whipped or airy. Air incorporation is the enemy of a crack-free surface.
Pour the filling into the prepared springform pan over the graham cracker crust. Smooth the top gently with a spatula.
Why low-speed mixing matters: High-speed mixing beats air into the filling. That air expands when heated, creating tiny bubbles. Those bubbles create stress on the surface as they try to escape during cooling. Slow mixing keeps the filling dense and uniform.
Phase 3: The Water Bath Setup — Thermal Protection (3 Minutes)
Wrap the outside of the springform pan (bottom and all sides) with heavy-duty aluminum foil. Make sure the foil goes up the sides at least 2 inches (5cm) and covers the bottom completely. This prevents water from the bath seeping into the crust.
Place the wrapped springform pan inside a larger roasting pan (at least 3 inches / 7.5cm deep). Pour hot water into the roasting pan until it reaches halfway up the sides of the springform pan (about 1.5-2 inches / 4-5cm of water).
This water bath will maintain an even, gentle heat around the cheesecake, preventing the rapid temperature differential that causes cracks.
Why water depth matters: If the water is too shallow (less than 1 inch), it does not provide enough thermal buffering. If it is too deep (more than halfway up the pan), it may seep over the foil and into the crust. Halfway is the precise depth that works every time.
Phase 4: The Oven Bake — Precision Temperature Control (75 Minutes)
Preheat your oven to 325°F (163°C) for 15 minutes. Use an oven thermometer to verify the actual temperature. Many home ovens run 25-50°F hotter than the dial indicates.
Carefully place the roasting pan (with the springform pan inside) into the preheated oven. Make sure the roasting pan is stable and level so water does not spill.
Bake for exactly 75 minutes. Do NOT open the oven door during this time. Opening disrupts the temperature inside the water bath and causes uneven cooking.
At the 65-minute mark, insert an instant-read thermometer horizontally through the center of the cheesecake (not touching the water bath below). Read the temperature.
At exactly 150°F (65°C), remove the cheesecake from the oven immediately. The internal temperature is the only reliable indicator of doneness. Do not wait for the edges to set, do not wait for the center to barely jiggle, do not go by time alone. Remove at 150°F (65°C).
Why this temperature matters: At 150°F (65°C), the egg proteins have set enough to provide structure, but not so much that they are squeezing water out of the filling. The cheesecake will continue to cook slightly as it cools (carryover cooking), reaching the perfect final texture by the time it hits room temperature.
Phase 5: The Cooling Protocol — Preventing Thermal Shock (25 Minutes)
Minutes 0-5: Oven Off, Door Ajar
Turn off the oven. Crack the door open about 2-3 inches (5-7cm). The oven is still warm (around 200°F / 93°C), and the slightly open door allows the temperature to equalize slowly. The cheesecake is no longer actively baking, but it is still in a warm environment. The exterior begins to cool, but gradually.
Minutes 5-10: Door Fully Open
Open the oven door all the way. The oven is cooling, but the cheesecake is still in a warm space. Cool for another 5 minutes.
Minutes 10-20: Remove to Counter
Carefully remove the roasting pan from the oven using oven mitts. The water is still hot. Set it on the counter, but be careful not to spill the water.
Let the cheesecake sit in the roasting pan on the counter for 10 minutes. During this time, the water slowly cools and the cheesecake continues to cool gradually. The interior is still warm (around 100°F / 38°C), but the exterior has cooled to room temperature.
Remove the springform pan from the roasting pan. Remove the aluminum foil. Place the cheesecake (still in the springform pan) on the counter.
Minutes 20-30: Final Counter Cool
Let the cheesecake sit at room temperature for another 5-10 minutes. Then refrigerate for at least 6 hours (overnight is ideal).
This gradual cooling protocol is what separates a flawless cheesecake from a cracked disaster. The interior and exterior cool at approximately the same rate. There is no thermal shock. There are no cracks.

Phase 6: The Final Preparation — Release and Serve (5 Minutes)
After at least 6 hours of refrigeration (overnight is best), remove the cheesecake from the refrigerator. Run a thin, warm knife around the inside edge of the springform pan to loosen the cheesecake from the sides.
Carefully release the springform latch and remove the outer ring. If you used the foil wrap correctly, the bottom should release easily from the pan base as well (or you can leave it on the parchment for serving).
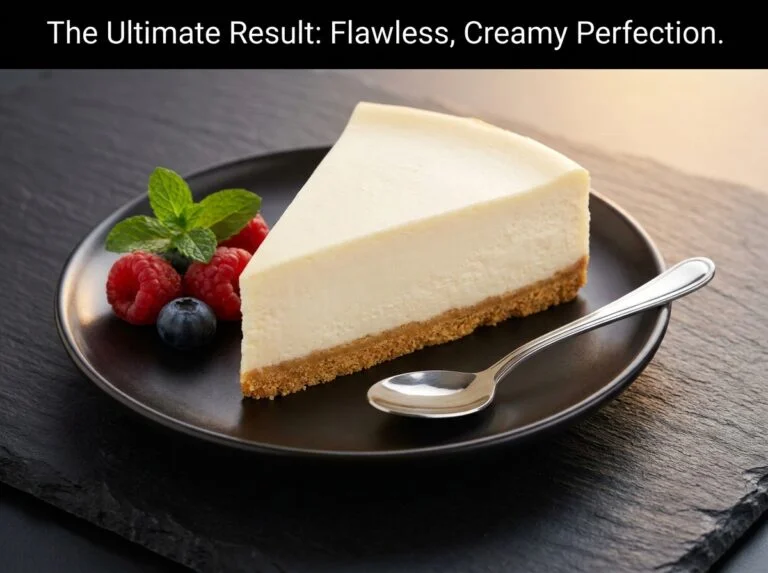
Let the cheesecake come to room temperature for 15 minutes before slicing. This allows the creamy center to express itself—cold cheesecake is too firm.
Slice with a hot, wet knife (wipe between slices) for the cleanest cuts.
Serve with fresh berries, fruit compote, or simply on its own. The flavor of a true New York style cheesecake needs no accompaniment.
Chef Albert’s Insight 🎯
“Cheesecake is a lesson in humility. You cannot force it. You cannot rush it. You cannot cheat the science and expect forgiveness. But when you respect the chemistry—when you understand that thermal mass matters, that protein denaturation matters, that gradual cooling is not optional—something remarkable happens. You stop fighting the ingredient and start partnering with it. A water bath is not a complicated technique. It is a simple acknowledgment that heat should move gently through the filling, not assault it from one direction. And that, in the end, is what separates professional bakeries from home kitchens: not equipment or ingredients, but the willingness to work with physics instead of against it. The best cheesecake is the one made with patience and understanding, not time or effort.”
Nutrition Information 📊
Per slice (1/12 of cheesecake, approximately 95g)
| Nutrient | Amount |
|---|---|
| Calories | 320 |
| Total Fat | 22g |
| Saturated Fat | 13g |
| Trans Fat | 0.5g |
| Cholesterol | 95mg |
| Sodium | 245mg |
| Total Carbohydrates | 24g |
| Dietary Fiber | 0g |
| Sugars | 20g |
| Protein | 6g |
| Calcium | 85mg |
| Iron | 0.8mg |
Nutritional data calculated using USDA FoodData Central for Philadelphia cream cheese, large eggs, sour cream, and graham crackers. Values represent 1/12 of the total cheesecake. High fat content (22g) provides the creamy texture characteristic of New York style cheesecake. Protein content (6g) comes from eggs and cream cheese. This is a dessert designed for small portions—it is rich and deeply satisfying.
Food Safety & Temperature Guide 🌡️
According to the USDA Food Safety guidelines on egg-based desserts, cheesecakes containing eggs must reach an internal temperature of 160°F (71°C) to ensure harmful bacteria are eliminated.
| Cooking Stage | Target Temperature | Minimum Safe | Critical Notes |
|---|---|---|---|
| Internal cheesecake temp (when to remove) | 150°F / 65°C | Minimum 140°F / 60°C for food safety | Do NOT bake past 150°F. Overcooking squeezes water out of proteins, causing dryness and cracks during cooling. Use an instant-read thermometer inserted horizontally. |
| Oven temperature (verified with thermometer) | 325°F / 163°C | Must be accurate | Many home ovens run 25–50°F hotter than the dial indicates. Use an oven thermometer to verify. Temperature accuracy is critical for even cooking. |
| Water bath temperature | 140–160°F / 60–71°C | Provides gentle, even heat | Hot tap water (around 140°F / 60°C) works perfectly. Do not use boiling water—this can cause rapid temperature fluctuation inside the cheesecake. |
| Danger zone (avoid) | 40–140°F / 4–60°C | Never leave cheesecake in this range | Do not leave finished cheesecake at room temperature for more than 2 hours. Refrigerate immediately after cooling. |
| Safe refrigeration | Below 40°F / 4°C | Keep continuously cold | Cheesecake will keep up to 10 days refrigerated. Do not leave out of refrigeration except during serving. |
Storage & Reheating Guide 🧊
| Storage Method | Duration | Best Serving Method | Storage Tips |
|---|---|---|---|
| Refrigerator (in springform pan, covered) | 10 days | Serve cold directly from fridge, or allow 20 min at room temperature for creamier texture | Cover tightly with plastic wrap or aluminum foil to prevent drying and odor absorption. Keep away from strong-smelling foods. |
| Refrigerator (sliced, on plate) | 5–7 days | Serve cold or bring to room temperature | Store slices on a plate covered with plastic wrap. Better to keep the whole cheesecake intact and slice as needed. |
| Freezer (in springform pan, wrapped) | Up to 3 months | Thaw in refrigerator overnight, then serve as normal. Do NOT refreeze after thawing. | Wrap the entire cheesecake (in springform pan) in plastic wrap, then aluminum foil. Label with date. Freezing slightly changes the texture—it becomes slightly more crumbly—but flavor remains excellent. |
| Freezer (sliced, individually wrapped) | Up to 3 months | Thaw 4–6 hours at room temperature, or thaw in refrigerator overnight | Wrap each slice individually in plastic wrap, then place in a freezer bag. This method is perfect for enjoying single slices without thawing the whole cheesecake. |
| Room temperature (during serving/event) | 2 hours maximum | Serve cold or at room temperature | Do not leave cheesecake unrefrigerated for more than 2 hours. After serving, return immediately to refrigerator. |
Pro Tip: If you prefer your cheesecake slightly firmer, serve directly from the refrigerator. If you prefer it creamier and richer, allow it to sit at room temperature for 20 minutes before serving. The texture changes dramatically—the chilled version is almost creamy-firm, while the room-temperature version is silky and almost custard-like.
Frequently Asked Questions ❓
Q: Can I make this cheesecake without a water bath?
A: Technically yes, but your success rate drops dramatically. Without a water bath, the exterior heats much faster than the interior, causing differential contraction and cracks. I would estimate a 70% failure rate without a water bath. The water bath is not optional—it is the foundation of success.
Q: What if my oven temperature is inaccurate?
A: This is the most common problem in home kitchens. Buy an oven thermometer (about $10) and place it inside your oven while preheating. If the actual temperature is different from the dial, adjust accordingly. If your oven runs 50°F hotter than the dial indicates, set the dial to 275°F (135°C) instead of 325°F (163°C). Temperature accuracy is more important than any other variable in this recipe.
Q: Can I use a different cream cheese brand?
A: Philadelphia is the standard for a reason—it has the optimal fat content and consistency. Neufchâtel (lower fat) will create a less creamy result. Store brands vary in quality. If Philadelphia is unavailable, use the highest-fat cream cheese you can find. Do not compromise on this ingredient.
Q: What if I do not have a springform pan?
A: You need a springform pan specifically because the water bath requires that you remove the cheesecake from the roasting pan without disturbing it. A regular cake pan would be difficult to work with in a water bath. Springform pans cost $8–15 and are worth the investment.
Q: Can I bake this cheesecake in a conventional oven instead of a preheated water bath?
A: Yes, but the texture will be slightly different. A water bath creates a gentler, more even cooking environment. A conventional oven (no water bath) will still work with the same time and temperature, but you are more likely to experience slight cracking. The water bath is the safer, more reliable method.
Q: How do I know if the cheesecake is done without a thermometer?
A: You will lose precision without a thermometer, but the visual cue is this: the edges should be fully set and slightly puffed, while the very center should still have a slight wobble (about the size of a quarter) when you gently jiggle the pan. Remove at that point and continue with the cooling protocol. But honestly, invest in an instant-read thermometer. They cost $12–20 and take the guesswork out entirely.
Q: Can I add toppings or swirls to the filling?
A: Yes, but add them before baking. Swirl in a fruit compote, chocolate sauce, or caramel at the very end of mixing, using just a few gentle folding motions. Do not over-mix. You want visible swirls, not a fully marbled filling. After baking, toppings (like fresh berries or a fruit coulis) can be added to individual slices at serving time.
Q: Why does my cheesecake taste slightly eggy?
A: This typically means the eggs were overcooked, which happens when you bake past 150°F (65°C) internal temperature. Eggs develop that sulfurous flavor when their proteins overcook. Use the thermometer to ensure you remove at exactly 150°F (65°C). Also, make sure you are using room-temperature eggs—cold eggs take longer to cook evenly and can develop off-flavors.
Related Recipes on Taste Pillar
🍰Overnight Cinnamon Rolls with Heavy Cream
🥐Cheesy Baked Chicken Quesadillas: The Crispy Trick You’ve Been Missing
☕ Flawless Butter Chicken Lasagna: The Creamy Indian-Italian Comfort Hack
🍫The 5-Minute Authentic Vietnamese Iced Coffee: The Bold Trick for a Flawless Brew!
The Ultimate New York Style Cheesecake: 3 Scientific Secrets to a Flawless, Crack-Free Surface
Ingredients
Equipment
Method
- STEP 1 – The Foundation: Graham Cracker Crust
- In a medium bowl, combine 1.5 cups (180g) finely ground graham cracker crumbs, 6 tablespoons (85g) melted unsalted butter, 2 tablespoons (25g) granulated sugar, and 0.25 teaspoon (1.5g) sea salt. Stir with a fork until the mixture resembles damp sand. Every crumb should be slightly moistened with butter, but the mixture should not be wet. Press this mixture firmly into the bottom of a 9-inch (23cm) springform pan using the bottom of a measuring cup. Compress it into a tight, even layer. The crust should be compact enough to hold together, but not so dense that it becomes hard. Do not press the crust up the sides—keep it on the bottom only. This prevents the crust from rising into the filling during baking. Set the prepared pan aside.
- STEP 2 – The Filling: Room Temperature Precision
- Remove 32 ounces (900g) of Philadelphia cream cheese from the refrigerator. Let it sit at room temperature for 30 minutes. Room temperature cream cheese blends smoothly and incorporates less air than cold cream cheese, which is critical for a crack-free surface. Add the room-temperature cream cheese to a stand mixer bowl. Beat at low speed for exactly 2 minutes. Stop immediately. Over-beating incorporates air, which creates bubbles that expand when heated and form cracks during cooling. Add 1 cup (200g) of granulated sugar. Beat at low speed for 1 minute until the sugar is incorporated. The mixture should look smooth and light, but not whipped. Add 4 large room-temperature eggs one at a time. After each egg, beat for just 30 seconds at low speed. Stop. Do not over-mix. Add 1 cup (240ml) sour cream and 1 teaspoon (5ml) Nielsen-Massey vanilla extract. Beat for 30 seconds at low speed. Stop mixing immediately. The filling should be smooth and creamy, but never whipped or airy.
- STEP 3 – Water Bath Setup: Thermal Protection
- Wrap the outside of the springform pan (bottom and all sides) with heavy-duty aluminum foil. Make sure the foil goes up the sides at least 2 inches (5cm) and covers the bottom completely. This prevents water from seeping into the crust. Place the wrapped springform pan inside a larger roasting pan (at least 3 inches / 7.5cm deep). Pour hot water into the roasting pan until it reaches halfway up the sides of the springform pan (about 1.5–2 inches / 4–5cm of water). This water bath will maintain an even, gentle heat around the cheesecake, preventing the rapid temperature differential that causes cracks.
- STEP 4 – The Oven Bake: Precision Temperature Control
- Preheat your oven to 325°F (163°C) for 15 minutes. Use an oven thermometer to verify the actual temperature. Many home ovens run 25–50°F hotter than the dial indicates. Carefully place the roasting pan (with the springform pan inside) into the preheated oven. Make sure the roasting pan is stable and level so water does not spill. Bake for exactly 75 minutes. Do NOT open the oven door during this time. Opening disrupts the temperature and causes uneven cooking. At the 65-minute mark, insert an instant-read thermometer horizontally through the center of the cheesecake (not touching the water bath below). At exactly 150°F (65°C) internal temperature, remove the cheesecake from the oven immediately. Do NOT bake past 150°F. Overcooking squeezes water out of proteins, causing dryness and cracks during cooling.
- STEP 5 – The Cooling Protocol: Preventing Thermal Shock
- Turn off the oven. Crack the door open about 2–3 inches (5–7cm) for 5 minutes. The oven is still warm, and the slightly open door allows the temperature to equalize slowly. After 5 minutes, open the oven door all the way and cool for another 5 minutes. Carefully remove the roasting pan from the oven using oven mitts. The water is still hot. Set it on the counter but be careful not to spill the water. Let the cheesecake sit in the roasting pan for 10 minutes. During this time, the water slowly cools and the cheesecake continues to cool gradually. Remove the springform pan from the roasting pan. Remove the aluminum foil. Place the cheesecake (still in the springform pan) on the counter. Let it sit at room temperature for another 5–10 minutes. Then refrigerate for at least 6 hours (overnight is ideal). This gradual cooling protocol ensures that the interior and exterior cool at approximately the same rate, preventing thermal shock and cracks.
- STEP 6 – Final Preparation: Release and Serve
- After at least 6 hours of refrigeration (overnight is best), remove the cheesecake from the refrigerator. Run a thin, warm knife around the inside edge of the springform pan to loosen the cheesecake from the sides. Carefully release the springform latch and remove the outer ring. Let the cheesecake come to room temperature for 15 minutes before slicing. This allows the creamy center to express itself. Slice with a hot, wet knife (wipe between slices) for the cleanest cuts. Serve with fresh berries, fruit compote, or simply on its own.
Notes
Calculated using USDA FoodData Central for Philadelphia cream cheese,
 large eggs, sour cream, and graham crackers. Values represent 1/12
of the total cheesecake. High fat content provides the creamy texture.
 This is a dessert designed for small portions—it is rich and deeply
 satisfying.


5 Comments on “The Ultimate New York Style Cheesecake: 3 Scientific Secrets to a Flawless, Crack-Free Surface”