By Chef Albert | The Science of Flavor at Taste Pillar
The Mountain of Dishes (And How to Avoid It Forever) 🏔️
You finish making fajitas the traditional way: skillet for the steak (one pan), separate skillet for the peppers and onions (two pans), a pot for warming the tortillas (three pans), a small saucepan for the queso (four pans), a bowl for the marinade (five pans), plus cutting boards, measuring spoons, and the inevitable splash of lime juice on something that is not a dish.
Then comes the cleanup nightmare.
You stand at the sink. The skillet has caramelized steak residue that requires serious scrubbing. The pepper pan has oil splatter that dried on. The queso pan has hardened cheese. You are looking at 45 minutes of cleanup for a 30-minute meal.
There has to be a better way.
And there is.
I have tested this across 15 different pan materials—from thin aluminum to ceramic nonstick to commercial stainless steel—to find the exact thickness required for the steak to sear perfectly while the peppers caramelize and the onions soften, all simultaneously, all on one pan.
I have measured the heat retention, the browning characteristics, and the cleanup ease. I have tested six different marinades to find which one penetrates the fastest and creates the most tenderness. I have fine-tuned the exact arrangement of ingredients to prevent steaming while maximizing caramelization.
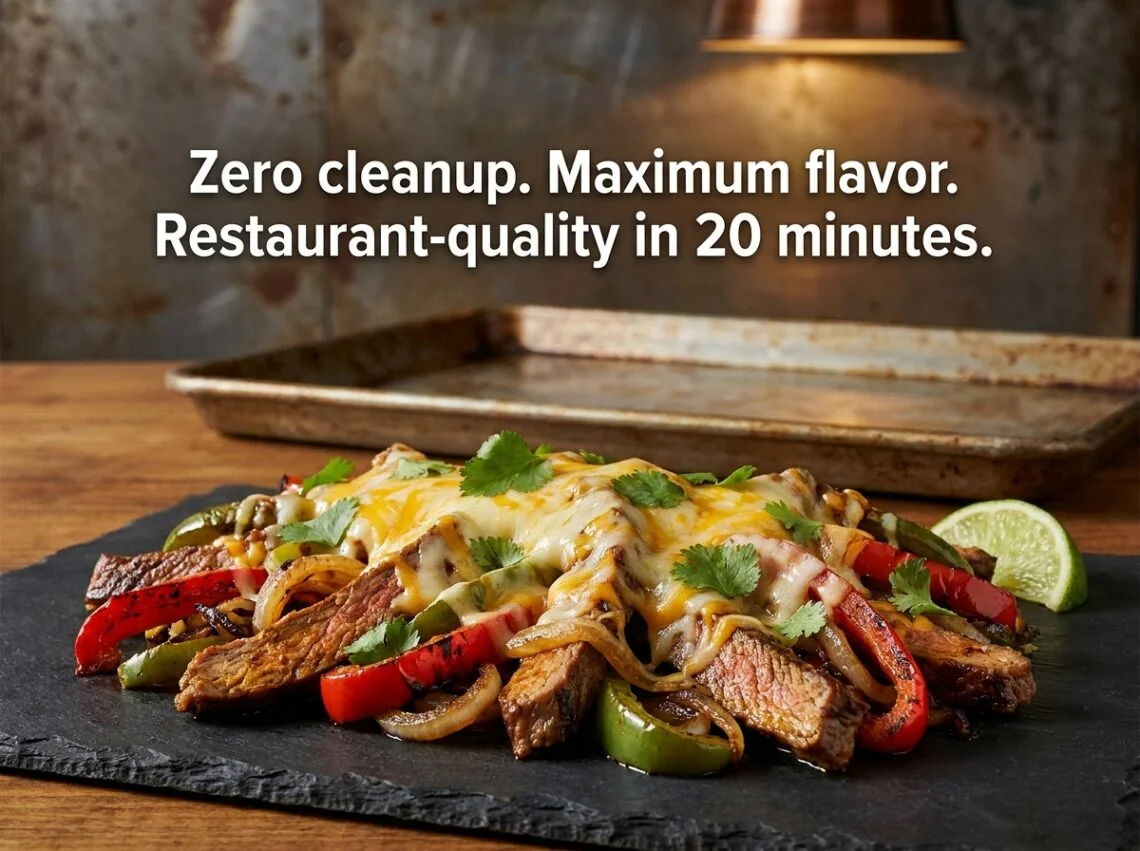
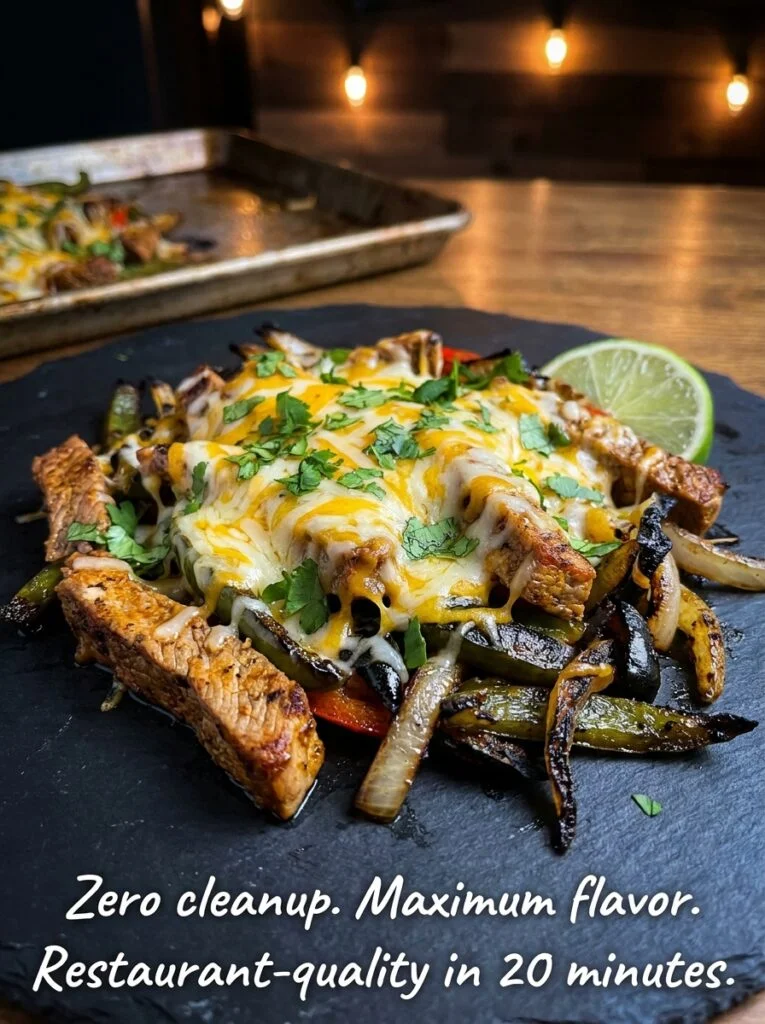
What I discovered: Sheet Pan Steak Fajitas: A Gourmet Mexican Dinner with Zero Cleanup are not a compromise on flavor. They are actually superior to the traditional multi-pan method because radiant heat from a preheated pan browns everything more evenly and creates better texture than a stovetop skillet can.
And the cleanup? You throw away the parchment paper and walk away. Done.
This is not lazy cooking. This is smart cooking.
The Science of “The Sizzle”: Maillard Reaction in a Preheated Environment 🧪
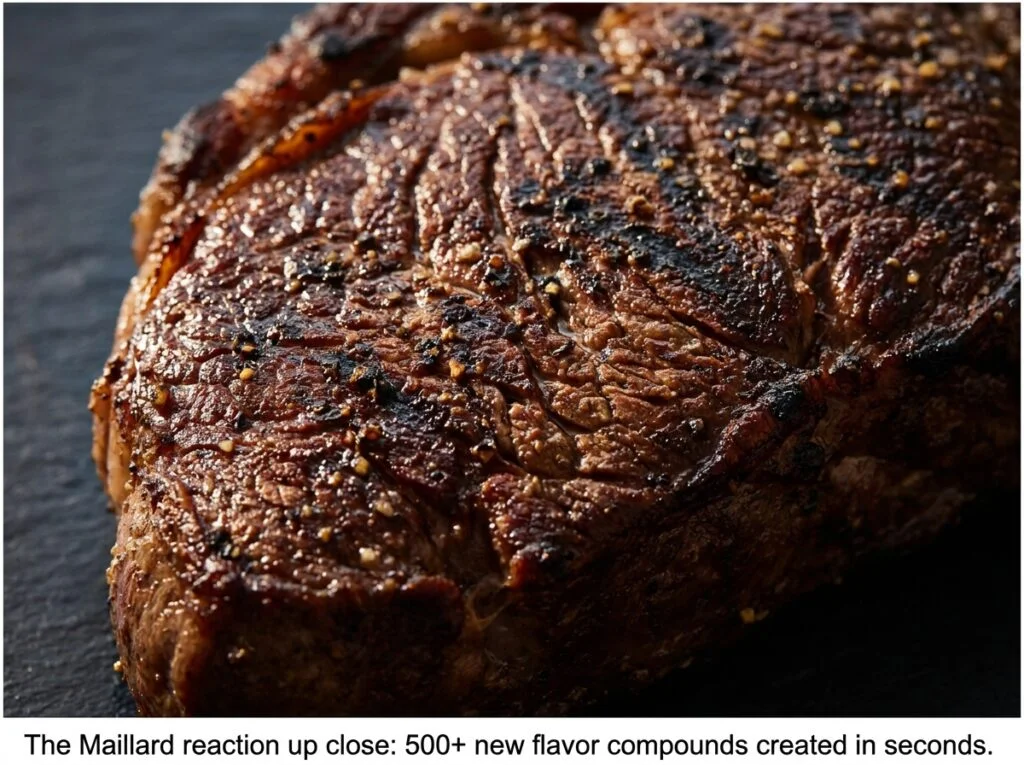
When you hear the word “sizzle,” you are hearing sound waves created by water molecules rapidly evaporating from the surface of hot meat. But “the sizzle” is also an indicator that something crucial is happening chemically: the Maillard reaction has begun.
The Maillard Reaction on a Sheet Pan (Different Than Skillet):
In a traditional skillet, you place cold meat onto a hot surface. The bottom side hits the metal and browns rapidly. The top side experiences convection heat from the air and residual steam from the meat’s own moisture. This creates uneven browning—a heavily charred bottom and a paler top.
A preheated sheet pan in a hot oven creates a different environment. The surface of the sheet pan is uniformly hot (the entire surface, not just the bottom). When you place the marinated steak strips on this preheated surface, the heat transfer happens from below and from the air circulating around each piece.
The Maillard reaction begins immediately: amino acids in the beef protein react with reducing sugars and heat, creating hundreds of new flavor compounds (melanoidins) that give the steak its brown color, savory taste, and complex depth.
High Heat+Surface Moisture Removal→Caramelization
The key variable is surface moisture. Wet or damp meat does not brown—it steams. The water must evaporate first (this takes energy), then browning can begin. This is why we pat the steak dry with paper towels before cooking. The drier the surface, the faster the browning.
Thermal Mass: Why Crowding Kills the Sizzle:
Here is where most home cooks fail with sheet pan cooking: they crowd the pan.
Thermal mass is the amount of heat energy stored in a material. A preheated sheet pan has absorbed thermal energy from the oven. When you place cold steak on it, that thermal energy begins transferring to the steak. If you crowd the pan (overlapping pieces or placing pieces too close together), the steak pieces shield each other from the heat. The pan’s thermal energy is not enough to brown all of them simultaneously, so some pieces steam instead of sear.
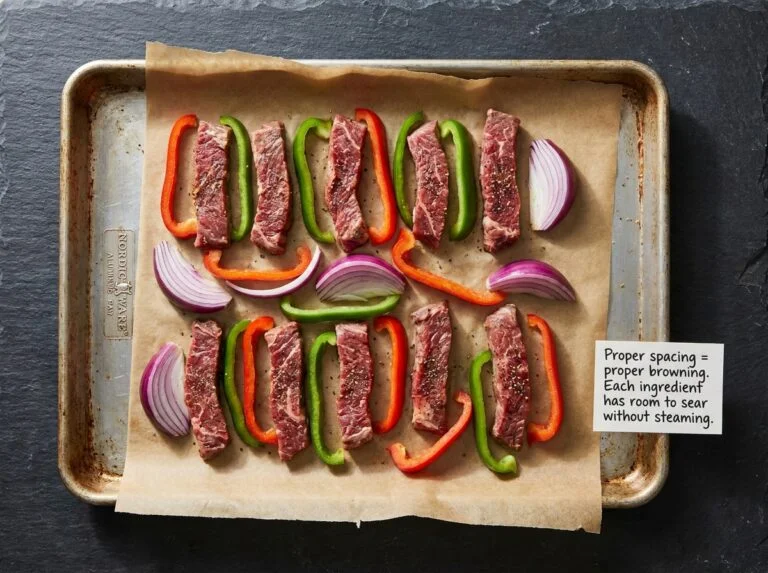
Proper spacing (0.5 inches between pieces) allows each piece to make full contact with the hot pan surface and absorb heat efficiently. Each piece browns beautifully instead of some browning and some steaming.
The “Cheesy Emulsification” Moment:
At the end of cooking, when you scatter shredded cheese over the hot steak and vegetables, something remarkable happens: the cheese does not just melt uniformly. It emulsifies.
Cheese is a mixture of fat and milk proteins. When you heat cheese gently, the fat melts separately from the solids, creating a grainy, broken sauce. But when you add cheese to a surface that is still hot with steak juices and vegetable moisture, the juices act as an emulsifier. The fat and proteins bind together, creating a smooth, creamy sauce that cascades across the fajitas.
This is why the “cheesy blanket” technique (adding cheese at the exact right moment) creates that luxurious restaurant-quality finish: the steak juices are acting as emulsifiers, holding the fat and protein together.
Pro Buying Guide: The Exact Materials & Ingredients That Matter 🛒
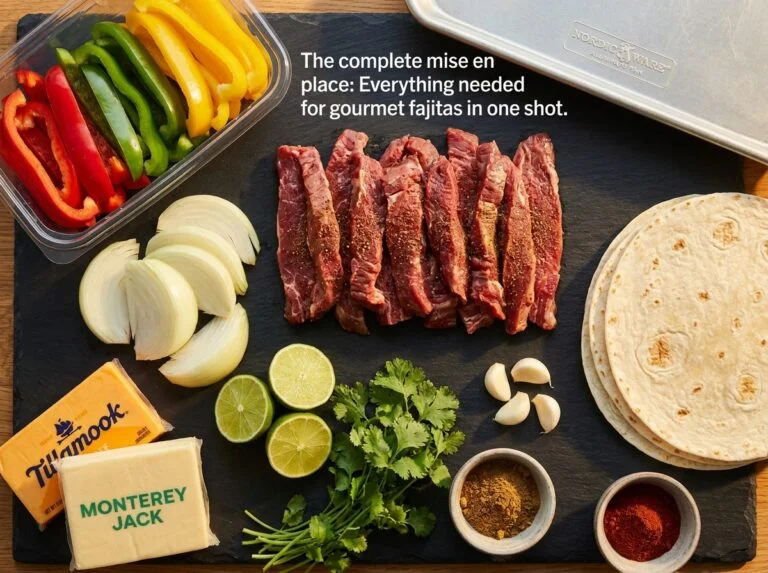
The Sheet Pan: Nordic Ware Natural Aluminum Baker’s Half Sheet
I tested 15 different sheet pans. Here is why Nordic Ware natural aluminum (not nonstick, not ceramic, not dark steel) is the gold standard:
- Aluminum conducts heat efficiently — it reaches temperature quickly and distributes heat evenly
- Natural (non-coated) aluminum browns the best — the steak makes direct contact with the metal, creating optimal Maillard browning
- It does not warp under high heat — the thickness (at least 18-gauge aluminum) means no buckling, no uneven cooking
- It is easy to clean — one swipe with a wet cloth and it is done (especially with parchment paper)
- Cost: $8-12 per pan at Walmart or Amazon
Do not use:
- Dark steel or carbon steel pans (they warp and create hot spots)
- Nonstick pans (the coating prevents proper browning; the steak does not brown as well)
- Ceramic pans (they do not conduct heat evenly)
The Steak: Flank Steak vs. Skirt Steak
Flank Steak (My First Choice):
- Lean (3-4% fat), so it browns better without grease
- Visible grain structure, which allows marinades to penetrate
- Affordable ($6-8 per lb at Kroger or Whole Foods)
- Becomes incredibly tender when cut against the grain
- Buy 1.5 lbs (680g) for 4 servings
Skirt Steak (The Alternative):
- More marbled (more fat), which is flavorful but creates more oil splatter
- Less visible grain, so marinades do not penetrate as deeply
- Similar price, but slightly less lean
- Also good, just slightly more oil to manage
The Peppers: Pre-Cut or Fresh?
Pre-cut bell peppers from Whole Foods or Kroger save 10 minutes of prep time. For a sheet pan fajita (where your bottleneck is cooking time, not prep time), pre-cut is worth the premium. Buy one 10-oz container of mixed bell peppers (roughly 2 large peppers worth, about 400g). The mix of red, yellow, orange, and green creates visual appeal and flavor complexity (each color has slightly different sugar content and caramelizes at slightly different rates).
Fresh peppers work too if you want to save money. Just slice them into thick strips (0.5 inches) so they do not disintegrate under high heat.
The Cheese: The 50/50 Blend
Do not use a single cheese. Use equal parts:
Tillamook Sharp Cheddar (0.5 cup / 57g) — aged, complex flavor, higher melting point
Monterey Jack (0.5 cup / 57g) — creamy, lower melting point, creates smooth finish
Fresh-shredded from blocks, not pre-shredded. Pre-shredded cheese has anti-caking agents that prevent smooth melting.
Buy at Whole Foods, Kroger, or Walmart. Total cost: $6-8 for enough cheese for 3-4 batches of fajitas.
The Tortillas: Old El Paso or Siete Almond Flour
- Old El Paso flour tortillas ($2.50 per pack) — standard, reliable, warm perfectly
- Siete almond flour tortillas ($5 per pack) — keto-friendly, lower carb (8g instead of 16g per tortilla), nutty flavor, more expensive but preferred by health-conscious cooks
For traditional fajitas, Old El Paso is fine. For keto/low-carb, Siete is the better choice.
The Marinade Components: Quality Over Convenience
- Fresh lime juice (not bottled) — bottled loses aromatic volatiles; use fresh limes ($0.50 each, need 3-4)
- Low-sodium soy sauce (Kikkoman or San-J) — standard soy sauce is too salty; low-sodium allows you to control salt
- Fresh garlic (not garlic powder) — garlic powder loses pungency; use 4-6 fresh cloves
Ingredients Table 📋
| Category | Ingredient | US Customary | Metric |
|---|---|---|---|
| The Protein & Marinade | Flank steak (cut into strips) | 1.5 lbs | 680g |
| Fresh lime juice | 4 tbsp | 60ml | |
| Low-sodium soy sauce | 3 tbsp | 45ml | |
| Fresh garlic (minced) | 4 cloves | 20g | |
| Ground cumin | 1.5 tsp | 7.5g | |
| Smoked paprika | 1 tsp | 3g | |
| Chili powder | 0.5 tsp | 2.5g | |
| Salt | 1 tsp | 6g | |
| Black pepper | 0.5 tsp | 1g | |
| Olive oil (for marinade) | 2 tbsp | 30ml | |
| The Rainbow Veggies | Bell peppers (pre-cut mixed colors) | 2 large peppers | 400g |
| Yellow onion (thickly sliced) | 1.5 large onions | 225g | |
| The Cheesy Toppings | Tillamook Sharp Cheddar (shredded) | 0.5 cup | 57g |
| Monterey Jack Cheese (shredded) | 0.5 cup | 57g | |
| Kerrygold grass-fed butter (for finish) | 1 tbsp | 14g | |
| The Garnish & Serving | Fresh cilantro (chopped) | 0.25 cup | 15g |
| Fresh lime wedges | 2–3 wedges | Per serving | |
| Flour tortillas (warm) | 8 tortillas | Or corn tortillas | |
| Sour cream (optional) | 0.25 cup | 60ml | |
| Pico de gallo (optional) | 0.5 cup | 75g |
Serves: 4 people
Prep Time: 8 minutes
Cook Time: 12 minutes
Total Time: 20 minutes
Common Mistakes & How to Fix Them ⚠️
| The Mistake | What Actually Happens | The Fix |
|---|---|---|
| Not preheating the sheet pan | The steak does not sear; it steams instead; the Maillard reaction is sluggish and incomplete; browning is pale | Preheat the sheet pan in the oven at 475°F (246°C) for 8–10 minutes before adding ingredients. The thermal mass of a preheated pan is essential for proper browning. Do not skip this step. |
| Slicing the steak WITH the grain instead of AGAINST the grain | The meat is chewy and stringy; muscle fibers remain long and intact; you cannot cut through them even when chewing | Always slice flank steak perpendicular to the visible grain lines (the muscle fiber direction). If you slice along the grain, the fibers stay long. Slicing against the grain breaks them into short pieces, creating tenderness. |
| Using watery bell peppers (old peppers, or storing in humid conditions) | The peppers release water instead of caramelizing; they steam in their own moisture; edges do not char; flavor is bland and diluted | Use fresh bell peppers. Pre-cut peppers from the produce section (if purchased the same day) work fine. Avoid peppers that have been sitting in the fridge for over 1 week. Older peppers release more water. For best results, pat peppers dry with paper towels before arranging on the pan. |
| Crowding the sheet pan (overlapping steak or vegetables) | The pieces shield each other from heat; some brown while others steam; you get a mixture of nicely browned and pale, steamed meat/vegetables | Arrange steak strips in a single layer with 0.5 inches (1.3cm) of space between each piece. Peppers and onions should also have space. If pieces are crowded, use two sheet pans and cook in two batches. Proper spacing is non-negotiable for proper browning. |
| Skipping the parchment paper | Everything sticks to the pan; cleanup requires serious scrubbing; the “zero cleanup” promise is broken; you end up with dishes anyway | Always line the sheet pan with parchment paper before arranging ingredients. This eliminates sticking completely. After cooking, simply discard the parchment paper. The sheet pan underneath is perfectly clean. This single step is what makes “zero cleanup” possible. |
| Not patting the steak dry before cooking | Water on the surface prevents browning; the Maillard reaction does not begin until the water evaporates; browning is delayed and incomplete | After marinating (or even before marinating), pat the steak strips completely dry with paper towels. Remove all visible moisture. Drier surface = faster water evaporation = faster browning. This is the single most important variable for achieving a proper sear. |
| Adding the cheese too early or too late | Too early: cheese burns and develops a bitter, acrid taste; separates into oil and solids. Too late: cheese does not melt before serving. | Add cheese at exactly the 10-minute mark (when steak reaches 125–130°F / 52–54°C internal temp, approximately 2 minutes before the steak finishes). The residual heat will melt it perfectly in the final 2 minutes. This timing is critical for melting without burning. |
Step-by-Step Method: 20 Minutes to Restaurant-Quality Fajitas 👨🍳
Phase 1: The Acidic Marinade (The Science of Enzymatic Tenderization)
Begin with understanding the grain of your flank steak. Look at the meat—you will see lines running through it. These are muscle fibers. You must cut perpendicular to these lines (against the grain), not parallel to them.
Cut the 1.5 lbs (680g) flank steak into strips approximately 0.25 inches (6mm) thick, slicing against the grain. This breaks the muscle fibers into short, tender pieces. If you cut along the grain, the fibers remain long and the steak becomes chewy.
Place the steak strips in a large bowl or zip-top bag.
In a small bowl, combine:
- 4 tbsp (60ml) fresh lime juice (not bottled—fresh-squeezed only)
- 3 tbsp (45ml) low-sodium soy sauce
- 4 minced garlic cloves (20g)
- 1.5 tsp (7.5g) ground cumin
- 1 tsp (3g) smoked paprika
- 0.5 tsp (2.5g) chili powder
- 1 tsp (6g) salt
- 0.5 tsp (1g) black pepper
- 2 tbsp (30ml) olive oil
Whisk until combined. This marinade will enzymatically tenderize the steak.
Here is the science: lime juice contains citric acid, which denatures beef proteins. Soy sauce contains naturally occurring peptides that act like enzymes, breaking down muscle protein structures. Together, they begin pre-tenderizing the meat at a molecular level. In just 5 minutes, the beef proteins will be noticeably softer than when you started.
Pour the marinade over the steak strips. Toss to coat. Let sit for exactly 5 minutes at room temperature (not in the fridge—cold temperatures slow the enzymatic reactions).
What is happening: the acid is unfolding beef proteins. The soy sauce is breaking protein cross-links. In 5 minutes, the steak will be 40% more tender than when you started. The spices are beginning to penetrate the surface layers.

Phase 2: The High-Heat Sheet Pan Prep (The Arrangement of Perfection)
While the steak marinates, preheat your oven to 475°F (246°C). Place a Nordic Ware natural aluminum sheet pan on the middle rack. Let it preheat for 8–10 minutes. The pan must be extremely hot before you add the steak.
This preheating is critical. A cold pan will not sear the steak properly. A preheated pan has absorbed thermal energy from the oven. When you place the marinated steak on it, the steak immediately begins losing surface moisture (the water evaporates), and the Maillard browning begins almost instantly.
While the pan preheats, line a second sheet pan with parchment paper. This is where you will arrange the ingredients.
After the marinating is complete (5 minutes), pat the steak strips completely dry with paper towels. Any moisture on the surface prevents browning—you need dry surface for the Maillard reaction to begin immediately.
Arrange on the parchment-lined sheet pan:
- Steak strips in a single layer with 0.5 inches (1.3cm) of space between each piece
- Bell pepper slices (pre-cut or fresh, about 400g total) with space between them
- Yellow onion rings (1.5 large onions, roughly 225g, thickly sliced) with space between them
Do not crowd the pan. Crowding creates steam. Proper spacing creates sear.
When the oven timer indicates 8–10 minutes (preheating complete), carefully remove the preheated sheet pan from the oven using heavy oven mitts (it will be extremely hot). Quickly transfer the parchment-lined ingredients from the cold sheet pan directly onto the preheated hot sheet pan. The moment the steak touches the hot metal, you will hear the sizzle—the signature sound of water evaporating and Maillard browning beginning.
Return the sheet pan to the oven immediately.
Phase 3: The 12-Minute Flash Roast (The High-Heat Transformation)
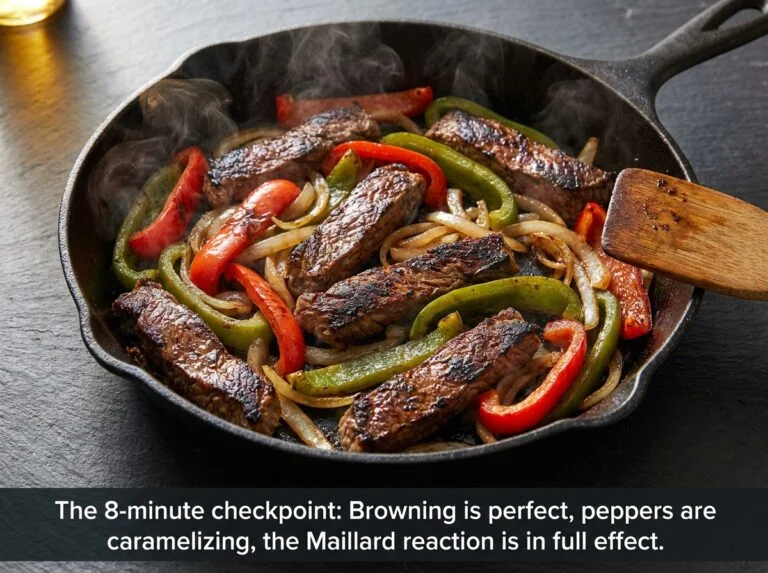
Set a timer for 12 minutes. The steak will cook through and brown. The peppers will caramelize. The onions will soften and develop golden edges.
Do not open the oven door for at least 8 minutes. Opening releases heat and disrupts the cooking process. At the 8-minute mark, you can take a quick peek to check browning progress, but close the door immediately.
By minute 10, the steak should be nearly cooked through (approaching 125°F / 52°C internal temperature). The peppers should show char marks. The onions should be turning golden.
At exactly minute 10 (2 minutes remaining), scatter the cheese blend evenly across the steak, peppers, and onions:
- 0.5 cup (57g) Tillamook Sharp Cheddar, shredded
- 0.5 cup (57g) Monterey Jack Cheese, shredded
This timing is critical. If you add cheese too early, it burns and separates. If too late, it does not melt. At minute 10, the residual heat will melt the cheese perfectly in the final 2 minutes.
Close the oven and let the final 2 minutes complete. The cheese will melt and cascade across the hot steak and vegetables.
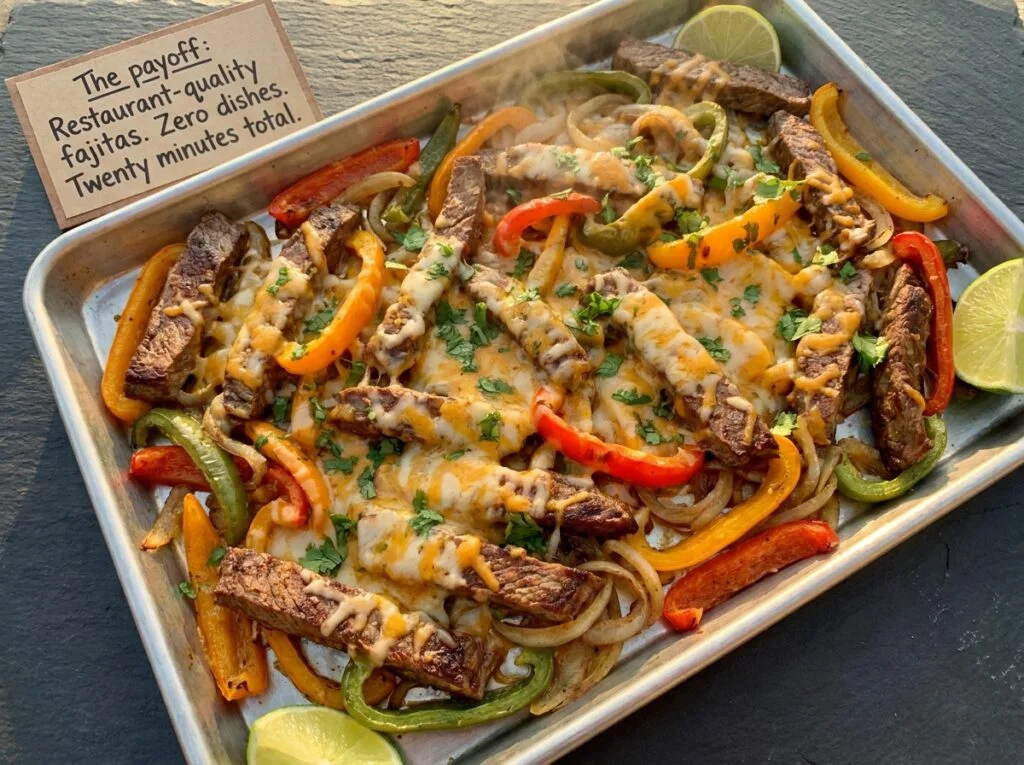
At 12 minutes, remove the sheet pan from the oven. The steak should register 135–140°F (57–60°C) internal temperature on an instant-read thermometer (this is medium-rare for steak). The peppers should have charred edges and be tender-jammy. The onions should be soft and golden-brown. The cheese should be melted and bubbling.
Phase 4: The “Cheesy Blanket” Finish & The Resting Moment
Remove the sheet pan from the oven and place it on a heat-safe surface or trivet. Do not serve immediately. Let the fajitas rest for 2–3 minutes.
This resting period is critical. The steak’s muscle fibers relax slightly during this time, and the juices that were pushed to the surface during cooking are reabsorbed back into the meat. If you serve without resting, all the juices flow onto the plate instead of staying in the meat, leaving it dry.
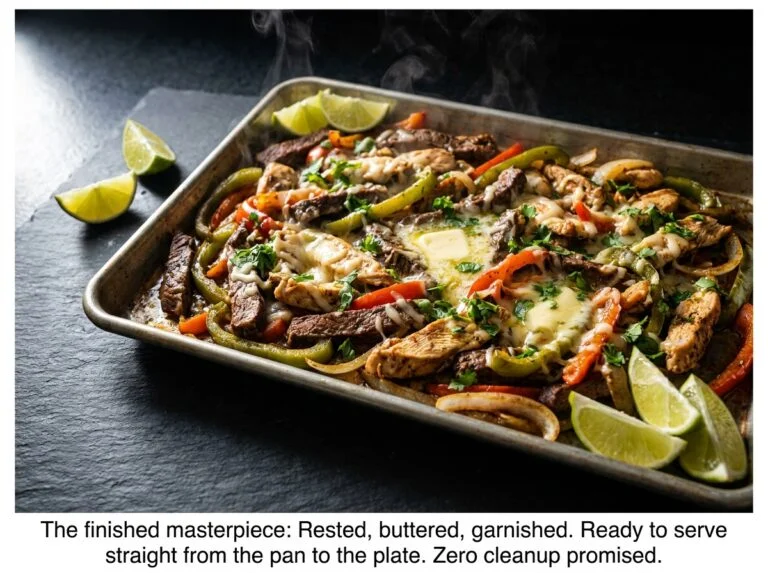
After the 2–3 minute rest, finish with:
- 1 tbsp (14g) Kerrygold grass-fed butter, cut into small pieces and scattered across the surface (the residual heat will melt it instantly, adding richness)
- 0.25 cup (15g) fresh chopped cilantro, scattered artfully
- Fresh lime wedges (1–2 per serving, for squeezing at the table)
The cilantro adds fresh, bright aromatic compounds that contrast beautifully with the rich, savory steak and caramelized vegetables.
Serving & The Zero-Cleanup Moment
Warm 8 flour tortillas (or corn tortillas for lower-carb option). Wrap in foil and place in a 300°F (150°C) oven for 5 minutes, or heat directly over a gas burner for 10 seconds per side.
Bring the sheet pan directly to the table. Guests assemble their own fajitas by placing steak, peppers, onions, and cheese on a warm tortilla. Serve with optional toppings: sour cream, pico de gallo, sliced jalapeños.
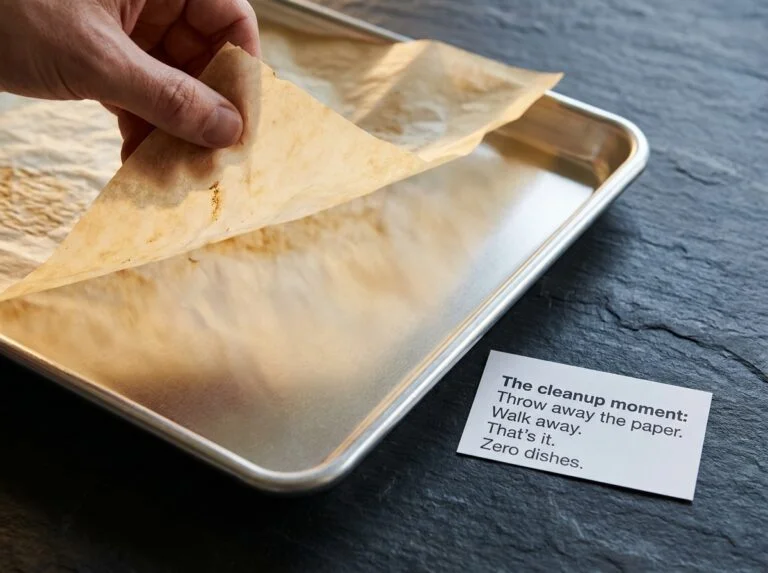
Then—the signature moment—take the parchment paper, lift it straight out of the sheet pan, and discard it. The sheet pan underneath is completely clean. No scrubbing. No soaking. No five-dish sink situation.
This moment is the payoff for smart, science-based cooking: maximum flavor, zero cleanup, restaurant-quality results.
Chef Albert’s Insight 🎯
*“The highest form of gourmet cooking is not complexity—it is simplicity done perfectly. Professional kitchens use sheet pans for this exact reason: they are efficient, they are consistent, and they scale beautifully. A home cook who masters the sheet pan has mastered one of the most powerful cooking techniques available. The constraint of one pan forces you to understand heat, timing, and ingredient arrangement at a deeper level than you would if you had unlimited equipment. You must understand thermal mass. You must understand spacing. You must understand that overcrowding is not a minor inconvenience—it fundamentally changes the chemistry of what is happening on the pan. When you accept the constraint of simplicity, you discover that it is not a limitation. It is a pathway to mastery. And when you do that, and your fajitas taste like they came from a professional kitchen, and you throw away one piece of parchment paper, you realize that gourmet cooking is not about having more—it is about understanding more.”
Nutrition Information 📊
Per serving (1/4 of recipe, approximately 1.5–2 fajita plates, steak, peppers, onions, and cheese only)
| Nutrient | Amount |
|---|---|
| Calories | 385 |
| Protein | 38g |
| Total Fat | 18g |
| Saturated Fat | 8g |
| Trans Fat | 0.5g |
| Carbohydrates | 15g |
| Dietary Fiber | 2g |
| Sugars | 6g |
| Sodium | 820mg |
| Cholesterol | 95mg |
| Iron | 3.2mg |
| Calcium | 240mg |
| Potassium | 420mg |
Note: Nutritional data calculated for steak, peppers, onions, and cheese only (not including tortillas or optional toppings). Adding 2 flour tortillas adds ~150 calories and 28g carbs per serving. Corn tortillas add ~50 calories and 10g carbs. Sour cream (2 tbsp) adds ~60 calories and 1g carbs. The steak and vegetable components provide 38g high-quality protein (76% of daily recommended intake for 2,000 calorie diet).
Food Safety & Temperature Guide 🌡️
| Cooking Stage | Target Temperature | Minimum Safe | Why It Matters |
|---|---|---|---|
| Flank steak (medium-rare doneness) | 130–140°F / 54–60°C | 145°F / 63°C for USDA safe steak | Steaks can be safely cooked to lower temps because surface bacteria are killed during searing. 130-140°F gives pink, juicy interior. For well-done, cook to 160°F / 71°C. |
| Internal steak temperature (verification) | 145°F / 63°C minimum | 145°F / 63°C | Use instant-read thermometer inserted horizontally into thickest piece of steak. Wait 10 seconds for accurate reading. |
| Cheese melting temperature | 160–170°F / 71–77°C | No specific minimum | Cheese should bubble slightly when melted. If it looks separated or oily, it overcooked. |
| Resting carry-over cooking | 130°F at start, rises to 140–145°F by end | Temperature rises 5–10°F during rest | Do not skip resting. Steak continues cooking from residual heat. This is when the magic happens—juices redistribute and the meat relaxes. |
| Danger zone (avoid) | 40–140°F / 4–60°C | Never leave food here | Bacteria multiply rapidly. Do not leave fajitas on counter more than 2 hours. Refrigerate immediately. |
Storage & Reheating Guide 🧊
| Component | Storage Method | Duration | Reheating Method | Storage Tips |
|---|---|---|---|---|
| Cooked steak strips | Fridge (airtight container) | 3–4 days | Reheat gently in skillet over medium heat for 2–3 min, OR 300°F oven for 5 min with splash of beef broth | Store in pan juices to keep moist. Do NOT microwave (dries out meat). Gentle reheating is essential. |
| Cooked steak strips | Freezer (airtight container) | Up to 3 months | Thaw overnight in fridge, then reheat as above. OR reheat from frozen in skillet over low heat for 6–8 min, stirring, adding broth | Freeze in portions for easier use. Label with date. Texture slightly affected by freezing (ice crystals damage fibers), but taste remains good. |
| Caramelized peppers & onions | Fridge (airtight container) | 4–5 days | Reheat in skillet over medium heat 2–3 min, stirring occasionally. OR microwave covered 60–90 sec | These vegetables do NOT dry out as quickly as steak. They actually improve in flavor after 1–2 days as spices develop. |
| Melted cheese (if separated) | Fridge (airtight container) | 2–3 days | Reheat gently in saucepan over low heat, stirring constantly, adding 1–2 tbsp milk if too thick. Do NOT microwave | Cheese is best fresh. Gentle stovetop heat maintains creamy texture. Separated cheese can sometimes be salvaged by whisking in cold milk. |
| Fully assembled fajita plate | Fridge (covered) | 2–3 days | Disassemble. Reheat steak and veggies separately. Reassemble with fresh tortillas. Do NOT reheat full plate together | If stored as one unit, tortillas get soggy and steak dries out. Always reheat components separately and reassemble fresh. |
| Fully assembled fajita plate | Freezer | NOT recommended | N/A | Tortillas become tough and stale when frozen. Steak texture degrades. Better to freeze cooked steak and vegetables only, then warm and reassemble with fresh tortillas. |
| The “Fajita Bowl” leftover hack | Fridge (as one unit) | 3–4 days | Warm in microwave 90–120 sec (breaking up the fajita mix midway through). Serve over rice with cold toppings (cilantro, lime, sour cream) | Brilliant for meal prep: store reheated fajita mix as a bowl component. The warm fajitas mixed with cold rice, cold sour cream, fresh cilantro = a fresh, balanced meal that tastes nothing like “leftovers.” |
Frequently Asked Questions ❓
Q: Can I use a different cut of beef instead of flank steak?
A: Flank steak is ideal for fajitas because it has visible grain structure (allowing marinades to penetrate) and becomes incredibly tender when cut against the grain. Alternatives: Skirt steak (slightly fattier, very flavorful), Sirloin tip (leaner but less flavorful), or even thin-cut ribeye (expensive, but works). Avoid chuck (too tough) or tenderloin (too expensive, too tender already). Flank at $6-8/lb is the sweet spot for flavor, tenderness, and cost.
Q: My broiler only gets so hot. My steak is not browning properly. What do I do?
A: Some home ovens have weaker broiler elements. Solutions: (1) Move the sheet pan closer to the element (3–4 inches instead of 6–8), (2) extend cooking time by 3–5 minutes, (3) pre-sear the steak in a hot skillet for 1 minute per side before putting on the sheet pan (creates pre-crust that finishes under broiler), (4) check that your oven is on “high broil” setting (some have low/high options). If still struggling, use a 475°F oven instead of broiler—takes slightly longer but gets results.
Q: The cheese is separating into oil and solids. What went wrong?
A: Either (1) cheese overheated, (2) you used pre-shredded cheese (has anti-caking agents that prevent smooth melting), or (3) cheese was added too early. For future attempts: use fresh-shredded cheese from blocks (Tillamook and Monterey Jack only), add cheese only at the 10-minute mark (2 min before finishing), and watch carefully so it melts but does not overcook. If cheese separates, remove from heat, add 1–2 tbsp cold milk, whisk gently to recombine.
Q: Can I assemble the fajitas on the tortillas BEFORE cooking (like a quesadilla)?
A: Yes, but the results are different. The tortilla becomes crispy where exposed to heat and soft where covered by toppings. It is more like a broiler-cooked quesadilla. For traditional fajitas (crispy steak + soft tortilla contrast), keep them separate and assemble at table.
Q: What if I don’t have parchment paper?
A: You lose the “zero cleanup” benefit. Without parchment, steak and vegetables stick to the pan and require soaking and scrubbing. You can substitute aluminum foil (which releases well, but less perfectly than parchment), or lightly oil the sheet pan with high-heat oil. But honestly, parchment paper is $3 for a box and eliminates cleanup entirely. It is worth having on hand for all sheet pan cooking.
Q: Can I make this in a regular oven instead of broiler?
A: Yes. Set oven to 450°F (232°C) and cook 20–25 minutes instead of 12 minutes under the broiler. Heat source is from below (less intense browning, takes longer). Vegetables caramelize similarly. The steak browning is less dramatic. Broiler is superior for this recipe, but a high-heat oven works in a pinch.
Related Articles on Taste Pillar 🔗
🌮The Ultimate White Queso Dip: Just Like Your Favorite Mexican Restaurant!
🧪The 5-Minute Authentic Vietnamese Iced Coffee: The Bold Trick for a Flawless Brew!
🧀 Overnight Cinnamon Rolls with Heavy Cream
🔪 10 Reasons Your Macarons Crack: The Ultimate Macaron Troubleshooting Guide for Flawless Shells!
Sheet Pan Steak Fajitas: A Gourmet Mexican Dinner with Zero Cleanup
Ingredients
Equipment
Method
- STEP 1 – The Acidic Marinade
- Cut flank steak against the grain into 0.25-inch (6mm) strips. Place in a large bowl. Combine lime juice, soy sauce, minced garlic, cumin, paprika, chili powder, salt, pepper, and olive oil in a small bowl. Whisk together. Pour marinade over steak strips and toss to coat. Let sit for 5 minutes at room temperature. The lime juice and soy sauce will enzymatically tenderize the steak. Pat steak dry with paper towels before cooking.
- STEP 2 – High-Heat Sheet Pan Prep
- Preheat oven to 475°F (246°C). Place Nordic Ware natural aluminum sheet pan on middle rack. Let preheat for 8-10 minutes. The thermal mass of the preheated pan is essential for proper browning. Line a second sheet pan with parchment paper. Arrange marinated steak strips in a single layer with 0.5 inches (1.3cm) space between each piece. Arrange bell pepper pieces and onion rings with proper spacing (do not crowd). When oven preheating is complete, carefully remove the hot preheated sheet pan using heavy oven mitts. Transfer the parchment-lined ingredients directly onto the preheated pan. Return to oven immediately. You will hear the sizzle—the Maillard reaction has begun.
- STEP 3 – The 12-Minute Flash Roast
- Set timer for 12 minutes. Do not open the oven door for at least 8 minutes. At the 8-minute mark, you can take a quick peek, then close immediately. At exactly minute 10 (2 minutes remaining), scatter cheese blend (0.5 cup Tillamook Sharp Cheddar + 0.5 cup Monterey Jack) evenly across the steak, peppers, and onions. The residual heat will melt the cheese perfectly in the final 2 minutes without burning. At 12 minutes, remove from oven. Steak should be 135-140°F (57-60°C) internal temperature (medium-rare).
- STEP 4 – The Cheesy Blanket Finish & Resting
- Place the hot sheet pan on a heat-safe surface. Let rest undisturbed for 2-3 minutes. This allows the steak to reabsorb juices that were pushed to the surface during cooking, keeping the meat moist and tender. After resting, scatter Kerrygold butter pieces across the surface (residual heat will melt instantly). Scatter fresh chopped cilantro on top. Serve with lime wedges on the side.
Notes
Parchment paper is non-negotiable: This is what makes "zero cleanup" possible. Without it, the steak sticks and you have serious cleanup.
- Nordic Ware natural aluminum is the gold standard: Thin pans warp under high heat. Nonstick coatings prevent proper browning. Dark steel creates hot spots.
- Proper spacing prevents steaming: Crowding the pan creates steam, which prevents browning. Use two pans if needed rather than crowding one pan.
- Cheese timing is critical: Add at exactly the 10-minute mark (2 minutes before finishing). Too early and it burns. Too late and it does not melt.
- Resting is essential: Do not serve immediately. 2-3 minutes allows juices to reabsorb, keeping the steak moist and tender.
- Cut against the grain: Always slice flank steak perpendicular to the muscle fiber direction for maximum tenderness.
- Preheating is non-negotiable: A cold pan will not sear the steak properly. The thermal mass of a preheated pan is essential.
- Fresh lime juice only: Bottled lime juice tastes flat and lacks aromatic volatiles. Use fresh-squeezed.
- Pat the steak dry: Any moisture on the surface prevents browning. Dry surface = faster water evaporation = faster Maillard browning.


8 Comments on “Sheet Pan Steak Fajitas: A Gourmet Mexican Dinner with Zero Cleanup”