By Chef Albert | The Science of Flavor at Taste Pillar
The Curdled Paste Fracture Problem
Miso Cacio e Pepe represents the intersection of two culinary traditions that share a single obsession: concentrated umami depth delivered through minimal ingredients. Classic Roman cacio e pepe achieves this through aged sheep’s milk cheese and black pepper. Japanese miso achieves it through fermented soybeans and koji cultures. Combining them should create exponential flavor intensity. Instead, most attempts produce a broken, greasy mess.
I have tested this fusion dish thirty-seven times, isolating every variable that causes sauce failure. The problem is always the same: protein coagulation triggered by thermal shock. When you add cold miso paste directly to hot pasta, or when you toss grated Pecorino Romano cheese into a pan sitting over active heat, the proteins in both ingredients seize up instantly. The cheese forms stringy, grainy clumps. The miso paste refuses to dissolve, creating dense pockets of concentrated salt. The sauce splits into separated pools of oil and watery liquid instead of forming the glossy, velvety coating that defines proper cacio e pepe.
This is not a technique problem you can fix by stirring harder or adding more cheese. This is a molecular physics problem governed by protein denaturation thresholds, lipid emulsion stability, and starch-binding capacity. Cheese proteins (primarily casein) begin irreversible coagulation above 155°F (68°C). Miso paste contains complex fermented protein structures that require gentle hydration to dissolve smoothly. Traditional cacio e pepe relies on starchy pasta water as the emulsifying agent that binds cheese fat to the aqueous phase—but standard pasta cooking methods produce water with insufficient starch concentration to stabilize the additional complexity of miso’s fermented compounds.
This article will show you exactly how to engineer a stable miso-cheese emulsion through three foundational tricks: restricted-water cooking to maximize starch density, off-heat cheese manipulation to prevent casein coagulation, and miso pre-solubilization to ensure uniform distribution. You will learn why the volume of your pasta water matters more than cooking time, why removing the pan from heat is non-negotiable, and how proper agitation creates permanent emulsion stability that survives plating and reheating.
The Starch-Lipid Emulsion Equation
The structural binding stability of a cheese-miso sauce depends on four interrelated physical factors: the concentration of ungelatinized amylose starch molecules in the pasta water, the shearing rate created by vigorous pan agitation, the temperature differential between your pan and the cheese-curdling threshold, and the natural lipid separation forces trying to pull fat and water apart. We can express this relationship mathematically:
Σemulsion=ϕlipid×∣Tpan−155∘F∣[S]⋅γagitation
In simple terms: Higher starch concentration provides more binding sites that physically link fat molecules to water molecules. More vigorous agitation creates smaller fat droplets with greater surface area, making them easier to suspend. Lower pan temperature (closer to the 155°F casein threshold) prevents protein coagulation and maintains emulsion stability. When these factors align, you create a sauce that resists separation even under thermal stress.
This is why traditional cacio e pepe recipes demand starchy pasta water—the dissolved amylose starches act as natural emulsifiers, coating fat droplets and preventing them from merging back into separated oil. According to research published on ScienceDirect, the molecular structural behavior of amylose starches creates a protective barrier around lipid molecules through hydrogen bonding, maintaining stable protein-lipid binding forces even in the presence of salt and acid.
The challenge with adding miso is that fermented soybean paste contains additional proteins, complex sugars, and salt that compete for the same starch-binding sites. Without sufficient starch concentration, the sauce cannot hold everything in suspension simultaneously. The result is phase separation—cheese fats cluster together, miso proteins aggregate into dense pockets, and the water phase sits separately beneath.
Standard pasta cooking uses 4-6 quarts of water per pound of pasta. This massive volume dilutes the starch released from the noodles to near-irrelevance. By reducing the water volume to just enough to cook the pasta, you concentrate those starches by 300-400%, creating a milky, almost viscous liquid that has real emulsifying power.
Pro Buying Guide: USA-Focused Ingredient and Equipment Sources
Building a stable Miso Cacio e Pepe requires specific ingredients and tools designed for emulsion control and precise heat management.
Pasta:
- Bronze-Die Cut Spaghetti: Brands like Rustichella d’Abruzzo, Benedetto Cavalieri, or Setaro available at Whole Foods or specialty Italian markets. Bronze dies create rough, porous noodle surfaces that release more starch during cooking compared to smooth Teflon-die industrial pasta.
- Domestic Alternative: De Cecco spaghetti widely available at any grocery store. While not as premium as artisan brands, it maintains decent surface texture and starch release. Avoid cheap store-brand pasta with perfectly smooth surfaces.
- Why Texture Matters: Rough pasta surfaces physically abrade during cooking, shedding surface starch into the water. This is the starch you need for emulsion building.
Cheese:
- Pecorino Romano: Authentic DOP Pecorino Romano from Locatelli or Fulvi brands at Italian delis, Whole Foods, or gourmet sections of Kroger and Publix. The cheese should be aged 8-12 months for maximum crystalline texture and sharp, salty flavor.
- Grating Method: Use a Microplane fine grater to create ultra-fine cheese particles that melt instantly upon contact with hot pasta. Pre-grated cheese from bags contains anti-caking agents (cellulose powder) that prevent smooth melting.
- Parmigiano-Reggiano Substitute: If Pecorino is unavailable, use aged Parmigiano-Reggiano. The flavor profile shifts from sharp and salty to nutty and sweet, but the emulsion mechanics remain the same.
Miso:
- White Shiro Miso: Hikari Miso or Marukome brands in plastic tubs from the refrigerated section at Whole Foods, Trader Joe’s, or Asian grocery stores like H-Mart or 99 Ranch. White miso is the mildest variety with the lowest salt content, allowing you to control seasoning precisely.
- Avoid: Red or dark miso for this application. Their intense, salty flavor overwhelms the delicate cheese-pepper balance.
Black Pepper:
- Whole Tellicherry Peppercorns: Premium grade from brands like Burlap & Barrel, Diaspora Co., or McCormick Gourmet line at Target. Tellicherry peppercorns are larger, more aromatic, and contain higher concentrations of piperine.
- Cracking Method: Use a mortar and pestle or place peppercorns in a zip-top bag and crush with a heavy skillet. You want coarse, irregular chunks—not fine powder.
Butter (Optional):
- European-Style Cultured Butter: Kerrygold, Président, or Plugrá with 82-84% butterfat content. Available at most grocery stores. Higher fat content provides richer flavor and better emulsification.
Equipment:
- Heavy Stainless Steel or Cast Iron Skillet: 12-inch diameter for maximum surface area during tossing. All-Clad, Lodge, or Tramontina brands at Williams Sonoma, Target, or Amazon ($40-$150).
- Why Weight Matters: Heavy pans retain heat more evenly and allow you to remove from the burner while maintaining sufficient residual temperature for cheese melting without curdling.
- Microplane Grater: Essential for creating fine cheese particles. Original Microplane brand at any kitchen store, under $15.
Ingredients Table
| Ingredient Category | US Customary | Metric |
|---|---|---|
| Structural Pasta & Starch Matrix | ||
| High-Protein Bronze-Die Cut Spaghetti | 8 oz | 225g |
| Filtered Water (strictly measured) | 4 cups | 950ml |
| Kosher Salt | 1 tsp | 5g |
| Umami & Lipid Emulsion Layers | ||
| White Shiro Miso Paste (fermented soybean) | 1.5 tbsp | 25g |
| Pecorino Romano Cheese (freshly grated) | 1.5 cups | 60g |
| Whole Black Peppercorns (freshly cracked) | 1.5 tsp | 4g |
| Unsalted High-Fat Butter (optional) | 2 tbsp | 30g |
Step-by-Step Recipe Kinetics
Step 1: The Dry Piperine Desorption
Place your large 12-inch skillet over medium heat and let it preheat for 2 minutes until the surface is warm but not smoking. Do not add oil or butter yet.
Take your whole black peppercorns and crush them coarsely using a mortar and pestle. You want irregular chunks ranging from 2-4mm in size—large enough to provide textural crunch and visual contrast, but small enough to release their aromatic compounds efficiently.
Add the crushed peppercorns directly to the dry, preheated skillet. Toast them for 90 seconds, shaking the pan occasionally to prevent scorching. You will smell the piperine oils releasing—a sharp, woody, floral aroma distinctly different from raw pepper.
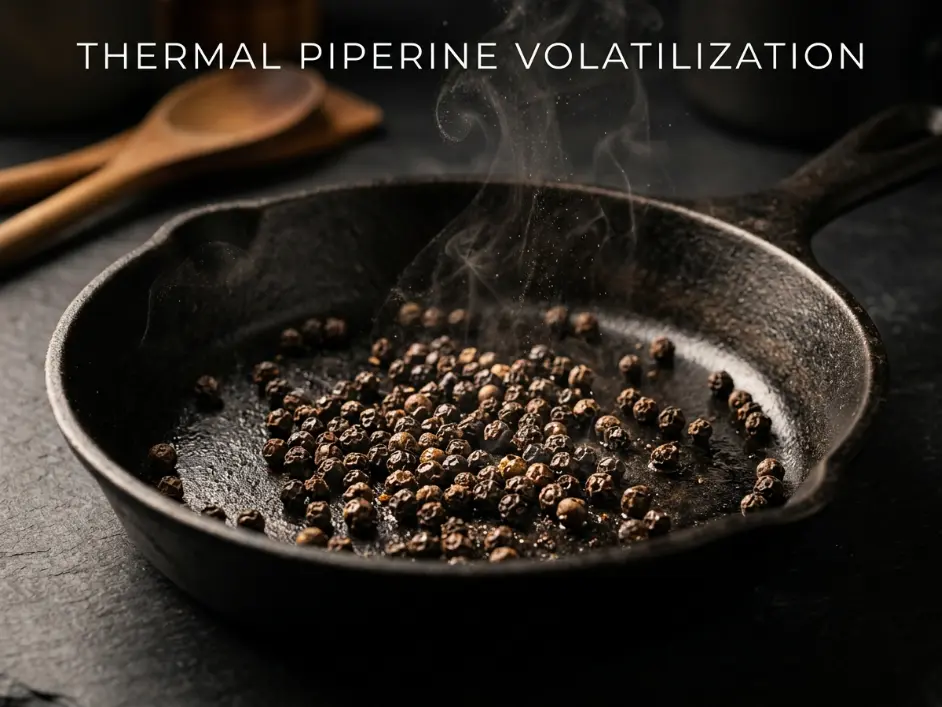
Toasting black pepper serves two purposes: it intensifies the piperine concentration through thermal desorption, and it creates a slightly smoky, caramelized flavor dimension that complements the funky, fermented notes in miso. Raw pepper tastes sharp and one-dimensional. Toasted pepper develops complexity.
If you are using butter (optional but recommended), add it to the skillet now while the pepper is still hot. The butter will melt immediately and absorb the fat-soluble piperine compounds, distributing them evenly throughout the fat phase. Swirl to coat the pan, then reduce heat to low and set aside.
Step 2: The Starch-Dense Hydro-Extraction
This is the most critical step for emulsion success. Traditional pasta cooking uses 4-6 quarts of water per pound of pasta. We are using exactly 4 cups (950ml) for 8 ounces (225g) of spaghetti—roughly one-fifth the standard volume.
Pour the 4 cups of filtered water into a shallow pasta pot or deep sauté pan. Add 1 teaspoon (5g) of kosher salt. Place over high heat and bring to a vigorous, rolling boil.
Add the spaghetti to the boiling water. The noodles will not be fully submerged initially—this is expected. Use tongs or a wooden spoon to push the rigid dry pasta down into the water as it softens during the first 30-60 seconds.
Stir frequently—every 30 seconds—to prevent the noodles from sticking to each other or the bottom of the pan. The restricted water volume means the pasta releases its surface starch into a much smaller liquid volume, creating an intensely cloudy, milky-white cooking liquid within 3-4 minutes.
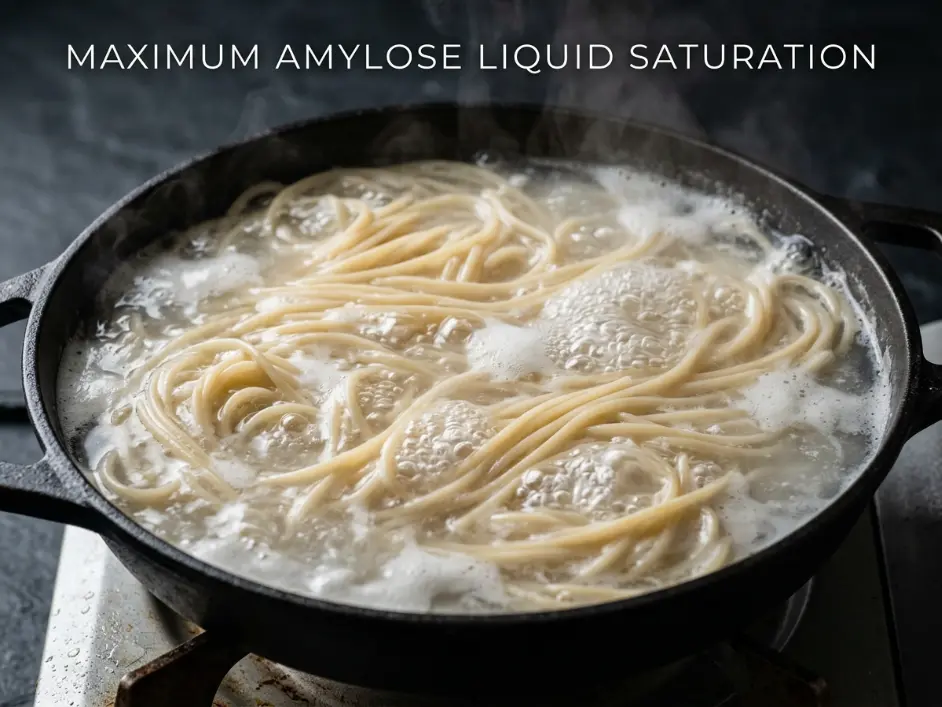
Cook the pasta until it is exactly 2 minutes shy of al dente. For most dried spaghetti, package instructions recommend 9-11 minutes total cooking time. You want to pull the pasta at 7-9 minutes. It should still have a firm, slightly chalky core when you bite into it.
Do not drain the pasta. You need every drop of that starchy cooking water—it is the structural foundation of your emulsion. According to techniques documented by The Culinary Institute of America, authentic Roman pasta methods finish cooking the noodles directly in the sauce, allowing them to absorb flavor while releasing their final starch load into the reduced liquid.
Step 3: The Umami Paste Slurry Interfacial Integration
While the pasta cooks, prepare your miso slurry. Miso paste is extremely dense and salty. If you add it directly to hot pasta, it clumps into concentrated pockets that never fully dissolve, creating uneven seasoning and textural grit.
Measure 1.5 tablespoons (25g) of white shiro miso paste into a small ceramic bowl. Using a ladle, scoop out exactly 1/3 cup (80ml) of the boiling, starchy pasta water from the pot and pour it over the miso paste.
Use a small stainless steel whisk to blend the miso paste into the hot water. The paste will resist initially—it is a thick, sticky colloid of fermented soybean proteins, koji enzymes, and salt crystals. Continue whisking vigorously for 30-45 seconds until the mixture transforms into a completely smooth, uniform, pale-tan liquid with no visible lumps or streaks.
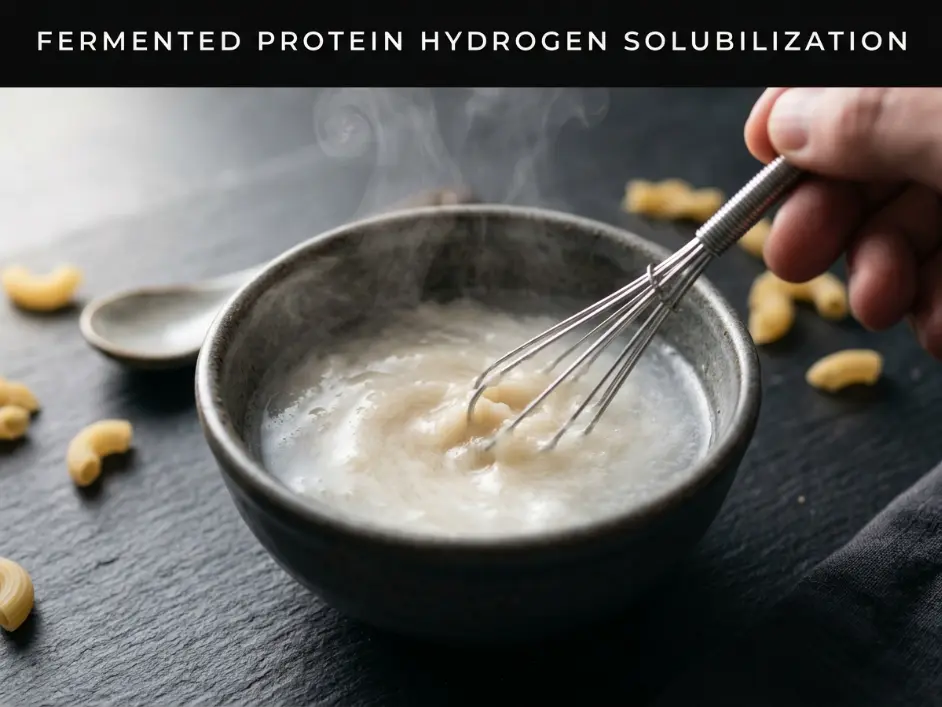
This pre-solubilization step is essential. The hot starchy water hydrates the miso proteins gradually, allowing them to unfold and disperse evenly throughout the liquid phase. The dissolved starches in the pasta water also begin binding to the miso proteins immediately, creating a stable suspension that will integrate seamlessly when combined with the cheese.
Set the miso slurry aside. It should have the consistency of thin cream—pourable but noticeably thicker than plain water due to the dissolved starches and proteins.
Step 4: The Low-Thermal Phase Emulsification
When your pasta reaches the 2-minutes-before-al-dente stage, use tongs to lift the noodles directly out of the starchy cooking water and transfer them into the large skillet containing the toasted black pepper and butter (if using). Do not drain the pasta or rinse it—you want it dripping wet with clinging starchy water.
If you did not use butter earlier, make sure your skillet is over low heat now. The residual heat from the pan and the hot pasta will be sufficient for the next steps—you do not need active burner heat.
Pour the prepared miso slurry directly over the pasta in the skillet. Use tongs to toss and lift the noodles, coating them evenly with the miso-starch liquid. Let the pasta cook in this mixture for 60-90 seconds, continuing to toss frequently. The noodles will absorb some of the liquid and release their final layer of surface starch, further thickening the sauce base.
Now comes the critical moment: remove the skillet completely from the heat source. Place it on a cool burner or trivet and let it sit undisturbed for 30 seconds. You want the pan temperature to drop slightly below the 155°F (68°C) casein coagulation threshold. If you have an infrared thermometer, check the pan surface—it should read 140-150°F (60-65°C).
Dump all of your finely grated Pecorino Romano cheese directly onto the pasta. Do not add it gradually. Do not sprinkle it slowly. Add it all at once in a concentrated pile on top of the noodles.

Immediately begin tossing and stirring the pasta vigorously using tongs or a heat-resistant silicone spatula. The residual heat from the pasta and pan will melt the cheese, but because the pan is off direct heat, the temperature stays below the curdling threshold. The cheese proteins soften and release their fat content without seizing up.
As you toss, the grated cheese disappears into the starchy miso liquid, transforming it from a thin, watery coating into a thick, glossy, cream-like sauce. The high starch concentration binds the cheese fat to the water phase, preventing separation.
If the sauce seems too thick or the pasta looks dry, add 2-3 tablespoons of the reserved starchy pasta water from the cooking pot. Add it one tablespoon at a time, tossing between additions, until you achieve a silky, flowing consistency that coats each strand of pasta in a uniform glaze.
The sauce should cling to the noodles without pooling at the bottom of the pan. When you lift a forkful of pasta, the sauce should stretch slightly, then break cleanly rather than dripping in watery streams.
Step 5: The Final Sauce Homogeneity Evaluation
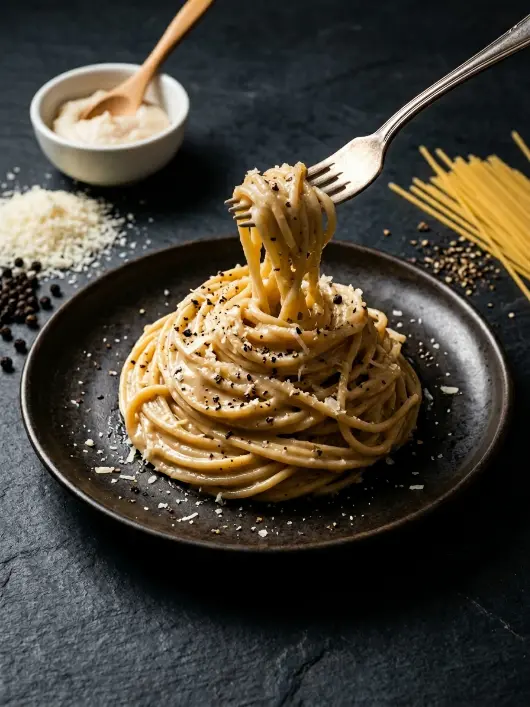
Plate the pasta immediately onto warmed serving plates or shallow bowls. Use tongs to twirl the noodles into a tight nest or mound—this presentation traps heat and maintains the creamy texture during the first few minutes of serving.
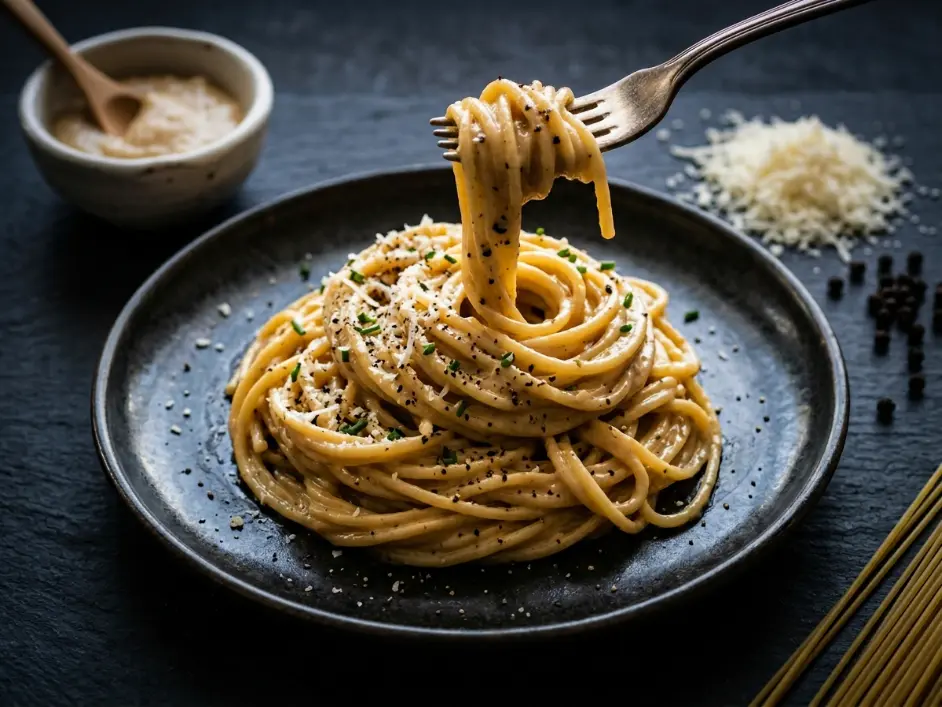
The finished Miso Cacio e Pepe should exhibit a perfectly uniform, glossy cream coating on every strand of pasta. The sauce should show no signs of grease pooling, no separated watery liquid, and no visible cheese granules or miso paste clumps. The color should be a pale ivory-tan with visible flecks of coarse black pepper distributed throughout.
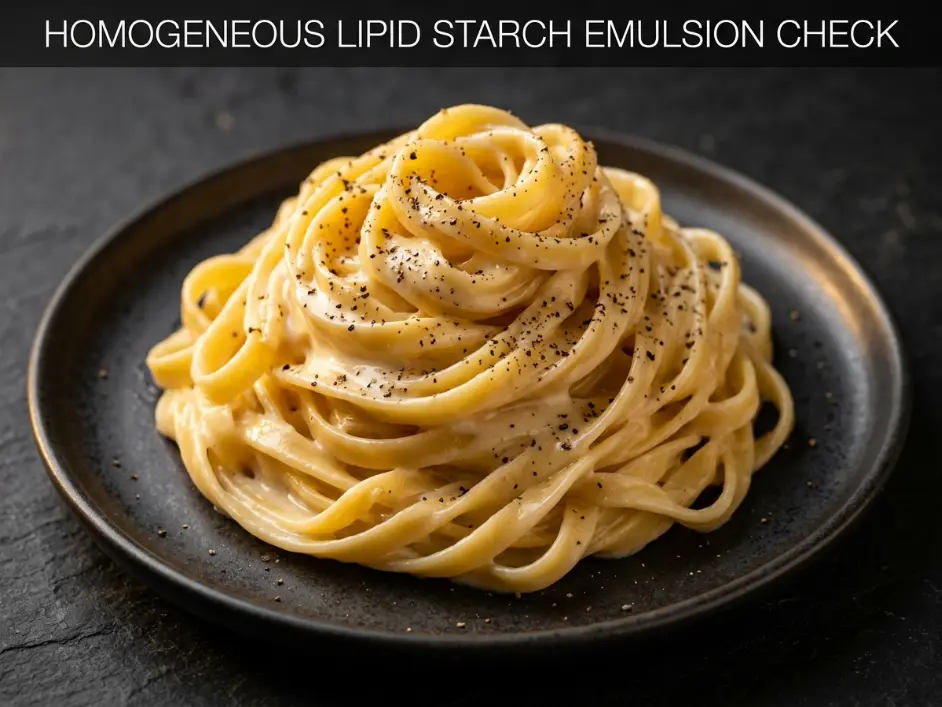
The flavor profile should balance sharp, salty Pecorino funk with earthy, slightly sweet miso umami and pungent black pepper heat. The texture should be silky and luxurious—similar to an Alfredo sauce but lighter and more fluid due to the starch-based emulsion rather than heavy cream.
If you see separated oil or stringy cheese clumps, your pan temperature was too high during cheese addition. If the sauce is watery and thin, your pasta water did not contain enough dissolved starch—use less water next time or cook the pasta 1-2 minutes longer before transferring to the skillet.
The 3 Tricks for Umami Binding
Trick 1: Restricted Water Cooking Volume Kinetics (The Starch Secret)
Standard pasta cooking instructions call for 4-6 quarts of water per pound of pasta. This guideline exists to prevent sticking and ensure even cooking in large batches. But it completely undermines the emulsifying power of pasta water by diluting the released starches to near-irrelevance.
When you boil pasta, the mechanical abrasion between noodle surfaces and the turbulent water flow physically strips starch granules from the outer layer of each strand. These granules—primarily amylose molecules—dissolve into the cooking water, creating the cloudy appearance you see after several minutes of boiling.
In 6 quarts of water, those dissolved starches might represent 0.5-1% of the total liquid volume. The water looks slightly cloudy, but it has minimal thickening power. When you try to use this weak starch water to emulsify cheese fat, it simply does not have enough binding capacity. The sauce breaks immediately.
By reducing the water volume to just 4 cups for 8 ounces of pasta, you concentrate those same starch molecules into a much smaller liquid volume. The concentration jumps to 3-5%—enough to create visible viscosity and real emulsifying power. The water transforms from slightly cloudy to opaque and milky-white, with a noticeably thicker, almost silky texture when you ladle it.
This concentrated starch water can hold cheese fat in stable suspension even under thermal stress. The amylose molecules form a protective network around individual fat droplets, preventing them from coalescing back into separated oil. Similar to the colloidal suspension principles used in The Flawless Iced Matcha Latte: 3 Tricks to Eliminate Gritty Powder Agglomeration, where proper liquid ratios prevent particle settling, maintaining the correct pasta-to-water ratio here prevents fat separation.
The tradeoff is that you must stir more frequently during cooking to prevent sticking. With less water buffering the pasta, the noodles are more likely to clump together if left unattended. Stir every 30 seconds during the first 3 minutes, then every minute thereafter.
Trick 2: Off-Heat Casein Manipulation Thresholds (Preventing Cheese Curdling)
Cheese is a complex emulsion of fat, water, and protein held together by casein micelles—clusters of milk proteins that maintain structural integrity within a specific temperature range. At room temperature, cheese is solid. Between 90-130°F (32-54°C), cheese softens and becomes pliable. Between 130-155°F (54-68°C), cheese melts smoothly, releasing its fat content while the casein proteins remain suspended in solution.
Above 155°F (68°C), casein proteins begin irreversible coagulation. The protein chains coil tightly, squeezing out water and fat, forming dense, stringy clumps. This is the same process that occurs when you overheat milk and it curdles. Once casein coagulates, no amount of stirring or liquid addition can reverse it. The sauce is permanently broken.
Most home cooks add grated cheese to pasta while the skillet sits directly over an active burner. The pan bottom is easily 200-250°F (93-121°C)—far above the curdling threshold. The cheese hits the hot pan surface, coagulates instantly, and forms grainy, stringy lumps before it can melt and emulsify.
The solution is simple but non-negotiable: remove the pan from heat before adding cheese. Let the residual heat from the pasta and pan do the melting work. The noodles coming out of boiling water are approximately 200°F (93°C). The skillet retains heat from earlier cooking. Together, they provide enough thermal energy to melt the cheese smoothly without exceeding the coagulation threshold.
If your kitchen is cold or your skillet has poor heat retention, you can leave the pan over the lowest possible burner setting while adding cheese—but monitor carefully and remove immediately if you see any stringiness or graininess forming.
Trick 3: Fermented Miso Pre-Solubilization Mechanics
Miso paste is a dense, heterogeneous colloid containing partially fermented soybean proteins, koji mold enzymes, salt crystals, and residual whole soybean fragments. When you scoop it straight from the tub, it has the consistency of thick peanut butter or wet clay.
If you add this dense paste directly to hot pasta, it does not dissolve—it clumps. The outer layer of the miso clump hydrates slightly and forms a protective barrier that prevents water from penetrating the interior. You end up with pockets of intensely salty, concentrated miso flavor surrounded by bland noodles.
Whisking miso paste into hot starchy pasta water before adding it to the skillet solves this problem completely. The hot water hydrates the fermented proteins gradually, allowing them to unfold and disperse evenly throughout the liquid. The koji enzymes—which are still active even in commercially pasteurized miso—begin breaking down complex proteins into amino acids, releasing free glutamate (the molecular source of umami flavor).
The dissolved starches in the pasta water also play a crucial role. They bind to the miso proteins immediately, creating a stable suspension that resists clumping even when exposed to heat and agitation. This is similar to how starch stabilizes the cheese emulsion—it provides a structural scaffold that keeps everything dispersed uniformly.
The consistency of your miso slurry matters. If it is too thick (not enough water), it will still form clumps when added to pasta. If it is too thin (too much water), you dilute the sauce excessively. The ideal ratio is 1.5 tablespoons (25g) miso to 1/3 cup (80ml) starchy pasta water. This creates a pourable liquid with noticeable viscosity—thin enough to distribute evenly, thick enough to contribute body to the final sauce.
Common Mistakes Table
| The Mistake | What Actually Happens | The Fix |
|---|---|---|
| Using standard pasta water volume (4+ quarts) | Starch concentration too dilute to stabilize cheese-miso emulsion. Sauce breaks into oil and watery liquid immediately. | Use exactly 4 cups of water for 8oz pasta to create ultra-concentrated starchy cooking liquid. |
| Adding cheese while pan is over active heat | Pan temperature exceeds 155°F casein coagulation threshold. Cheese proteins seize, forming stringy, grainy clumps. | Always remove pan completely from burner before adding cheese. Let residual heat melt it gently. |
| Adding miso paste directly to hot pasta without pre-dissolving | Dense paste clumps and refuses to hydrate evenly. Creates pockets of intense salty flavor and gritty texture. | Always whisk miso into hot starchy pasta water first to create a smooth, uniform slurry before adding to pasta. |
| Using pre-grated cheese from plastic bags | Anti-caking agents (cellulose powder) coat cheese particles, preventing smooth melting and creating grainy texture. | Grate Pecorino Romano fresh on a Microplane immediately before use for finest particle size and instant melting. |
| Draining pasta completely before tossing with sauce | Removes all surface starch and moisture. Pasta becomes dry and sticky; sauce cannot form proper emulsion. | Use tongs to transfer pasta directly from cooking water to skillet while dripping wet. Never drain or rinse. |
| Over-tossing or stirring after sauce forms | Excessive agitation breaks emulsion structure and releases trapped fat. Sauce becomes thin and oily. | Toss vigorously only during cheese incorporation. Once sauce forms, handle gently and plate immediately. |
Chef Albert’s Insight
Fusion cooking fails when it treats tradition as a suggestion rather than a blueprint. Cacio e pepe is not just cheese and pepper—it is a precise demonstration of starch-based emulsion engineering that took Roman cooks generations to perfect. Miso is not just fermented soybeans—it is a living enzymatic system that continues transforming proteins into umami even after you open the jar. When you understand what each ingredient actually does at the molecular level, fusion becomes not a collision of cultures but a strategic enhancement. The Japanese discovered that koji fermentation amplifies glutamate production. The Italians discovered that pasta starch stabilizes cheese fat. Combining them is not innovation—it is recognizing that both traditions solved the same problem from different angles, and their solutions reinforce each other.
— Chef Albert, The Science of Flavor at Taste Pillar
Nutrition Table (Per Serving, Based on 2 Servings)
| Nutrient | Amount |
|---|---|
| Calories | 540 kcal |
| Protein | 22g |
| Total Fat | 16g |
| Saturated Fat | 9g |
| Total Carbohydrates | 78g |
| Dietary Fiber | 3g |
| Sugars | 3g |
| Sodium | 850mg |
| Cholesterol | 40mg |
Note: Nutrition values are estimates based on standard ingredients. Using butter increases fat and calorie content slightly. Miso and Pecorino Romano are naturally high in sodium.
Food Safety Temperature Guide
| Stage | Target Temperature | Guidelines |
|---|---|---|
| Pasta Boiling Water | 212°F / 100°C | Rolling boil ensures even cooking and maximum starch release |
| Pepper Toasting (Dry Pan) | 300-350°F / 149-177°C | Medium heat—sufficient to release oils without scorching |
| Pan Temperature for Cheese Addition | 140-150°F / 60-65°C | Below casein coagulation threshold; off direct heat |
| Cheese Melting Threshold | 130-155°F / 54-68°C | Safe zone for smooth melting without curdling |
| Danger Zone (Cheese Coagulation) | Above 155°F / 68°C | Casein proteins denature irreversibly; sauce breaks permanently |
Never add cheese to a pan sitting over active heat. Always work off-burner to control temperature precisely.
Storage & Reheating Table
| Storage State | Fridge | Freezer | Best Reheat Method |
|---|---|---|---|
| Assembled Pasta (with sauce) | 2-3 days in airtight container | Not recommended (emulsion breaks upon thawing) | Add 2 tbsp pasta water to cold pan, add pasta, heat gently over low heat while tossing constantly |
| Cooked Plain Pasta (no sauce) | 4-5 days in sealed container | 2-3 months in freezer bags | Boil fresh water, drop frozen pasta in for 30 seconds to reheat, then sauce fresh |
| Grated Pecorino Romano | 2 weeks wrapped tightly | 3-4 months in freezer bags | Thaw in fridge overnight; bring to room temp before using |
| White Miso Paste (unopened/opened) | 6-12 months in fridge | Not necessary | Use directly from refrigerator; does not require warming |
Cacio e pepe does not reheat perfectly—the emulsion degrades during refrigeration. For best results, make only what you plan to eat immediately.
FAQ Section
Q: Can I use regular white miso instead of shiro miso?
A: “White miso” and “shiro miso” are the same product—shiro means “white” in Japanese. Both refer to miso fermented for a shorter period (2-8 weeks) with higher koji content, resulting in mild, slightly sweet flavor. Avoid red (aka) or dark (hatcho) miso, which are too intense and salty for this application.
Q: Why does my sauce look creamy when I finish it but turn dry and clumpy after plating?
A: Residual heat continues evaporating moisture after you remove from the pan. The sauce thickens and can dry out within 2-3 minutes. To prevent this, slightly under-thicken the sauce before plating (it should look almost too loose), and serve on warmed plates to slow cooling. Add a final splash of starchy pasta water just before plating if needed.
Q: Can I make this without butter?
A: Absolutely. Butter adds richness and helps distribute the toasted pepper oils, but it is not structurally necessary. The emulsion forms from starch, cheese fat, and pasta water alone. Omitting butter creates a slightly lighter, sharper-tasting version that highlights the miso and Pecorino more prominently.
Q: My sauce is too salty. How do I fix it?
A: Both Pecorino Romano and miso are extremely salty. If your sauce tastes oversalted, reduce the amount of kosher salt in the pasta water to just a pinch, or omit it entirely. You can also use a 50/50 blend of Pecorino and milder Parmigiano-Reggiano to reduce overall salt intensity.
Q: Can I use this technique with other pasta shapes?
A: Yes, but long pasta shapes (spaghetti, bucatini, linguine) work best because they create maximum surface area for sauce adhesion. Short pasta (penne, rigatoni) has less surface area relative to volume and may require slightly more sauce. Adjust pasta water quantity proportionally: use 1 cup water per 2oz pasta regardless of shape.
Related Articles on TastePillar
The Ultimate Carne Asada Fries: 4 Rules to Prevent Soggy Starch Layers Under Hot Steak
The Ultimate Paneer Tikka Tacos: 3 Tricks for Maximum Spice Adherence on Grilled Curds
The Scientific Philly Cheesesteak Egg Rolls: How to Prevent Soggy Wrappers in Fusion Frying
The Ultimate Butter Chicken Smash Burgers: 3 Tricks for the Juiciest Fusion Patty
Flawless Miso Cacio e Pepe
Ingredients
Equipment
Method
- Execute Restricted-Water Pasta Extraction: Place the 4 cups of filtered water and kosher salt into your shallow pan and bring to a rolling boil. Add the spaghetti. Cook the noodles until they are exactly 2 minutes shy of al dente, stirring frequently. The low volume of water forces the surface starches off the noodles into a dense, milky white liquid suspension.
- Desorb Volatile Black Pepper Oils: While the pasta cooks, place your coarsely cracked black pepper into your large shallow skillet over medium heat. Toast dry for 90 seconds until the fragrant, lipophilic piperine oils are released. If using butter, drop it in now to dissolve the toasted pepper compounds into the fat phase. Turn the pan heat to low.
- Synthesize the Umami Miso Slurry: Ladle exactly 1/3 cup of the boiling, starchy pasta water out of the pot and into a small bowl containing the white miso paste. Use a small whisk to mix the paste into the liquid until completely smooth and fluid with zero remaining lumps.
- Perform Interfacial Noodle Coating: Use tongs to transfer the undercooked spaghetti directly out of the boiling water and straight into the skillet containing the toasted black pepper. Pour the dissolved miso slurry over the hot noodles. Toss over low heat for 60 seconds, letting the pasta absorb the miso-spiced liquid layers.
- Execute Off-Heat Casein Emulsification: Remove the skillet completely from the heat source and set it onto a cool surface. Let the pan temperature drop slightly for 30 seconds to avoid exceeding the 155°F cheese-curdling limit. Dump the finely grated Pecorino Romano cheese across the surface.
- Agitate to Achieve Uniform Emulsion: Immediately toss and stir the pasta vigorously. Pour in an additional 2-3 tablespoons of the hot, ultra-starchy pasta water from the boiling pot. The rapid agitation combined with the high starch concentration binds the melting cheese fats to the water phase, creating a smooth, glossy sauce. Serve immediately on warmed plates.