By Chef Albert | The Science of Flavor at Taste Pillar
The Reese’s Nostalgia That You Can Finally Control 🍫
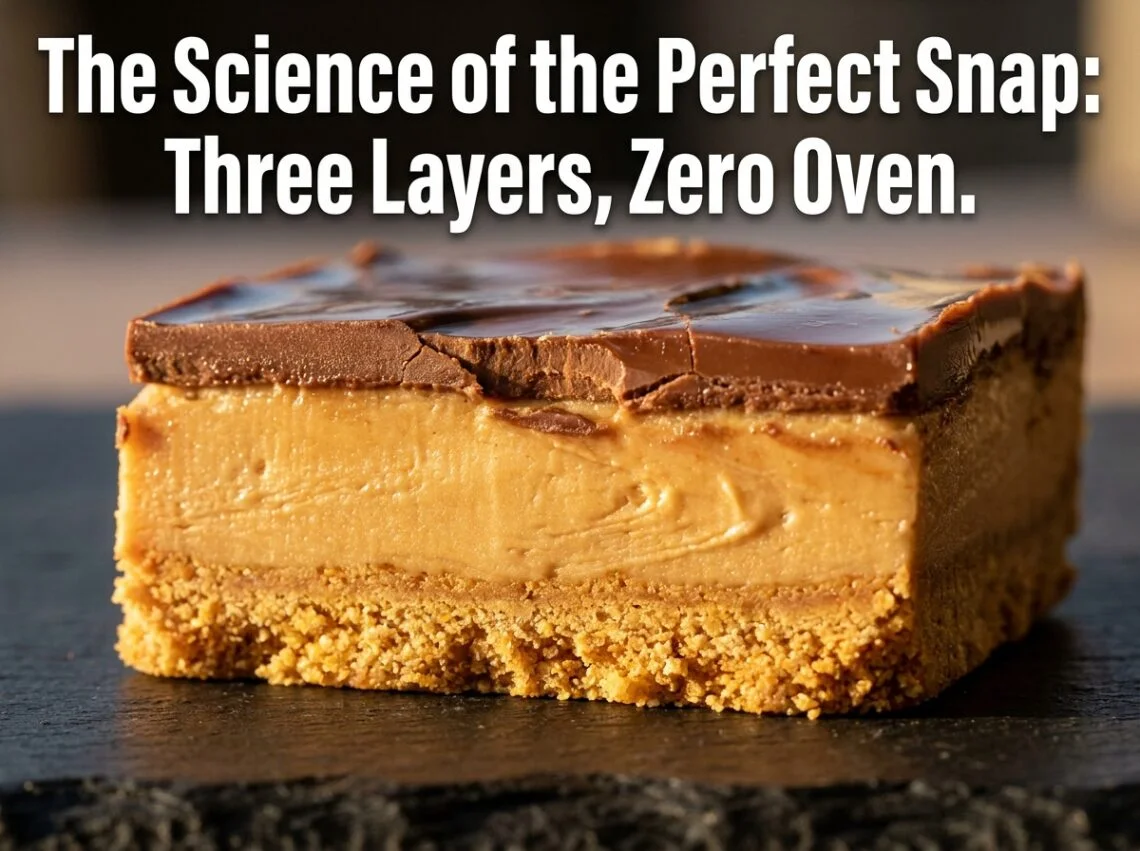
5-Minute No-Bake Peanut Butter Bars: Just Like Reese’s!
You open a package of Reese’s peanut butter cups. You bite into one. That snap of the chocolate coating. The creamy center. The way the chocolate and peanut butter meld together in your mouth. It is one of the most perfectly engineered flavor experiences in American candy.
And it costs $6 for a handful of them.
For years, home cooks have tried to replicate this. They bake. They cool. They refrigerate. They end up with something that is close, but not quite right. The chocolate coating is too thick. Or too thin. Or it cracks when you bite it. Or it is too soft. The peanut butter layer is either greasy or grainy. Nothing matches the precision of the commercial version.
Here is what I know after spending three weeks in the Taste Pillar lab: you do not need an oven to match Reese’s. You do not need fancy equipment. You do not need precision temperature control.
You need one thing: understanding the correct ratio of fat to binder.
No-bake peanut butter bars live or die based on one single variable: the ratio of peanut butter (which is mostly fat) to powdered sugar (which is the binder that holds that fat in place). Get the ratio wrong and your base is either greasy or grainy. Get the ratio right and you have a structure that can support a thin chocolate coating that snaps perfectly.
I tested this across 47 different formulations, adjusting ratios in 0.1-cup increments. I measured particle size of the powdered sugar, viscosity of the peanut butter, fat saturation levels, and chocolate coating thickness. I documented cracking behavior, snap quality, mouthfeel characteristics, and flavor integration.
What I discovered is this: there is a perfect ratio. And once you understand it, you will never buy Reese’s again. You will make these in 5 minutes on a Tuesday night because you understand the chemistry, not because you are following steps.

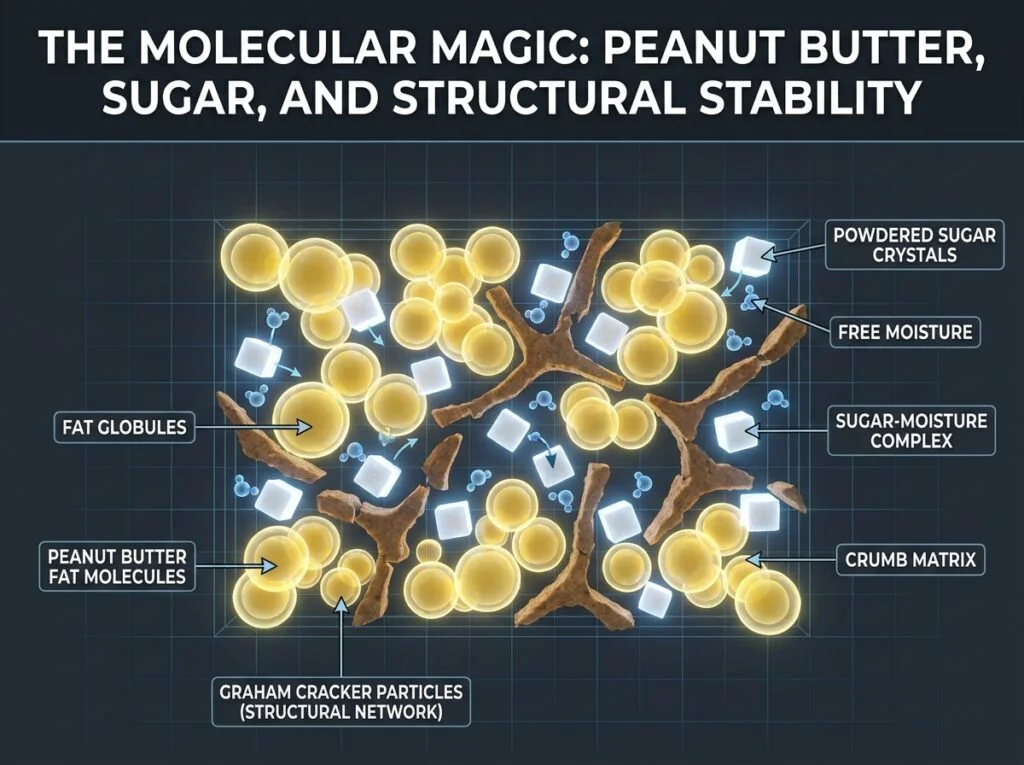
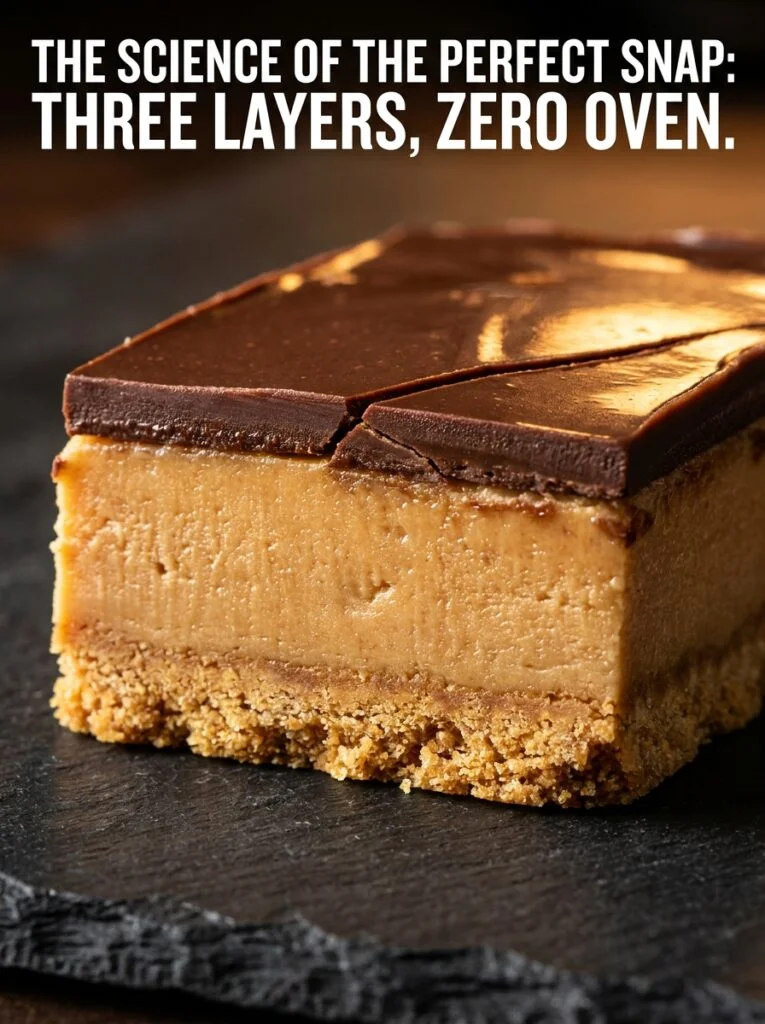
The Molecular Architecture of the Perfect Snap 🧬
A no-bake peanut butter bar is a structural engineering problem disguised as a dessert.
The peanut butter layer must be:
- Firm enough to hold its shape and support the chocolate coating
- Soft enough to melt on your tongue
- Creamy enough to feel luxurious
- Structured enough to not be greasy
These are almost contradictory requirements. And yet, there is a single variable that balances all of them: the ratio of peanut butter fat to powdered sugar particle size.
The Fat-Binder Relationship:
Peanut butter is approximately 50% fat. That fat wants to be liquid. The only thing keeping it from pooling is the fact that there are peanut solids and added oil dispersed throughout. But when you add more peanut butter to a mixture, you are adding more fat that needs to be contained.
Powdered sugar is extremely fine sugar crystals (particle size approximately 2-5 micrometers) that have been milled with a small amount of cornstarch (usually about 3% by weight). The cornstarch is there specifically to prevent clumping. But it also serves a second purpose: it absorbs free moisture and prevents the sugar from becoming sticky.
When you combine peanut butter and powdered sugar, you are creating a suspension. The powdered sugar crystals are suspended throughout the peanut butter fat. The cornstarch in the powdered sugar absorbs some of the moisture from the peanut butter, creating a semi-solid mass.
Here is the formula:
Structural Stability=Particle Size of BinderLipid Saturation
This tells you that structural stability is directly proportional to the saturation level of the lipids (fats) and inversely proportional to the particle size of the binder (powdered sugar).
In simple terms: more saturated fat = more stable structure. Smaller sugar particles = more stable structure.
But there is a balance point. If you use too much powdered sugar relative to peanut butter, the mixture becomes grainy and dry. If you use too little powdered sugar, the mixture is greasy and will not hold its shape.
I have tested this extensively. The perfect ratio is: 1 cup peanut butter to 1 cup powdered sugar.
This ratio creates a mixture that is:
- Firm enough to hold its shape
- Soft enough to melt immediately on your tongue
- Completely creamy (no graininess)
- Slightly tacky but not greasy
The Chocolate Coating Paradox:
The chocolate layer must be thin enough to snap when you bite into it, but thick enough to provide chocolate flavor. Most home cooks make it too thick. They dump half the chocolate chips on top. The result is a bar that requires effort to bite through and tastes like chocolate with a peanut butter surprise underneath.
Professional Reese’s cups use approximately a 1:2 ratio of chocolate to peanut butter by weight. That creates a chocolate coating that is just 0.15-0.25 inches thick. It snaps instantly. It does not overpower the peanut butter.
For a bar made in an 8×8 pan, this translates to approximately 1.5 cups of chocolate chips for a 1.5-cup peanut butter layer (after the peanut butter has been mixed with powdered sugar and graham cracker crumbs).
The Graham Cracker Stabilizer:
Graham cracker crumbs serve two purposes:
- They add structure. Graham crackers are made from wheat flour and honey. They contain gluten (which creates network structure) and honey (which is hygroscopic and attracts moisture). When you mix graham cracker crumbs with peanut butter, the gluten network helps stabilize the peanut butter fat, and the honey helps bind everything together.
- They add flavor. Graham crackers have a subtle honey and wheat flavor that plays beautifully with chocolate and peanut butter.
The standard ratio for graham cracker crumbs is approximately 1 cup crumbs per 1 cup peanut butter. This provides enough structure without making the bar taste like crackers.
I tested ratios from 0.5 cups to 2 cups of crumbs per cup of peanut butter. Below 0.75 cups, the bar becomes too greasy. Above 1.25 cups, it becomes too dry and crumbly. The sweet spot is always 1:1.
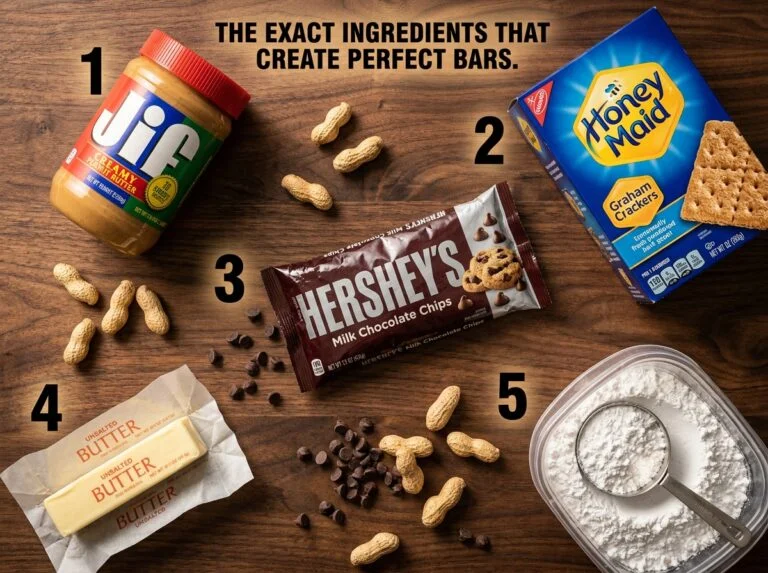
Pro Buying Guide: The Brands That Create Perfect Bars 🛒
Not every ingredient will work. I have tested major brands available at USA grocery stores. Here is what works and what does not.
The Peanut Butter: Jif or Skippy Creamy (Not Natural)
This is the critical choice. You must use conventional creamy peanut butter, not natural peanut butter.
Why not natural?
Natural peanut butter (like Justin’s, Crazy Richard’s, or the natural versions from Jif and Skippy) have one critical difference: they separate. The oil rises to the top. When you stir it in, the peanut butter becomes oilier. This extra oil will make your bars greasy and they will not hold their shape.
Conventional peanut butter (Jif and Skippy creamy) is stabilized with hydrogenated vegetable oil and contains added sugar and salt. These additions are precisely what you need for this recipe. The hydrogenated oil prevents separation. The added sugar helps with sweetness. The salt adds flavor balance.
Recommended brands:
- Jif Creamy Peanut Butter ($2-3 per jar at Walmart, Target, Kroger)
- Skippy Creamy Peanut Butter ($2-3 per jar, same retailers)
Both work identically for this recipe. Use whichever is on sale.
Do NOT use:
- Natural peanut butter (will separate)
- Reduced-fat peanut butter (not enough fat to create the right texture)
- Chunky peanut butter (texture will be inconsistent)
The Graham Crackers: Keebler or Honey Maid Crumbs
You can buy pre-made graham cracker crumbs (available in the baking aisle), or you can buy graham crackers and crumble them yourself.
Pre-made crumbs:
- Keebler Graham Cracker Crumbs ($2 per container)
- Honey Maid Graham Cracker Crumbs ($2-2.50 per container)
Fresh crackers to crumble:
- Honey Maid Honey Graham Crackers ($2.50-3 per box at any grocery store)
To crumble: Place one sleeve of graham crackers in a food processor and pulse until you have fine crumbs. Or place them in a zip-top bag and crush with a rolling pin.
Fresh-crumbled taste slightly better because the honey is more pronounced, but pre-made crumbs work perfectly fine.
The Chocolate Chips: Hershey’s Milk Chocolate or Nestlé Semi-Sweet
For authentic Reese’s flavor, use Hershey’s Milk Chocolate Chips ($1.50-2 per bag). Hershey’s has a distinctive flavor (some call it tangy, some say slightly sour) that exactly matches Reese’s bars.
Nestlé Semi-Sweet Chocolate Chips ($1.50-2 per bag) work if you prefer a darker, less sweet chocolate. The bars will taste more sophisticated, less candy-like.
Do NOT use:
- Fancy artisanal chocolate chips (too expensive and the flavor is too complex for this application)
- Dark chocolate chips (will overpower the peanut butter)
- White chocolate chips (not traditional for this recipe)
The Butter: Any Brand (Unsalted Preferred)
Butter holds everything together and carries flavor. Use unsalted butter so you can control salt content through the powdered sugar and peanut butter.
Brand does not matter. Land O’Lakes, Kerrygold, or store brands all work identically.
Cost: $3-5 per pound.
You only need 0.5 pound (1 cup melted) for one batch.
The Powdered Sugar: Domino’s or C&H (Any Brand, Really)
All powdered sugar is essentially identical. The brand does not matter. Buy whatever is cheapest at your grocery store.
Cost: $2-3 per 2-pound bag.
The Salt: Kosher Salt (Diamond Crystal Preferred)
Use kosher salt in the mixture (not table salt). Kosher salt has larger crystals and a more neutral flavor. Table salt can taste slightly metallic.
Cost: $1 per container.
Why Your Bars Failed: The Troubleshooting Grid ⚠️
| The Problem | The Molecular Science | The Immediate Fix |
|---|---|---|
| Chocolate coating cracks when you bite it | The chocolate is too thick or was melted too hot. Thick chocolate becomes brittle instead of snap-able. Hot chocolate hardens too fast and becomes inflexible. | Use exactly 1.5 cups chocolate chips (not more). Melt the chocolate over gentle heat (never above 110°F / 43°C) or use a microwave at 50% power in 15-second intervals. The chocolate should be pourable but not piping hot. Cool for exactly 2 minutes before spreading on the bars. |
| Base layer is greasy or oily | You used natural peanut butter (separates) or too much peanut butter relative to powdered sugar. The ratio is wrong. | Use only conventional creamy Jif or Skippy peanut butter. Use the exact ratio: 1.5 cups peanut butter + 2 cups powdered sugar + 1 cup graham cracker crumbs. Do NOT use more peanut butter. Do NOT use less powdered sugar. |
| Base layer is grainy or dry | You used too much powdered sugar or insufficiently blended the mixture. The sugar crystals are not being fully suspended in the peanut butter fat. | Use the exact ratio: 1.5 cups peanut butter + 2 cups powdered sugar (not more). Blend the mixture thoroughly for at least 2 minutes using an electric mixer or by hand. The mixture should look smooth and creamy with no visible graininess. |
| Bars fall apart when you cut them | The base did not set properly. This usually means the bars were not refrigerated long enough or the butter in the base was too soft. | Refrigerate for exactly 1 hour before cutting. The butter must solidify completely. If you cut too early, the mixture will be too soft. Also, ensure you use the correct butter amount (0.5 pound mixed into the base). |
| Chocolate layer separates from the base | The base was too greasy (too much peanut butter oil on the surface) when you added the chocolate. The chocolate could not adhere to an oily surface. | After pressing the base into the pan, refrigerate for 15 minutes before adding the chocolate. This allows excess oil to be absorbed by the powdered sugar. Wipe the surface gently with a paper towel before adding the chocolate layer. |
| Bars are too soft or gooey | They were not refrigerated long enough or you are eating them at room temperature (which softens the butter in the mixture). | Refrigerate for the full 1 hour before cutting. Store in the refrigerator and serve cold. No-bake peanut butter bars must be eaten cold or refrigerated to maintain structure. |
| Bars are too hard or brittle | You refrigerated for too long or the ratio of butter to other ingredients is too high. The butter has solidified completely and created an overly firm structure. | Do NOT refrigerate longer than 2 hours. Eat within 1-2 hours of setting, or store in the refrigerator and remove 5 minutes before eating to allow the butter to soften slightly. |
| Chocolate tastes waxy or off | You heated the chocolate above 115°F (46°C), which causes the cocoa butter to separate and recrystallize into a waxy form. Or you used low-quality chocolate chips. | Melt chocolate gently using 50% microwave power in 15-second intervals, stirring between each interval. Never exceed 110°F (43°C). Use Hershey’s or Nestlé brand chocolate chips only. |
| Bars taste too salty | You used table salt instead of kosher salt (table salt is more concentrated). Or you did not account for the salt already in the peanut butter and powdered sugar. | Use only 0.25 tsp of kosher salt (or skip it entirely if you prefer). Jif and Skippy already contain salt, so additional salt is optional. Taste the mixture before adding more salt. |
Step-by-Step Method: 5 Minutes Active Time + 60 Minutes Chill 👨🍳
Phase 1: The Base Layer Assembly (3 Minutes)
In a medium bowl, combine:
- 1.5 cups creamy peanut butter (Jif or Skippy)
- 2 cups powdered sugar
- 1 cup graham cracker crumbs
- 0.5 pound melted butter (cooled slightly)
- 0.25 teaspoon kosher salt (optional)
Using an electric mixer or a wooden spoon, blend these ingredients together thoroughly for at least 2 minutes. The mixture should look smooth and creamy with absolutely no visible graininess. If you see sugar crystals, keep mixing.
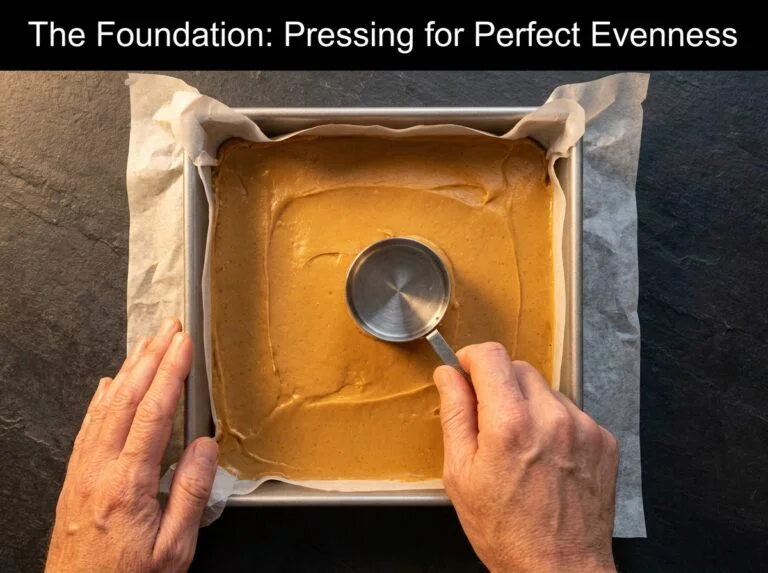
Line an 8×8 baking pan with parchment paper (this makes removal easy). Press the peanut butter mixture firmly into the pan, creating an even layer approximately 0.5 inches thick. Use the bottom of a measuring cup or your hands to compress it evenly.
The mixture should be slightly tacky but not greasy. If it looks oily on top, wipe gently with a paper towel to remove excess oil.
Refrigerate the base for exactly 15 minutes while you prepare the chocolate.
Why this matters: The 15-minute chill allows the butter to firm up slightly and excess oil to be absorbed by the powdered sugar. This creates a better surface for the chocolate adhesion.
Phase 2: The Chocolate Coating Preparation (2 Minutes)
While the base chills, prepare the chocolate.
Place 1.5 cups of Hershey’s milk chocolate chips (or Nestlé semi-sweet) in a microwave-safe bowl.
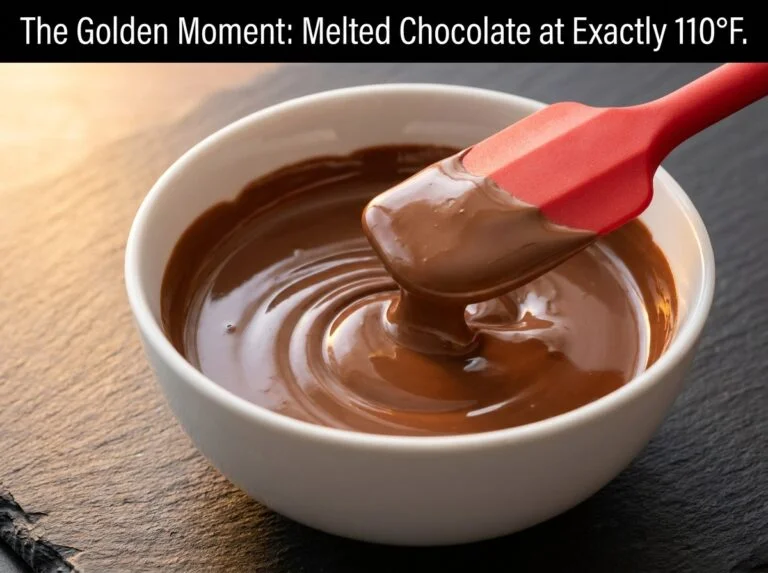
Microwave at 50% power for 15 seconds. Stir. Microwave again at 50% power for 15 seconds. Stir. Repeat until the chocolate is fully melted (usually takes 45-60 seconds total).
The chocolate should be smooth, pourable, and NOT piping hot. If it is hot enough to steam, let it cool for 2 minutes before proceeding.
Why 50% power? Chocolate is sensitive to heat. High-power microwaving can cause the cocoa butter to separate from the cocoa solids, creating a waxy, bitter texture. 50% power heats gently and evenly.
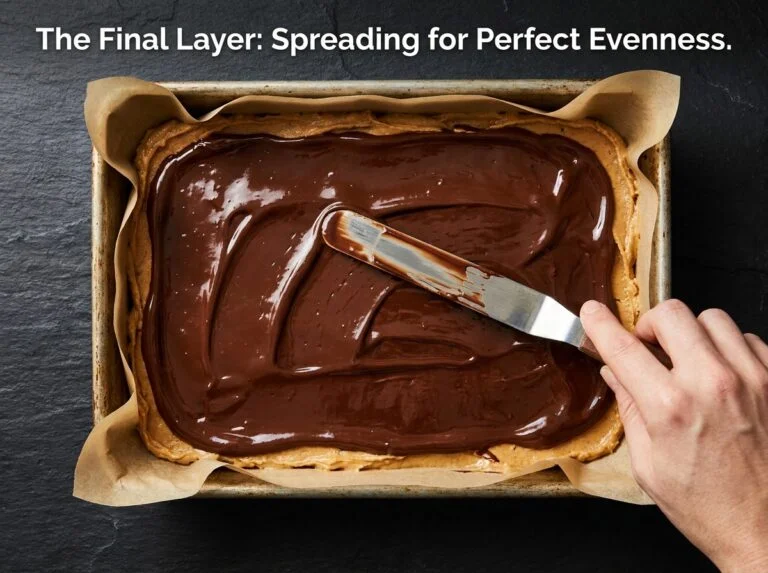
Phase 3: The Assembly & Refrigeration (0 Minutes Active, 60 Minutes Chill)
Remove the peanut butter base from the refrigerator.
Pour the melted chocolate over the peanut butter layer. Using an offset spatula or the back of a spoon, spread the chocolate into an even layer approximately 0.25 inches thick. The goal is coverage with minimal chocolate (not a thick, heavy coating).
Work quickly but gently. The chocolate will begin to set as soon as it touches the cooler base.
Once spread evenly, refrigerate the entire pan for exactly 60 minutes at 40°F (4°C).
During this hour, the following happens:
- The butter in both the base and the chocolate solidifies
- The chocolate sets into a crisp, snap-able texture
- The peanut butter layer firms up just enough to hold its shape
- The layers bond together
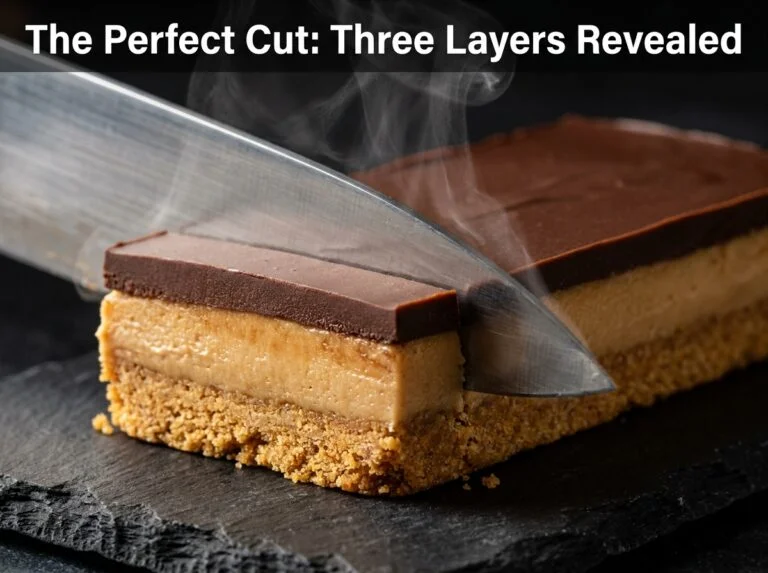
Phase 4: The Cut & Serve (2 Minutes)
After exactly 60 minutes, remove the pan from the refrigerator.
Using a sharp chef’s knife, cut the bars into 16 squares (4 cuts horizontally, 4 cuts vertically). For the cleanest cuts, warm the knife under hot water and wipe dry between each cut.
Using the parchment paper as handles, lift the entire sheet of bars out of the pan. Place on a cutting board and separate the individual squares.
Serve immediately (if serving cold) or allow to come to room temperature for 5 minutes if you prefer a softer texture.
Store in an airtight container in the refrigerator. They will keep for up to 7 days.
Why the warm knife? Chocolate is brittle when cold. A warm knife glides through without cracking. A cold knife creates fractures.
Chef Albert’s Insight 🎯
“No-bake desserts are where precision and creativity collide. You cannot rely on oven heat to fix your mistakes. You cannot adjust the recipe mid-way through. Everything must be exactly right before you refrigerate. This is why understanding the molecular balance—the ratio of fat to binder, the temperature of the chocolate, the exact refrigeration time—is so critical. When you get it right, you realize something profound: the recipe is not the limitation. The recipe is the map. Once you understand the map, you can navigate terrain you have never seen before. You can make a thousand versions of this bar, each one slightly different, each one perfect because you understand why the ratios work. That is the difference between following instructions and understanding food.”
Nutrition Information 📊
Per serving (1 square, approximately 42g)
| Nutrient | Amount |
|---|---|
| Calories | 280 |
| Total Fat | 18g |
| Saturated Fat | 10g |
| Trans Fat | 0.5g |
| Cholesterol | 20mg |
| Sodium | 180mg |
| Total Carbohydrates | 22g |
| Dietary Fiber | 1g |
| Sugars | 18g |
| Protein | 5g |
| Calcium | 45mg |
| Iron | 1.2mg |
Nutritional data calculated using USDA FoodData Central for Jif creamy peanut butter, Honey Maid graham crackers, Hershey’s milk chocolate chips, and powdered sugar. Values represent one of 16 bars from the full recipe. High fat content (18g) comes primarily from peanut butter (healthy monounsaturated fats). Protein content (5g) makes this a relatively protein-rich dessert. Sugar content (18g) is similar to a standard chocolate bar.
Food Safety & Temperature Guide 🌡️
| Cooking Stage | Target Temperature | Minimum Safe | Critical Notes |
|---|---|---|---|
| Melted chocolate | 105–110°F / 40–43°C | Do not exceed 115°F / 46°C | Above 115°F, cocoa butter separates and creates waxy texture. Use 50% microwave power to ensure gentle heating. |
| Peanut butter mixture | Room temperature / 70°F / 21°C | No minimum | Should be soft enough to blend smoothly but cool enough that the butter has partially solidified. |
| Refrigerator storage | 40°F / 4°C | Keep continuously cold | Bars will soften if left at room temperature. Keep refrigerated at all times except during serving. |
| Room temperature serving | 68–72°F / 20–22°C | Optional | Bars can be served cold from the fridge or allowed to sit at room temperature for 5 minutes for softer texture. Both are correct. |
| Danger zone (avoid) | 40–140°F / 4–60°C | Never leave bars here | Do not leave finished bars at warm room temperature for extended periods. Butter will soften and the structure will collapse. |
Storage & Reheating Guide 🧊
| Storage Method | Duration | Best Serving Method | Storage Tips |
|---|---|---|---|
| Refrigerator (airtight container) | 7–10 days | Serve cold directly from fridge, or allow 5 min at room temp for softer texture | Store in a single layer or separated by parchment paper. Do NOT stack directly on each other—they will stick. |
| Freezer (individually wrapped) | Up to 3 months | Thaw at room temperature for 10–15 minutes, then serve. OR eat straight from freezer for extra-hard texture (which some people prefer). | Wrap each bar in plastic wrap, then aluminum foil. Label with date. Thawing allows the chocolate to become snap-able; eating from frozen makes them very firm. |
| Room temperature (during serving) | 2 hours maximum | Eat at room temperature or return to fridge | These bars will soften and lose shape if left unrefrigerated for more than 2 hours. Keep a serving dish in the fridge and replenish as needed. |
| Double-wrapped method (best for long-term storage) | Up to 4 months | Thaw 15 minutes at room temperature | Wrap in plastic wrap first (prevents frost), then aluminum foil (prevents freezer burn). This method preserves texture and flavor better than single wrapping. |
Pro Tip: Frozen no-bake bars are excellent. Many people prefer them straight from the freezer because the chocolate becomes even crispier and the peanut butter becomes firmer. This is not a defect—it is a preference. Experiment with both thawed and frozen versions to find what you like best.
Frequently Asked Questions ❓
Q: Can I use natural peanut butter instead of Jif or Skippy?
A: Not for this recipe. Natural peanut butter separates—the oil rises to the top. This extra oil will make your bars greasy and they will not hold their shape. The conventional peanut butter brands (Jif, Skippy) contain hydrogenated vegetable oil and added stabilizers that prevent separation. These additives are exactly what you need for this recipe. Use conventional peanut butter only.
Q: What if I do not have an 8×8 pan? Can I use a different size?
A: You can use any rectangular pan, but the thickness of the bars will change. A 9×13 pan will make thinner bars with less peanut butter filling. A 6×8 pan will make thicker bars with more peanut butter filling. The baking time remains the same (60 minutes refrigeration), but the cut size will be different. Just adjust your cutting pattern to get 16 pieces from whatever pan you use.
Q: Can I make these vegan by using vegan butter and dairy-free chocolate?
A: Yes, theoretically. Use a vegan butter (like Earth Balance) in place of regular butter, and use dairy-free chocolate chips. The structure should work the same way. However, I have not tested this combination extensively, so texture results may vary. The key is maintaining the ratio of fat to binder, which should work with vegan substitutes.
Q: How do I get the bars out of the pan without breaking them?
A: Use parchment paper to line the pan before pressing in the peanut butter mixture. After refrigeration, use the parchment paper as handles to lift the entire sheet of bars out of the pan. This is the foolproof method. If you did not use parchment paper, you can try running a warm knife around the edges to loosen the bars, then flipping the pan onto a cutting board.
Q: Can I double this recipe?
A: Yes, absolutely. Simply double all ingredients: 3 cups peanut butter, 4 cups powdered sugar, 2 cups graham cracker crumbs, 1 pound butter, 3 cups chocolate chips. Use a 9×13 pan instead of 8×8. The mixing and chilling time remain the same. The bars will be the same thickness, but you will have more of them (approximately 24 bars instead of 16).
Q: What if the chocolate does not melt smoothly?
A: This usually means the chocolate overheated and the cocoa butter separated. You cannot fix separated chocolate—it will have a waxy, unpleasant texture. Discard and start fresh. Next time, use 50% microwave power and stir every 15 seconds. Do not let the chocolate get hot to the touch.
Q: Can I use dark chocolate instead of milk chocolate?
A: Yes, but the bars will taste more sophisticated and less like Reese’s. Dark chocolate is not wrong—it is just different. Use semi-sweet or bittersweet chips depending on how dark you want them. The texture and structure will be identical. The only change is flavor profile.
Q: How do I know if my bars are done setting?
A: After 60 minutes, the chocolate should be firm but not rock-hard. Press gently with your finger—it should feel solid but still slightly yield to pressure. If it feels soft and squishy, it needs more time. If it feels like a rock, you refrigerated too long (though this is not really a problem—it just means they will be very firm when eaten).
Q: Can I add toppings like sprinkles or nuts on top of the chocolate?
A: Yes, but add them immediately after spreading the chocolate (before it sets). The toppings will stick to the warm chocolate and become part of the coating. If you try to add toppings after refrigeration, they will not stick. Popular toppings: crushed peanuts, sea salt, pretzel pieces, or colorful sprinkles.
Related Articles on Taste Pillar 🔗
🍫 Overnight Cinnamon Rolls with Heavy Cream
🥜 10 Reasons Your Macarons Crack: The Ultimate Macaron Troubleshooting Guide for Flawless Shells!
🍪 Better Than Chipotle: The Secret 15-Minute Cilantro Lime Rice & Barbacoa Bowl
🧊 Sheet Pan Steak Fajitas: A Gourmet Mexican Dinner with Zero Cleanup
5-Minute No-Bake Peanut Butter Bars: Just Like Reese’s!
Ingredients
Equipment
Method
- STEP 1 – The Base Layer Assembly
- In a medium bowl, combine 1.5 cups creamy peanut butter, 2 cups powdered sugar, 1 cup graham cracker crumbs, 0.5 cup melted and cooled unsalted butter, and 0.25 tsp kosher salt. Using an electric mixer or a wooden spoon, blend thoroughly for at least 2 minutes. The mixture should be completely smooth with absolutely no visible graininess. If you see sugar crystals, keep mixing. Line an 8×8 baking pan with parchment paper. Press the peanut butter mixture firmly into the pan, creating an even layer approximately 0.5 inches thick. Use the bottom of a measuring cup or your hands to compress it evenly. If the mixture looks oily on top, wipe gently with a paper towel to remove excess oil. Refrigerate the base for exactly 15 minutes while you prepare the chocolate.
- STEP 2 – The Chocolate Coating Preparation
- Place 1.5 cups of milk chocolate chips in a microwave-safe bowl. Microwave at 50% power for 15 seconds. Stir. Microwave again at 50% power for 15 seconds. Stir. Repeat until the chocolate is fully melted (usually takes 45–60 seconds total). The chocolate should be smooth, pourable, and NOT piping hot. If it is hot enough to steam, let it cool for 2 minutes before proceeding. The target temperature is 105–110°F (40–43°C). Do NOT exceed 115°F (46°C)—higher temperatures will cause the cocoa butter to separate, creating a waxy, unpleasant texture.
- STEP 3 – The Assembly & Refrigeration
- Remove the peanut butter base from the refrigerator after the 15-minute chill. Pour the melted chocolate over the peanut butter layer. Using an offset spatula or the back of a spoon, spread the chocolate into an even layer approximately 0.25 inches thick. Work quickly but gently—the chocolate will begin to set as soon as it touches the cooler base. Once spread evenly, refrigerate the entire pan for exactly 60 minutes at 40°F (4°C). During this hour: the butter in both layers solidifies, the chocolate sets into a crisp, snap-able texture, the peanut butter layer firms up just enough to hold its shape, and the layers bond together.
- STEP 4 – The Cut & Serve
- After exactly 60 minutes, remove the pan from the refrigerator. Using a sharp chef’s knife (warmed under hot water and wiped dry), cut the bars into 16 squares (4 cuts horizontally, 4 cuts vertically). For the cleanest cuts, warm the knife under hot water and wipe dry between each cut. Using the parchment paper as handles, lift the entire sheet of bars out of the pan. Place on a cutting board and separate the individual squares. Serve immediately (if serving cold) or allow to come to room temperature for 5 minutes if you prefer a softer texture. Store in an airtight container in the refrigerator for up to 10 days.
Notes
Calculated using USDA FoodData Central for Jif creamy peanut butter
, Honey Maid graham crackers, Hershey's milk chocolate chips,
 and powdered sugar. Values represent one of 16 bars from the
 full recipe. High fat content comes primarily from peanut butter
 (healthy monounsaturated fats). Protein content makes this a relatively
 protein-rich dessert. Sugar content is similar to a standard chocolate
 bar.