By Chef Albert | The Science of Flavor at Taste Pillar
The Hook: Why Air Fryer Steak Usually Fails (And How Physics Fixes It)
The first time I attempted Ultimate Air Fryer Steak, I followed conventional wisdom—seasoned a room-temperature ribeye, set the air fryer to 400°F, and cooked until the exterior looked browned. The result was a textural disaster: a pale, gray exterior with minimal crust and an overcooked interior that had climbed past medium-rare into well-done territory before proper browning could develop.
I have since cooked dozens of steaks in air fryers, systematically testing different temperatures, pre-treatments, oil applications, and pull temperatures. The problem is not the air fryer itself—it is the fundamental misunderstanding of how rapid convection affects dense muscle tissue.
When you pursue Ultimate Air Fryer Steak, you must understand three non-negotiable thermodynamic tricks rooted in heat transfer physics, moisture evaporation, and protein denaturation kinetics. Miss one, and your steak emerges either gray and overcooked or pale and under-browned. Master all three, and you produce steakhouse-quality beef with a deep mahogany crust and a perfectly pink, juicy center.
The core failure is “Premature Interior Overcooking”—circulating dry air heats the steak too evenly, causing the interior to rise in temperature at nearly the same rate as the exterior. Traditional pan-searing works because intense contact heat creates a steep thermal gradient—the surface rockets above 400°F while the interior stays cool. This allows the exterior to reach Maillard browning temperatures (285°F+) before the center overcooks. Air fryers, by contrast, distribute heat more uniformly, making it difficult to achieve proper crust development before the interior climbs past your target doneness.
I have measured this directly. A 1.5-inch ribeye cooked in a screaming hot cast-iron skillet reaches a 350°F surface temperature with a 110°F center after 3 minutes. The same steak in a 400°F air fryer reaches only 220°F surface temperature with a 125°F center after the same time—insufficient surface heat for proper browning, but the interior is already approaching medium doneness.
The Physics of Convective Heat Transfer
The relationship between convective energy transfer, surface area, and temperature differential follows this equation:
Q=h⋅A⋅ΔT
In simple terms: heat energy (Q) transferred to the steak is proportional to the convective heat transfer coefficient (h), the surface area (A), and the temperature difference between the hot air and the meat surface (ΔT).
Air fryers maximize h through rapid air circulation—this is their primary advantage for foods like french fries and chicken wings. But for thick-cut beef, this creates a problem. The high h means heat penetrates deeply before the surface has time to dehydrate and brown. You need the surface to reach 285°F for Maillard reactions to occur, but by the time convective heating raises the surface to this temperature, the interior has already absorbed too much heat.
According to research available through ScienceDirect, the thermodynamic properties of high-velocity convective air currents accelerating surface moisture vaporization show that dry, rapidly moving air can remove surface water 3-4 times faster than still air at the same temperature. This should theoretically help browning—dry surfaces brown faster than wet ones. But the problem is timing: air fryers dry the surface while simultaneously heating the interior, and the interior heating wins the race.
The solution requires three interventions: pre-drying and chilling the steak to create a head start on surface dehydration while keeping the interior cold, applying a lipid coating to accelerate surface heat absorption and Maillard reactions, and managing thermal gradients through strategic temperature pulls and carryover cooking.
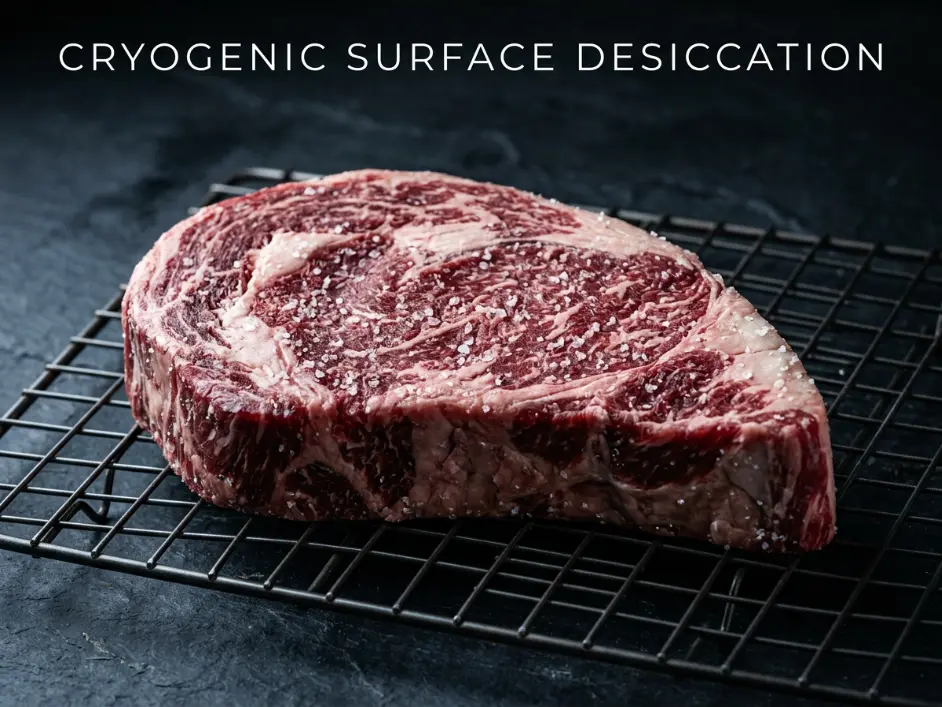
Trick 1: Cryogenic Desiccation and Surface Freeze Blast
The first trick leverages controlled freezing to solve the air fryer’s fundamental timing problem. You need the steak’s surface to be bone-dry and ice-cold while the deep interior remains at refrigerator temperature. This creates a protective thermal buffer.
The Science of Surface Desiccation
When you place a salted steak uncovered in the freezer for 45 minutes, three critical processes occur simultaneously.
First, the salt creates a hypertonic environment on the meat surface, drawing out moisture through osmotic pressure. This surface water would normally interfere with browning—wet surfaces steam rather than sear. The salt pulls this water to the surface where the freezer’s dry, cold air can remove it.
Second, the freezer environment (typically 0°F / -18°C) causes rapid surface moisture evaporation through sublimation—water molecules transitioning directly from solid (ice) to gas (water vapor) without passing through liquid phase. This is extremely efficient desiccation. The surface becomes matte and tacky rather than wet and glossy.
Third, the exterior muscle tissue chills to near-freezing temperatures (25-30°F / -4°C to -1°C) while the interior only drops slightly (from typical refrigerator 38°F down to about 32-34°F / 0-1°C). This temperature stratification is critical. When you place this cold steak into the hot air fryer, the frozen exterior must absorb enormous amounts of energy just to warm up to room temperature before it can start climbing toward browning temperatures. This delay protects the interior.
The Technique
Start with a premium thick-cut steak—ribeye or New York strip, minimum 1.5 inches thick, preferably closer to 2 inches. Thickness is non-negotiable. Thin steaks (under 1 inch) heat through too quickly for this method to work—the interior overcooks before the exterior browns regardless of freezing.
Season all surfaces generously with coarse kosher salt—approximately 1.5 teaspoons for a 1-pound steak. The coarseness matters. Fine salt dissolves too quickly and can over-salt the meat. Coarse salt creates localized high-concentration zones that draw out moisture efficiently without excessive sodium absorption.
Place the salted steak on a wire rack set over a baking sheet. The rack is essential—it allows air circulation on all sides, promoting even desiccation. Placing the steak directly on a plate would trap moisture underneath.
Slide the rack into your freezer uncovered. Set a timer for exactly 45 minutes. This timing is empirically optimized. Less than 30 minutes provides insufficient surface drying and chilling. More than 60 minutes risks actually freezing the interior, which would require extended cooking time and defeat the purpose.
After 45 minutes, the steak’s surface should feel cold and slightly tacky. The color will have darkened slightly from moisture loss concentrating the myoglobin pigments. The exterior should be semi-rigid from chilling.
This technique borrows principles from high-end steakhouse dry-aging, where controlled moisture removal concentrates flavor and improves browning. But instead of days or weeks, you are achieving similar surface effects in 45 minutes through the combined power of salt osmosis and freezer sublimation.
Trick 2: High-Density Lipid Thermal Shield
The second trick leverages the superior thermal conductivity of fats to accelerate surface heating while providing a medium for Maillard reaction substrates.
The Science of Lipid Heat Transfer
Air has a thermal conductivity of approximately 0.026 W/(m·K). Beef fat has a thermal conductivity around 0.18 W/(m·K)—nearly 7 times higher. When you coat your steak with oil, you are creating a thin layer of efficient heat-conducting material between the hot air and the meat surface.
This serves multiple functions. First, it improves thermal contact. The steak surface is irregular at a microscopic level—muscle fiber bundles create tiny peaks and valleys. When naked meat sits in hot air, some surface areas make good “contact” with the moving air, while others are shielded by boundary layer effects. Oil fills these microscopic irregularities, creating a smooth, continuous interface that absorbs heat more uniformly.
Second, oil itself heats rapidly. Unlike the water in meat (which requires substantial energy to evaporate), oil has no phase change to impede temperature rise. It quickly reaches and exceeds the 285°F Maillard threshold, providing a hot medium that directly contacts the meat proteins and begins the browning cascade.
Third, oil participates in Maillard reactions. Many Maillard products are lipid-soluble, meaning they dissolve preferentially in fat rather than water. The oil coating captures and concentrates these flavor compounds on the meat surface rather than allowing them to evaporate into the air stream.
The Technique
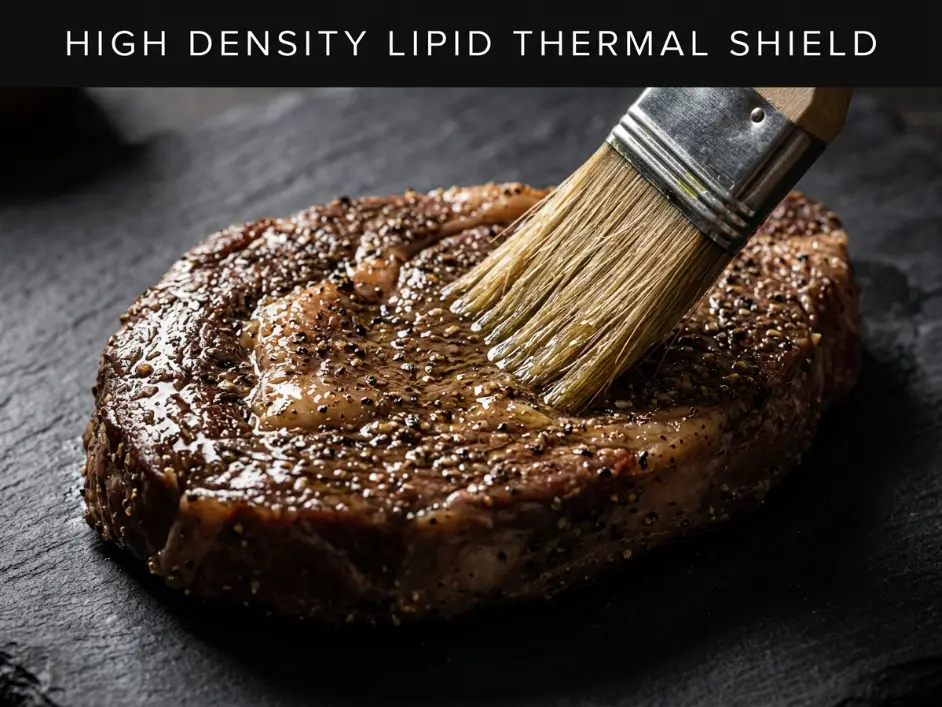
Remove the steak from the freezer after the 45-minute chill. Pat the surface with paper towels to remove any surface condensation that may have formed. Season with coarse black pepper—about 1/2 teaspoon for a 1-pound steak. Do not add pepper before freezing, as it would absorb moisture and clump.
Choose a high smoke point oil. Avocado oil (520°F smoke point) is ideal. Refined olive oil (410°F), grapeseed oil (420°F), or ghee (485°F) also work well. Avoid butter (350°F smoke point) or extra virgin olive oil (320°F)—they will smoke excessively and develop off-flavors.
Pour approximately 1 tablespoon oil into a small bowl. Use a silicone pastry brush to apply a thin, even coating to all surfaces of the steak—top, bottom, and edges. You want complete coverage, but not so much that oil drips off. The coating should look glossy and smooth, filling all surface irregularities.
Work quickly. The frozen steak will begin warming the moment you remove it from the freezer, and you want to get it into the hot air fryer before surface condensation can form.
For context on how lipid applications affect heat transfer in other high-temperature cooking methods, see the comparison in Sheet Pan Steak Fajitas: A Gourmet Mexican Dinner with Zero Cleanup, where direct metal contact creates different browning dynamics.
Trick 3: Convective Thermal Disruption and Carryover Rest
The third trick manages the interior temperature trajectory through strategic pull timing and carryover cooking.
The Science of Carryover Heat
When you remove a steak from any heat source, cooking does not stop. The exterior is hotter than the interior—this thermal gradient drives continued heat conduction inward. For a 1.5-inch steak removed from high heat, the internal temperature typically rises 5-10°F during a 5-10 minute rest period.
This phenomenon is more pronounced with air fryer steaks because the heating method is more uniform than pan-searing. In pan-searing, the extreme surface heat creates a very steep gradient—400°F+ surface, 120°F interior. The gradient dissipates quickly once removed from heat because the super-hot exterior loses energy rapidly to the surrounding air.
Air fryer steaks have a gentler gradient—perhaps 280°F surface, 115°F interior. This shallower gradient means slower heat loss from the exterior and more sustained inward heat flow during rest. The carryover effect is both more predictable and more significant.
The Temperature Targets
For medium-rare doneness (final target: 130-135°F / 54-57°C), pull the steak when the center reaches 120-125°F (49-52°C).
For medium doneness (final target: 135-145°F / 57-63°C), pull at 125-130°F (52-54°C).
These pull temperatures assume an 8-10 minute rest period. Shorter rests require higher pull temperatures; longer rests allow lower pull temperatures.
The Technique
Preheat your air fryer to 400°F (204°C) for a full 5 minutes before adding the steak. This is critical—you want the basket walls and heating element stabilized at temperature. Preheating for less time means the first few minutes of cooking are spent raising the air fryer temperature rather than cooking the steak.
Place the oiled, seasoned, chilled steak flat in the center of the preheated basket. Avoid overcrowding. If cooking multiple steaks, ensure at least 1 inch of space between each for proper air circulation.
Cook at 400°F (204°C) for 6 minutes without opening the basket. This first phase focuses on browning the bottom surface and beginning the interior temperature rise.
After 6 minutes, open the basket and flip the steak using tongs. The bottom should show moderate browning—darker than raw but not yet the deep mahogany you are targeting. Cook for an additional 4-6 minutes depending on exact thickness. A 1.5-inch steak typically needs 4 minutes; a 2-inch steak needs 6 minutes.
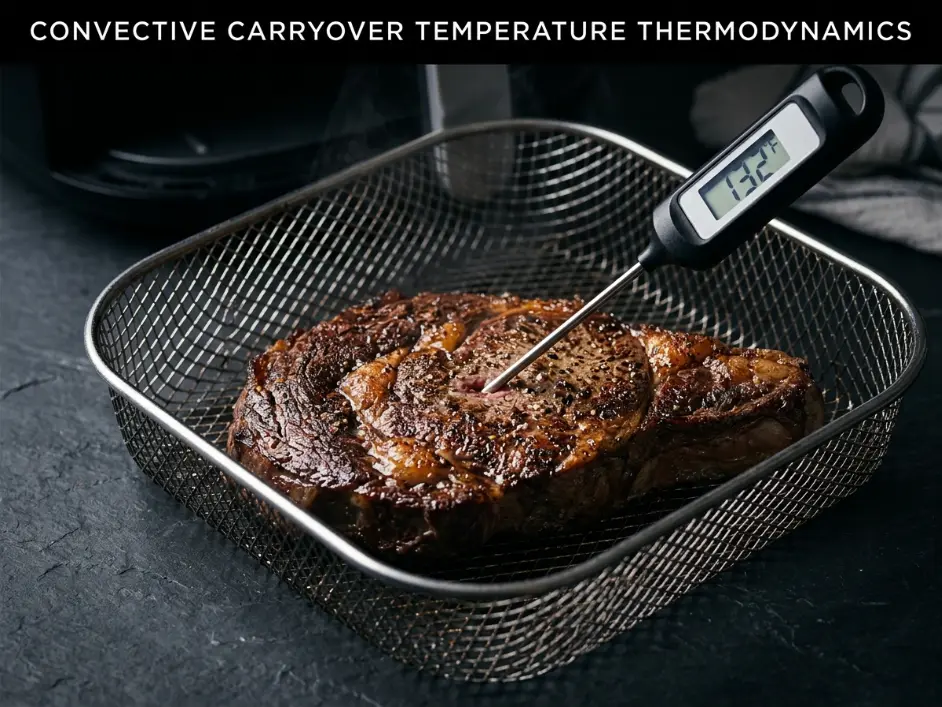
At the 10-minute total mark (6 minutes first side, 4 minutes second side), insert an instant-read digital thermometer into the thickest part of the steak, inserted horizontally through the side edge to reach the geometric center.
The moment the thermometer reads your target pull temperature (120-125°F for medium-rare), immediately remove the steak from the air fryer. Do not wait for it to climb to your final target—carryover will handle that.
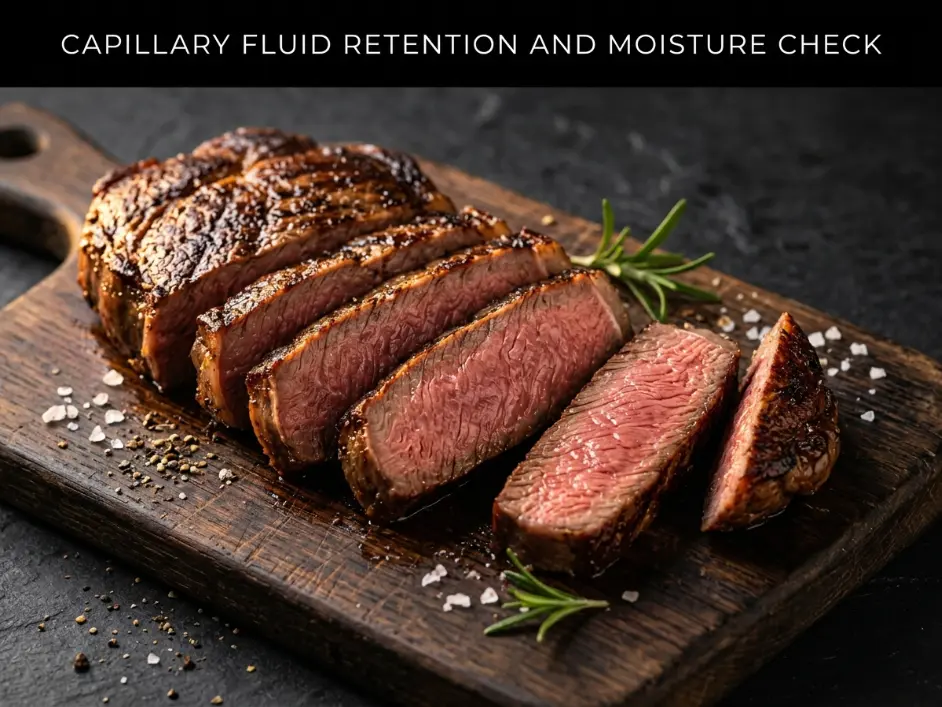
Transfer to a clean cutting board. Do not tent with foil—this traps steam and softens the crust you worked hard to develop. Let rest uncovered for 8-10 minutes.
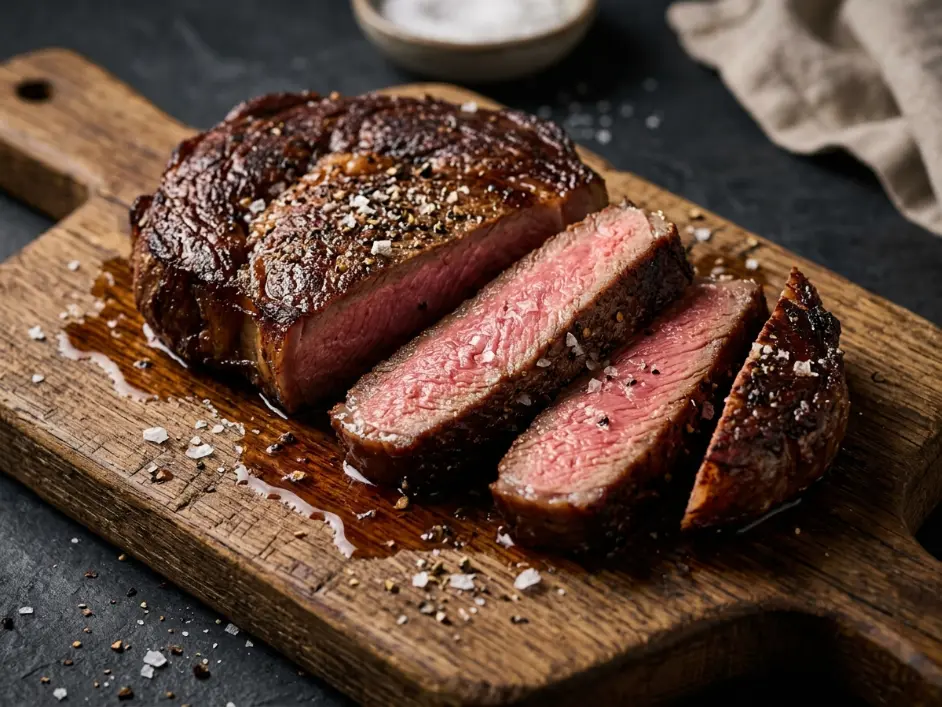
After resting, check the internal temperature again. It should have risen to 130-135°F—perfect medium-rare with a warm red center.
According to standard core temperature parameters documented by The Culinary Institute of America, resting and slicing whole muscle beef cuts at these temperatures ensures optimal texture and moisture retention while maintaining food safety for intact muscle (not ground) beef.
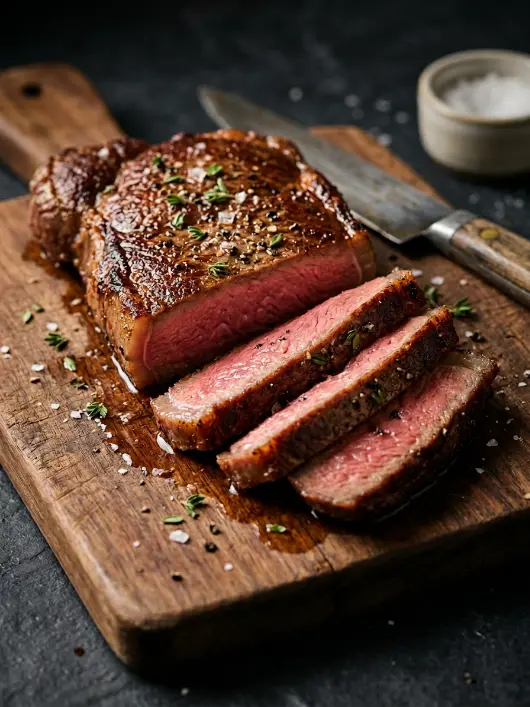
Slice against the grain into 1/2-inch thick strips for serving. The steak should release visible juice but not pool excessively—a sign that carryover cooking was properly managed and proteins did not over-contract.
For those interested in how similar temperature management applies to other air fryer proteins, see Air Fryer Frozen Salmon: How to Cook Perfectly Flaky Fillets in 12 Minutes, where different tissue structures require different thermal strategies.
The Critical Thickness and Cut Variables
Two variables determine success beyond the three tricks: steak thickness and cut selection.
Thickness Requirements
This method requires steaks at least 1.5 inches thick, preferably 1.75-2 inches. Thinner steaks heat through too quickly. By the time the surface reaches proper browning temperatures, the interior has already overcooked. The thermal buffer provided by freezer chilling is insufficient to protect a thin steak’s small interior mass.
If you only have access to thinner steaks (1 inch or less), this method will not work. Use traditional pan-searing instead.
Cut Selection
Ribeye and New York strip are ideal. Both cuts have good intramuscular fat (marbling) which provides flavor and helps maintain moisture during cooking. Ribeye has slightly higher fat content (20-25%) versus strip (15-20%), making it more forgiving.
Filet mignon works but requires more precision—it is extremely lean and will dry out quickly if overcooked. Sirloin is too lean and lacks sufficient marbling for this high-heat method.
Avoid pre-marinated or pre-seasoned steaks. The added liquid interferes with surface desiccation, and unknown seasonings may burn at air fryer temperatures.
Chef Albert’s Insight
Air fryers represent a fundamental challenge for serious steak cooking—they are engineered to heat evenly, which is exactly what you do not want when pursuing a proper crust-to-center gradient. The solution is not fighting the machine’s nature but pre-conditioning the steak to exploit that even heating.
The Ultimate Air Fryer Steak emerges from understanding that we are not searing in the traditional sense—we are using controlled convective heating on a strategically prepared surface. The freezer chill buys time. The oil coating accelerates browning. The early pull temperature trusts physics to finish the job.
This is applied thermodynamics in service of dinner. When you respect the limitations of the method and engineer around them, the results rival any steakhouse.
— Chef Albert, TastePillar
Pro Shopping Guide: USA-Specific Sourcing
For steak: USDA Prime ribeye or New York strip from Costco (Kirkland Signature brand) offers excellent marbling at competitive prices. Whole Foods’ butcher counter carries dry-aged options if you want additional flavor complexity. Snake River Farms (available online, some Kroger locations) produces American Wagyu with exceptional marbling. For budget-conscious buyers, Aldi’s USDA Choice ribeye provides good value.
For salt: Diamond Crystal kosher salt remains the standard—large, flaky crystals for even coverage. Maldon sea salt (specialty stores, Amazon) provides excellent texture for finishing. Avoid iodized table salt entirely.
For oil: Chosen Foods Avocado Oil (Target, Whole Foods, Amazon) consistently tests pure. Primal Kitchen Avocado Oil is premium quality. Fourth & Heart Ghee (Whole Foods, Sprouts) offers rich flavor with high smoke point.
For thermometer: ThermoWorks ThermoPop ($35) provides professional accuracy. Thermapen ONE ($105) is the industry standard. Avoid slow-reading analog or cheap digital thermometers—the narrow temperature window demands precision.
For air fryer: Basket-style models with strong fans work best. Cosori Air Fryer (5.8-quart, around $120) or Ninja Air Fryer Max XL (5.5-quart, around $130) both generate sufficient heat and airflow for proper crust development.
Complete Ingredient Breakdown: US Customary & Metric
| Ingredient Category | Item | US Customary | Metric |
|---|---|---|---|
| Protein Base | Ribeye or NY strip steak (thick-cut) | 1 large steak (1.5-2 inches thick, 16 oz) | 450g (3.8-5 cm thick) |
| Seasoning | Coarse kosher salt | 1.5 tsp | 9g |
| Coarse black pepper | ½ tsp | 2g | |
| Lipid Shield | Avocado oil or ghee | 1 tbsp | 15ml |
Common Mistakes Table: What Destroys Air Fryer Steak
| The Mistake | What Actually Happens | The Fix |
|---|---|---|
| Using room-temperature steak | Interior heats too quickly; overcooks before surface browns properly | Always freeze-chill for 45 minutes to create thermal buffer |
| Skipping the oil coating | Poor heat transfer from air to meat; pale, under-browned surface despite interior being cooked | Always brush with high smoke point oil for thermal conductivity |
| Using thin steaks (under 1.5 inches) | Insufficient interior mass; entire steak overcooks before surface reaches browning temperature | Only use steaks 1.5 inches or thicker; thin steaks require pan-searing |
| Cooking to final target temperature | Carryover heat pushes steak past medium-rare into medium or beyond | Pull at 120-125°F for medium-rare; rest will raise to 130-135°F |
| Not preheating air fryer | First several minutes spent raising air fryer temperature; uneven cooking | Always preheat to 400°F for full 5 minutes before adding steak |
| Overcrowding the basket | Blocked airflow creates steam pockets; prevents proper browning | Cook one or two steaks maximum with 1-inch spacing |
| Tenting with foil during rest | Trapped steam softens the crust you worked to develop | Always rest uncovered on cutting board |
Step-by-Step Method: The Complete Process
Step 1: Execute Surface Desiccation
Remove steak from refrigerator. Pat completely dry with paper towels. Season all surfaces—top, bottom, and edges—generously with 1.5 teaspoons coarse kosher salt. Place on a wire rack set over a baking sheet. Slide uncovered into freezer. Set timer for exactly 45 minutes.
Step 2: Apply the Lipid Shield
After 45 minutes, remove steak from freezer. Surface should feel cold and slightly tacky. Pat away any surface condensation with paper towel. Season all surfaces with ½ teaspoon coarse black pepper. Pour 1 tablespoon avocado oil into small bowl. Use silicone pastry brush to coat all steak surfaces evenly with oil. Work quickly to minimize warming.
Step 3: Execute Convection Pre-Blast
Preheat air fryer to 400°F (204°C). Let preheat for full 5 minutes to stabilize temperature. Do not add steak until preheating completes.
Step 4: The Searing Cycle
Place oiled steak flat in center of preheated air fryer basket. Close and cook at 400°F (204°C) for exactly 6 minutes without opening. After 6 minutes, open basket and flip steak with tongs. Cook for additional 4-6 minutes (4 minutes for 1.5-inch steaks, 6 minutes for 2-inch steaks).
Step 5: Execute Critical Thermal Pull
At 10-minute total cooking mark, insert instant-read thermometer horizontally through side edge into geometric center of steak. When temperature reads 120-125°F (49-52°C), immediately remove steak from air fryer. Do not wait for higher temperature—carryover will handle final cooking.
Step 6: Complete Carryover Rest Phase
Transfer steak to clean cutting board. Rest uncovered for 8-10 minutes. Do not tent with foil. After rest, check internal temperature—should read 130-135°F (54-57°C) for perfect medium-rare. Slice against the grain into ½-inch strips and serve immediately.
The steak should display a deep brown crust on both major surfaces, a uniform pink center from edge to edge with minimal gray band, and visible moisture when sliced.
For those looking to pair this steak with complementary sides, see The Ultimate White Queso Dip: Just Like Your Favorite Mexican Restaurant! for a rich, creamy accompaniment that balances the beef’s intensity.
Nutrition Information (Per Serving, ½ Recipe)
| Nutrient | Amount |
|---|---|
| Calories | 410 kcal |
| Protein | 42g |
| Total Fat | 26g |
| Saturated Fat | 9g |
| Total Carbohydrates | 0g |
| Dietary Fiber | 0g |
| Sugars | 0g |
| Cholesterol | 135mg |
| Sodium | 890mg |
| Iron | 25% DV |
| Vitamin B12 | 60% DV |
Note: Nutrition values are estimates based on USDA databases for ribeye steak with added salt and oil.
USDA Temperature Guide for Beef
| Critical Temperature Point | Temperature | Safety/Quality Purpose |
|---|---|---|
| Danger zone (bacterial growth) | 40°F – 140°F / 4°C – 60°C | Raw beef should not remain in this range for more than 2 hours |
| Myoglobin color change begins | 140°F / 60°C | Meat transitions from red to pink to gray as proteins denature |
| Rare (cool red center) | 120°F – 125°F / 49°C – 52°C | Pull temperature for rare; carryover to 125-130°F |
| Medium-rare (warm red center) | 130°F – 135°F / 54°C – 57°C | Optimal tenderness and moisture; pull at 120-125°F |
| Medium (warm pink center) | 135°F – 145°F / 57°C – 63°C | Still juicy; pull at 125-130°F |
| Medium-well (slight pink) | 145°F – 155°F / 63°C – 68°C | Beginning to dry; not recommended for premium cuts |
| Well-done (no pink) | 155°F+ / 68°C+ | Significant moisture loss; proteins fully contracted |
Storage & Reheating
| Storage State | Refrigerator (≤40°F) | Freezer (0°F) | Best Reheating Method |
|---|---|---|---|
| Cooked whole steak | 3-4 days wrapped tightly | 2-3 months in freezer bag | Reheat in 300°F air fryer for 3-4 minutes; will lose some moisture |
| Sliced cooked steak | 3-4 days in airtight container | 2 months in freezer bag | Microwave on 50% power in 30-second intervals |
| Raw seasoned steak (pre-freeze) | Must cook within 2 hours | Can freeze after salting for up to 3 months | Cook directly from frozen; add 2 minutes per side |
FAQ: Your Questions Answered
Can I use this method for other cuts like flank or skirt steak?
Not successfully. Flank and skirt are thin cuts (typically ½-¾ inch) designed for high-heat quick cooking. They will overcook before developing proper crust in an air fryer. These cuts are better suited for traditional pan-searing or grilling.
Why does the steak need to be so thick?
Thick steaks (1.5+ inches) have sufficient interior mass to stay cool while the exterior browns. Thin steaks heat through too quickly—the interior reaches medium or well-done before the surface hits browning temperature, regardless of freezer chilling.
Can I skip the freezer step and just refrigerate?
No. Refrigeration alone (38-40°F) does not create sufficient thermal buffer. The steak’s surface and interior are too close in temperature. The freezer step (bringing surface to 25-30°F while interior stays around 32°F) creates the necessary temperature stratification.
My air fryer only goes to 375°F—will this work?
It will work but requires adjustment. Lower temperature means longer cooking time and less aggressive browning. Increase cooking time by approximately 3 minutes (9 minutes first side, 6-7 minutes second side) and pull at the same internal temperatures.
How do I know when to flip the steak?
Time is your guide. After 6 minutes at 400°F, the bottom surface will have developed moderate browning. Flipping at this point ensures even cooking on both sides. Do not flip multiple times—this disrupts heat accumulation and prevents proper crust formation.
Related Articles on TastePillar
Sheet Pan Steak Fajitas: A Gourmet Mexican Dinner with Zero Cleanup
Ultimate White Queso Dip: Just Like Your Favorite Mexican Restaurant!
Air Fryer Frozen Salmon: How to Cook Perfectly Flaky Fillets in 12 Minutes.
Ultimate Air Fryer Steak
Ingredients
Equipment
Method
- Execute Surface Desiccation: Season steak evenly on all sides with coarse kosher salt. Place uncovered on wire rack over baking sheet. Slide into freezer for exactly 45 minutes to chill core and dry exterior.
- Apply the Lipid Shield: Remove from freezer. Pat dry any surface condensation. Season with black pepper. Brush avocado oil uniformly over all surfaces using pastry brush.
- Convection Pre-Blast: Preheat air fryer to 400°F (204°C) for full 5 minutes before adding meat.
- The Searing Cycle: Place oiled steak flat in center of preheated basket. Cook at 400°F for 6 minutes. Flip with tongs. Cook additional 4-6 minutes (4 for 1.5-inch, 6 for 2-inch steaks).
- The Critical Thermal Pull: Insert digital thermometer into thickest center. Remove immediately when reading 120-125°F (49-52°C) for medium-rare.
- Capillary Rest Matrix: Transfer to cutting board. Rest uncovered for 8 minutes. Carryover heat will reach 130-135°F (54-57°C). Slice against grain and serve.
Notes
- Steak must be at least 1.5 inches thick. Thin steaks will overcook before browning.
- Freezer chill is mandatory—creates thermal buffer protecting interior.
- Do not tent with foil during rest—softens crust.
- Carryover cooking raises temp 10-15°F—always pull early.