Ingredients
Equipment
Method
- Construct the Frictionless Guideway - Take a pastry brush and dip it into the 2 tablespoons of softened butter. Paint the inside of each 6-ounce ramekin using strict, vertical strokes going from the bottom straight up to the rim. Do not brush horizontally or in circular motions—only vertical upward strokes. The vertical brush pattern creates microscopic grooves that guide the expanding batter upward during baking. Rotate the ramekin and continue vertical brushing until the entire interior surface is coated with a thin, even layer of butter. Pay special attention to corners where bottom meets walls. Repeat with remaining three ramekins. Pour the 3 tablespoons of granulated sugar into one buttered ramekin, tilt and rotate to coat entire butter surface with sugar granules. Tip excess sugar into next ramekin and repeat until all four are coated. Place all prepared ramekins into refrigerator to chill and solidify the butter layer, locking the sugar coating in place.
- Synthesize the Acidic Cocoa Paste - In a small stainless steel or glass saucepan (non-reactive), combine 2 tablespoons unsalted butter, 3 tablespoons whole buttermilk, 1 teaspoon white distilled vinegar, and 1 teaspoon liquid red food coloring. Place over low heat and whisk continuously as butter melts. The mixture will look curdled initially—this is normal. Once butter has completely melted, add 3 tablespoons natural cocoa powder. Whisk vigorously for 30-45 seconds to break up lumps until completely smooth. Add the 2 ounces of finely chopped white chocolate. Reduce heat to lowest setting and stir continuously for 2-3 minutes as white chocolate melts completely. The paste will transform from thin watery liquid into thick, glossy, deep crimson chocolate mixture. Remove from heat, stir in 1 teaspoon vanilla extract, and set aside to cool to lukewarm temperature (90-100°F / 32-38°C). The paste must cool before adding to egg whites or it will cook the proteins on contact.
- Build the Elastic Albumen Foam - Ensure your mixing bowl (glass or stainless steel—not plastic) and wire whisk attachment are completely clean and dry. Any trace of fat, egg yolk, butter, or oil will prevent proper foam formation. Add 4 room-temperature egg whites (they should have been sitting at room temperature for 30-60 minutes after separating) to the bowl. The whites should flow easily, not have thick gel-like consistency. Add 1/4 teaspoon cream of tartar. Begin mixing on medium speed (speed 4-5 on 10-speed stand mixer). Whip for approximately 2 minutes until clear liquid whites transform into white, opaque foam that holds soft peaks. When you lift the whisk, peaks should curl over gently rather than standing straight up. With mixer still running on medium speed, begin adding the 1/4 cup granulated sugar in slow, steady stream over 30-45 seconds—do not dump all at once. Once all sugar is added, increase mixer speed to high (speed 8-10). Continue whipping for 60-90 seconds until foam becomes glossy, brilliant white, and holds stiff peaks. When you lift whisk, peaks should stand straight up without curling over. Foam should have marshmallow-like texture—smooth, dense, and stable. Stop mixer—do not over-whip or foam becomes grainy and collapses.
- execute Low-Shear Interfacial Folding - Scrape all lukewarm red velvet cocoa paste into a wide, shallow mixing bowl using silicone spatula. Take a large serving spoon and scoop out approximately 1/4 of the whipped egg white foam (roughly 1 cup). Add this dollop directly on top of red paste. Using wire whisk (not spatula yet), vigorously beat the egg white foam into red paste for 15-20 seconds. Do not be gentle—you are intentionally sacrificing this portion of foam to lighten the paste's density. Beat until mixture is uniform with no white streaks. The paste will transform from thick and sticky to smooth and pourable. Pour entire lightened red paste into bowl containing remaining whipped egg whites. Switch to wide silicone spatula. Insert spatula edge vertically into center of bowl, cutting straight down to bottom. Sweep spatula across bottom, then lift up along side, bringing denser red mixture from bottom up and over top of white foam. Rotate bowl 90 degrees and repeat. Count your folds—you want 10-12 complete folds total. After 10 folds you should see marbled mixture with occasional white streaks. Stop folding before achieving 100% uniformity—a few white streaks are acceptable and will disappear during baking.
- Prepare for Precision Thermal Expansion - Preheat oven to 375°F (190°C). Position oven rack in center. Remove prepared, sugar-coated ramekins from refrigerator—they should be cold with butter layer solidified. Using large spoon or ladle, carefully divide red velvet batter evenly among four ramekins. Fill each ramekin completely to the top rim—do not under-fill. Once filled, take a flat palette knife, offset spatula, or straight back of butter knife. Hold it perpendicular to ramekin rim and run across top surface, scraping off any excess batter rising above rim. Top surface should be perfectly flat and level with rim. This leveling is critical—any mounded batter will bake into crusty cap that weighs down center and prevents vertical rise. Now perform rim technique: Take your thumb and run it around inside edge of each ramekin rim, creating shallow circular trench approximately 1/8 inch deep where batter meets ceramic. This trench breaks surface tension between batter and ramekin wall, allowing center to rise freely.
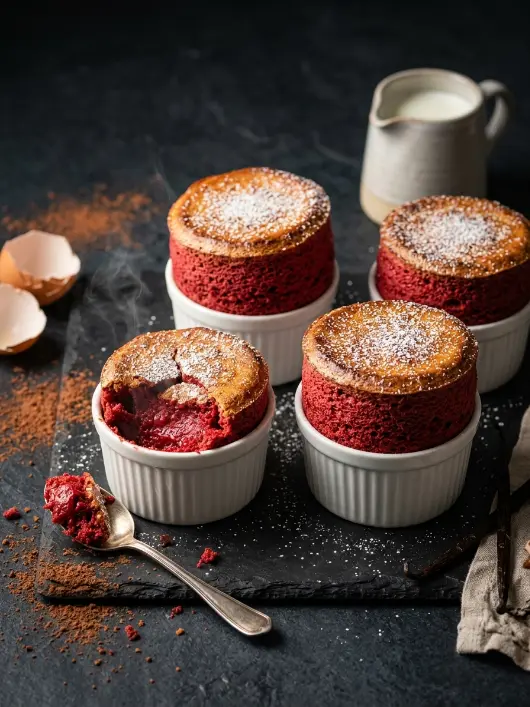
- Bake to High Vertical Equilibrium - Place all four filled ramekins on rimmed baking sheet for easy handling. Transfer immediately to preheated 375°F oven. Set timer for 13 minutes. DO NOT OPEN OVEN DOOR during first 10 minutes of baking—this is absolutely non-negotiable. Opening door causes sudden temperature drop that makes expanding gases contract rapidly, causing irreversible structural collapse. After 13 minutes, check soufflés through oven window. They should have risen dramatically—at least 1.5-2 inches above rim. Tops should be golden-brown with slightly darker edges. Surface should look dry and set, not wet or shiny. If needed, bake additional 2 minutes. Once well-risen and brown, remove immediately. Using oven mitts or kitchen towels, immediately transfer ramekins from baking sheet to individual serving plates—ceramic will be extremely hot. If desired, dust tops lightly with powdered sugar using fine-mesh sieve. Serve immediately within 5 minutes while soufflés are still hot and at peak height. Instruct diners to break through crispy top crust with spoon—interior should be creamy, custardy, and intensely red velvet in flavor.
Notes
Never open oven door during first 10 minutes of baking; sudden air temperature drop breaks expanding gas pockets inside protein walls, causing structure to deflate permanently and irreversibly. Always use natural (non-alkalized) cocoa powder—Dutch-processed cocoa has alkaline pH (7.0-8.0) that destroys foam stability and prevents red color development. Room temperature egg whites are essential—cold eggs whip to only 60-70% of volume achieved by room-temp whites. Any trace of egg yolk, fat, or oil in mixing bowl will prevent proper foam formation—bowl and whisk must be absolutely clean and dry. Cream of tartar is critical for foam stability—it lowers pH to optimal range (4.5-5.0) and prevents over-coagulation during baking. Vertical butter brushing creates grooves that guide upward expansion—horizontal brushing encourages outward spreading instead of vertical rise. Soufflés must be served within 5 minutes of baking at peak height—they begin deflating within 2-3 minutes as internal temperature drops and gases contract. Cannot be made ahead, reheated, or held—this is a time-sensitive dessert that must be timed to finish exactly when ready to serve.