Ingredients
Equipment
Method
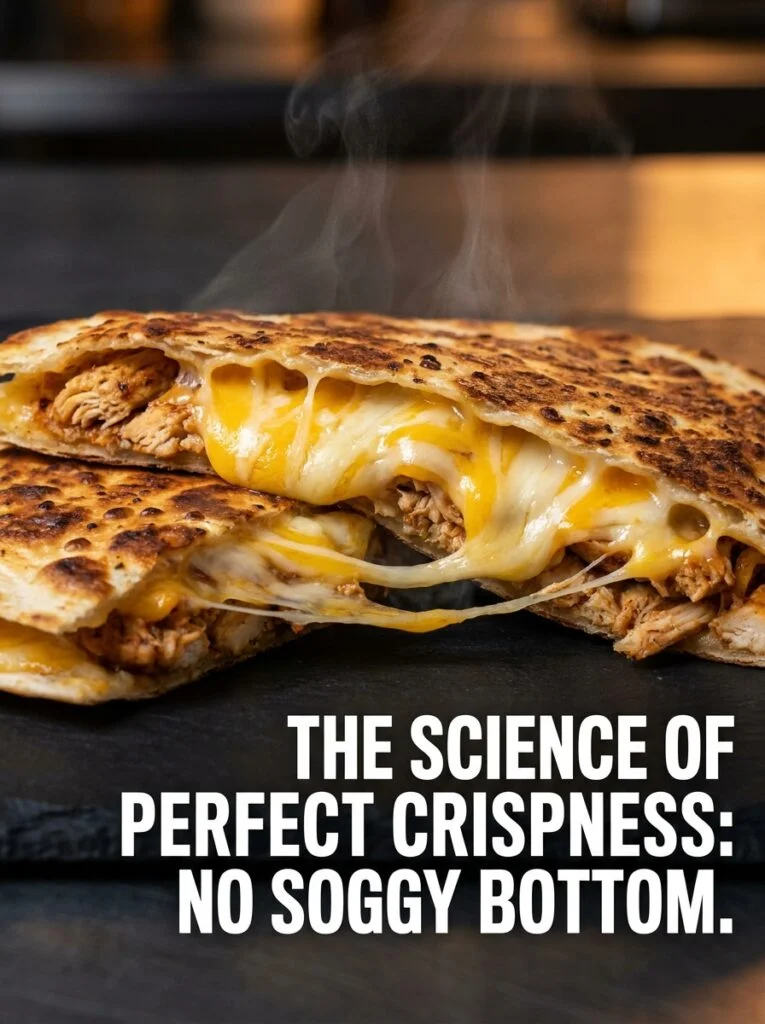
- STEP 1 - The Cornstarch Dusting (The Secret Trick)
- Lay six Mission 10-inch flour tortillas flat on the counter. Using a fine-mesh sifter, very lightly dust one side of each tortilla with cornstarch. You want so little cornstarch that you can barely see it—if you can see white powder, you used too much. This cornstarch will absorb the water released by melting cheese, eliminating the soggy bottom problem. This single step is the entire secret.
- STEP 2 - Pan Preheat & Cheese Preparation (Parallel)
- Turn oven on to 475°F. Place Nordic Ware natural aluminum sheet pan on middle rack. Set timer for exactly 10 minutes. Do NOT open the oven during preheating. While pan preheats, use a box grater to fresh-shred 1 cup Tillamook Sharp Cheddar and 1 cup Monterey Jack Cheese. Combine cheeses in a bowl and mix together with a fork. Shred immediately before assembling—do not pre-shred and let sit. Also prepare the rotisserie chicken: remove from packaging and shred into 1-2 inch pieces. You need approximately 1.5 cups shredded chicken.
- STEP 3 - The Assembly (The Critical Layering Sequence)
- As soon as the 10-minute preheat timer goes off, assemble the quesadillas quickly. For each of six quesadillas, lay down one tortilla (cornstarch side up). Layer in this exact sequence: Layer 1 - Approximately 1/6 of the cheese blend (about 38g) sprinkled evenly. Layer 2 - 1/4 cup rotisserie chicken (about 37g) distributed across the cheese. Layer 3 - Another 1/6 of the cheese blend (about 38g) sprinkled on top of the chicken. Layer 4 - The second tortilla placed on top (cornstarch side down). Critical: Always use the sequence tortilla → cheese → chicken → cheese → tortilla. This layering prevents the quesadilla from falling apart and creates the signature cheese pull. Do NOT use more than 1/3 cup cheese per quesadilla total—excess water will overwhelm the cornstarch.
- STEP 4 - The Hot Pan Transfer & Baking
- Carefully remove the preheated sheet pan from the oven using heavy-duty oven mitts (it will be extremely hot—approximately 420°F surface temperature). Immediately place the assembled quesadillas on the hot pan. You will hear a loud sizzle—this is the Maillard reaction beginning and is the sign of success. Place up to 6 quesadillas on one pan (or 3-4 per pan if using two pans). Each quesadilla should have at least 1 inch of space on all sides. Return pan to oven immediately. Set timer for exactly 12 minutes. Do NOT open the oven door during baking.
- STEP 5 - The Rest & Serve
- At exactly 12 minutes, remove the pan from the oven and place on a heat-safe trivet. Let quesadillas rest undisturbed for exactly 90 seconds on the hot pan. This resting allows the cheese to set slightly and the crust to crisp further. After 90 seconds, use a pizza wheel or chef's knife to cut each quesadilla into four triangular pieces. The cheese should pull beautifully as you cut. Serve immediately while hot with optional toppings: sour cream, pico de gallo, cilantro, lime wedges, or sliced jalapeños.
Notes
Calculated using USDA FoodData Central for Costco Kirkland Signature rotisserie chicken, Tillamook cheeses, and Mission flour tortillas. High protein content (32g per quesadilla) provides 64% of daily recommended protein for a 2,000 calorie diet. Nutrition data is per one complete quesadilla.