Ingredients
Equipment
Method
- STEP 1: The Rice-Aromatics Infusion
- Step Name: Start the Cilantro Lime Rice First
- Step Instructions:
- Rinse 1.5 cups (300g) of basmati rice under cold water for 30 seconds, stirring gently, until the water runs clear. This removes excess starch and ensures the grains separate during cooking without clumping. Pat the rinsed rice dry with a clean cloth.
- In a rice cooker (or heavy pot with tight-fitting lid), combine the rinsed rice with 2.25 cups (540ml) of water, 3 tbsp (45ml) fresh lime juice, 1 tsp (3g) lime zest, 0.25 cup (15g) cilantro stems (the leafy green part of the stems, not the thick woody bottom), 2 minced garlic cloves, and 0.75 tsp (4g) sea salt.
- Stir everything together until well combined. The mixture should smell bright and herbaceous—like you are cooking rice in a lime-cilantro broth, not plain water. This infusion is the key to restaurant-quality flavor throughout each grain.
- If using a rice cooker, press start now. If using a pot on the stovetop, bring to a boil over high heat, then reduce heat to low, cover with a tight-fitting lid, and cook for 17 minutes without opening (peeking releases steam and causes uneven cooking).
- The rice will be done in approximately 17-18 minutes. Set a timer and do not open the lid until the timer goes off. This is critical for proper cooking.
- Timing Notes:
- Start this step FIRST. The rice takes the longest (17-18 minutes), so beginning it first ensures all components finish simultaneously for assembly.
- STEP 2: Prepare the Barbacoa Marinade
- Step Name: Blend the Chipotle-Lime Marinade
- Step Instructions:
- While the rice cooks, prepare the barbacoa marinade. In a blender or using an immersion blender, combine 3 tbsp (45ml) fresh lime juice, 1 tbsp (6g) lime zest, 3-4 canned chipotle peppers (plus 2 tbsp of the adobo sauce from the can), 4 minced garlic cloves (20g), 1 tsp (5g) ground cumin, 0.5 tsp (1g) dried Mexican oregano, 1 tsp (6g) sea salt, and 0.5 tsp (1g) black pepper.
- Blend until you achieve a rough paste consistency. The marinade should be thick enough to coat the back of a spoon and should smell intensely smoky and spicy—like Chipotle's signature barbacoa spice blend.
- Do not over-blend into a completely smooth paste; some texture is good. You want visible pieces of chipotle pepper (about pea-sized chunks) throughout. This creates complex flavor notes in the final dish.
- Transfer the marinade to a small bowl and set aside. You will use this in the next step.
- STEP 3: The Flash-Barbacoa Sear (Two-Batch Method)
- Step Name: Sear the Beef Chuck in Two Batches
- Step Instructions:
- Cut 1.5 lbs (680g) of beef chuck steak into 2-inch chunks (do not shred yet; you are searing whole pieces). Pat the beef chunks completely dry with a paper towel—moisture on the surface prevents browning through the Maillard reaction (water must evaporate before browning can begin).
- Heat 2 tbsp (30ml) olive oil in a large heavy skillet (preferably cast iron, 12-inch diameter) over high heat until it is just barely smoking (about 2 minutes). You will know it is ready when wisps of smoke are visible above the oil and it shimmers.
- Working in two batches to avoid crowding the skillet (crowding creates steam, which prevents browning), carefully add half of the beef chunks to the hot oil. Sear for 2-3 minutes on the first side without moving them. You want a dark mahogany-brown crust to form—this is the Maillard reaction creating deep, complex flavors.
- Flip each piece and sear the second side for an additional 2-3 minutes. The interior will still be raw (this is correct; you are building crust flavor, not cooking through yet). Transfer the first batch to a clean plate.
- Sear the second batch using the same method (2-3 minutes per side). Transfer to the plate with the first batch when done.
- Why two batches? Crowding the skillet creates steam, which raises the humidity around the meat and prevents browning. Each piece needs direct contact with hot metal and low humidity. Searing in batches takes an extra 2 minutes but produces dramatically better crust and flavor.
- STEP 4: Braise in Chipotle Sauce & Shred
- Step Name: Simmer Barbacoa in Chipotle-Lime Sauce
- Step Instructions:
- Return all the seared beef chunks to the skillet (it is okay if they are still in the same skillet or a clean one). Add the chipotle-lime marinade (prepared in Step 2) and 1 cup (240ml) of low-sodium beef broth. Stir everything together to combine, making sure the marinade coats all the beef pieces evenly.
- Reduce heat to medium (not high—you want a gentle simmer, not a rolling boil). Simmer uncovered for 6-8 minutes. The liquid will reduce and concentrate, the meat will finish cooking through to safe temperature (160°F / 71°C internal), and the marinade will caramelize onto the surface of the beef, creating a glossy coating.
- Check doneness at 6 minutes: the beef should feel tender when pierced with a fork (it will break apart easily due to the lime acid pre-tenderization). If still tough, simmer an additional 1-2 minutes.
- After 6-8 minutes, remove the skillet from heat. Using two forks, shred the beef by pulling apart the meat along the grain (the direction the muscle fibers run). The meat should separate into tender strands approximately 0.5 inches wide. Each strand should still have visible texture—not mushy, not too fine (fine shreds absorb too much sauce and become grainy).
- Taste and adjust seasoning: if you want more lime brightness, squeeze in another 0.5 tbsp of fresh lime juice. If you want more smokiness, add another half chipotle pepper, blended smooth and stirred in.
- Timing Notes:
- By this point, your rice should be done or nearly done. Timing should align such that rice finishes at approximately the same time as the barbacoa for assembly.
- STEP 5: Prepare the Queso Sauce (While Meat Braises)
- Step Name: Emulsify the Smooth Queso Sauce
- Step Instructions:
- While the barbacoa braises (during the 6-8 minute simmer), start preparing the queso. In a small saucepan, combine 0.5 cup (120ml) whole milk (not skim; fat is essential for emulsification) and 0.5 tsp (2.5g) cornstarch.
- Whisk the milk and cornstarch together vigorously for 30 seconds, ensuring the cornstarch is fully dissolved with no lumps remaining. The cornstarch acts as an emulsifier—it will keep the fat and proteins in the cheese bonded together as you heat, creating a smooth sauce instead of a grainy, broken one.
- Place the saucepan over medium heat and warm until the mixture is steaming and just beginning to thicken (about 2 minutes). You should see it bubbling at the edges. Do not bring to a rolling boil.
- Remove from heat immediately. Add 1 cup (115g) shredded Pepper Jack cheese and 0.5 cup (57g) shredded Sharp Cheddar cheese all at once. Stir continuously and vigorously for about 60 seconds. The cheese will melt completely and combine with the cornstarch-milk base to create a smooth, creamy sauce.
- The queso should be pourable (like warm lava flowing) but still thick enough to coat a spoon. Test: dip a spoon in the sauce and hold it upside down. The sauce should flow slowly off the spoon, not drip in a stream and not stay clumped.
- If the queso is too thick, add 1-2 tbsp more whole milk and stir. If too thin, you did not cook long enough or the cheese-to-milk ratio is off (use the recipe amounts exactly next time).
- The queso should be kept warm until you pour it over the assembled bowl. If it cools and thickens, you can reheat it gently over low heat, stirring constantly, adding a splash more milk if needed.
- Critical Notes:
- The emulsifier (cornstarch) is non-negotiable. Do not skip this step. Without the cornstarch, the fats will separate from the solids as you heat, creating a grainy, broken, unpleasant sauce that is nothing like Chipotle's queso.
- STEP 6: Assemble the Bowl (Layering is Everything)
- Step Name: Layer Rice, Barbacoa, Then Queso
- Step Instructions:
- Grab a large serving bowl (not a rice cooker—a proper serving bowl that can hold 3.5-4 cups of food). Layer from bottom to top:
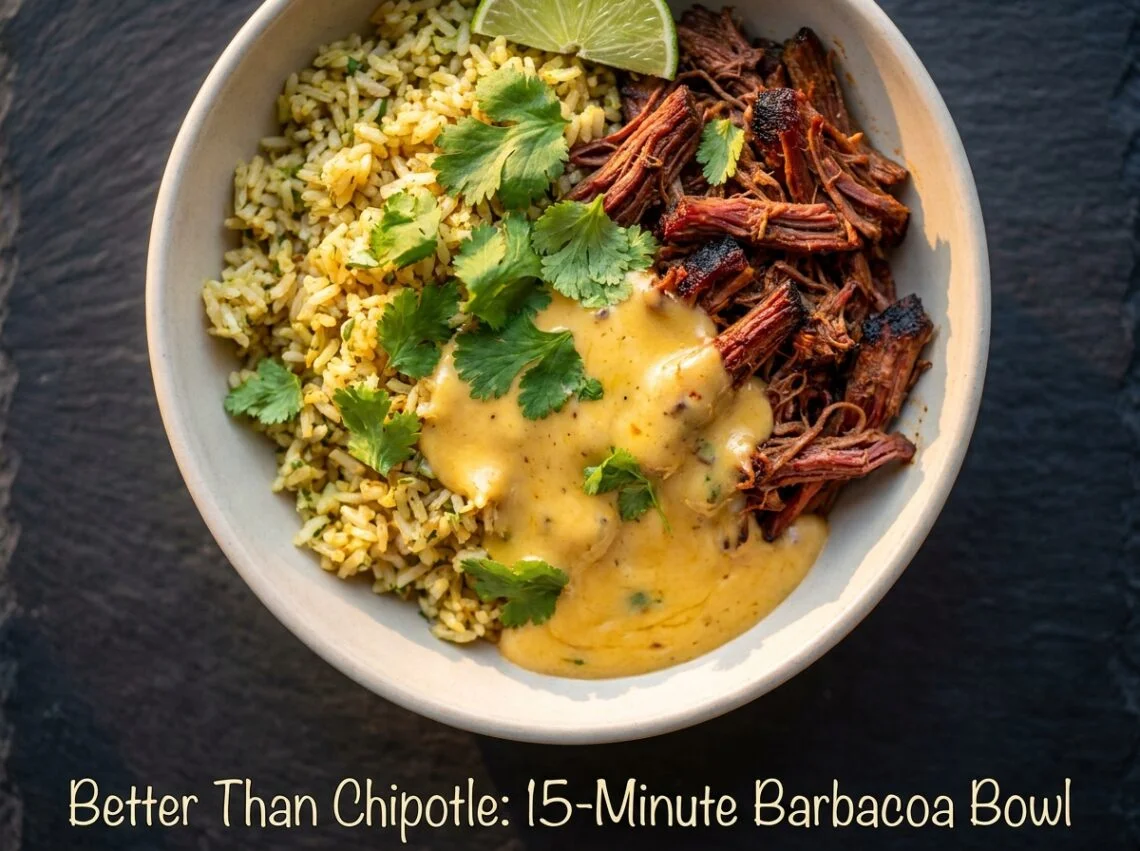
- Layer 1 - The Rice Base: Scoop approximately 1 cup (about 200g) of the cilantro lime rice into the bowl. Use the back of a spoon to gently press and create a stable, even base layer. The rice should be warm and fluffy, with visible cilantro flecks and lime zest throughout.
- Layer 2 - The Barbacoa: Add approximately 0.75 cup (150g) of the shredded barbacoa directly on top of the rice base. The residual heat from the meat will slightly warm the rice below, allowing flavors to meld at the microscopic level. Drizzle any liquid/sauce remaining in the skillet over the meat layer.
- Layer 3 - The Queso Sauce: This happens next (see Step 7).
- The reason for this specific layering: you want warm rice + warm meat + warm queso all in contact with each other simultaneously. This allows flavors to integrate and creates that unified restaurant bowl taste. Cold toppings placed on hot components create a disconnect in flavor and texture.
- Do not let the bowl sit while you prepare the queso (if rice and meat cool too much, the queso will set partially when poured, creating an uneven texture).
- STEP 7: The Final Queso Pour (The Signature Move)
- Step Name: Pour Hot Queso Over the Assembled Bowl
- Step Instructions:
- Pour the prepared hot queso sauce (from Step 5) over the assembled rice and barbacoa in the bowl. Pour in a slow, steady stream, allowing the queso to pool and cascade across the components. The queso should coat the barbacoa, pool on the rice, and integrate with the warm components below.
- The heat of the queso will gently warm the rice and meat, melding flavors. The queso pooling is part of the visual presentation—it should look luxurious and creamy, not completely absorbed.
- You should have approximately 0.75 cup (180ml) of queso total; this creates the signature Chipotle bowl appearance and mouthfeel.
- STEP 8: The Final Garnish & Serve Immediately
- Step Name: Add Fresh Garnish and Serve Now
- Step Instructions:
- Top the assembled bowl with:
- 0.25 cup (15g) fresh cilantro leaves, finely chopped (add right before serving, do not add earlier as cilantro wilts and loses brightness)
- Fresh lime wedges (1-2 per bowl, positioned artfully on the rim or to the side)
- Optional toppings: diced red onion (0.25 cup / 30g), fresh pico de gallo (0.5 cup / 75g), or a small dollop of sour cream or Mexican crema (2 tbsp / 30ml)
- Serve immediately while everything is hot. The cilantro should be bright green and fresh, the queso should be warm and pourable, and the barbacoa should be steaming.
- Do not let the bowl sit after assembly—queso begins to cool and thicken, and the overall temperature drops rapidly once the hot queso stops providing heat.
Notes
Why Start the Rice First:
Rice takes 17-18 minutes to cook perfectly. If you start the barbacoa first, the meat finishes before the rice, and you are left with cold components that cannot meld flavors properly. Start rice first, then begin searing meat while rice cooks. Everything finishes simultaneously for optimal assembly. The Cornstarch Emulsifier is Non-Negotiable:
Cornstarch (0.5 tsp mixed into the milk) creates a smooth queso sauce. Without it, cheese sauce breaks and separates into oil + solid lumps, creating a grainy, unpleasant texture. Do not skip this step. Cornstarch acts as an emulsifier, bonding fat and proteins together as you heat, creating Chipotle-quality queso. Fresh Lime Juice Temperature Matters:
Slightly warm lime juice (not cold) penetrates beef more effectively and tenderizes faster through acid denaturation. If your lime juice is straight from the refrigerator, warm it in a small pan for 20 seconds or let it sit at room temperature for 10 minutes before marinating. This improves acid penetration and tenderness. Two-Batch Searing Prevents Steaming:
Crowding the skillet creates steam, which prevents browning and crust development. Even if it takes an extra 2 minutes, sear in two batches. Each piece needs space and direct contact with hot metal for proper Maillard reaction browning. Shred Along the Grain:
When shredding the cooked beef, use two forks to pull apart the meat along the grain (the direction the muscle fibers run). Shredding across the grain makes the meat too fine and mushy. Proper shred size should be approximately 0.5 inches wide with visible texture. Do Not Add Cilantro Leaves Too Early:
Add fresh cilantro leaves as the final garnish, right before serving. If you add cilantro during cooking or earlier assembly, it wilts, darkens, and loses its bright fresh flavor. Save cilantro leaves for the very end. Serve Immediately After Assembly:
Do not let the assembled bowl sit. Queso begins to cool and thicken within 2-3 minutes. Queso is best when still hot and pourable. Rice and meat cool rapidly once the hot queso stops providing heat. Serve within 2 minutes of assembly for optimal temperature and texture. Make-Ahead Strategy for Meal Prep:
Barbacoa and rice can be made in bulk on Sunday and refrigerated separately in airtight containers for 4-5 days. The barbacoa actually improves in flavor after 1-2 days as the spices continue to meld. Fresh queso is best, but you can prepare it ahead and reheat gently (low heat, stirring constantly) when needed. Assemble fresh bowls throughout the week as desired. High-Altitude Adjustments (5,000+ feet elevation):
At higher elevations, air pressure is lower, affecting cooking times. Increase rice cooking time by 2-3 minutes. Increase barbacoa simmer time by 1-2 minutes. Watch carefully for proper doneness rather than relying on the recipe times alone. Flavor Variations & Customizations:
Beef chuck steak must reach 160°F (71°C) internal temperature to be safely consumed (it is ground meat equivalent due to searing and shredding). Check with an instant-read thermometer at the thickest point. Rice must be cooled to 70°F (21°C) within 1 hour of cooking to prevent Bacillus cereus growth (a food-poisoning bacterium found in rice). If rice sits uncovered at room temperature, cool it quickly in an ice bath or spread it on a baking sheet. Do not leave the assembled bowl at room temperature for more than 2 hours.
Rice takes 17-18 minutes to cook perfectly. If you start the barbacoa first, the meat finishes before the rice, and you are left with cold components that cannot meld flavors properly. Start rice first, then begin searing meat while rice cooks. Everything finishes simultaneously for optimal assembly. The Cornstarch Emulsifier is Non-Negotiable:
Cornstarch (0.5 tsp mixed into the milk) creates a smooth queso sauce. Without it, cheese sauce breaks and separates into oil + solid lumps, creating a grainy, unpleasant texture. Do not skip this step. Cornstarch acts as an emulsifier, bonding fat and proteins together as you heat, creating Chipotle-quality queso. Fresh Lime Juice Temperature Matters:
Slightly warm lime juice (not cold) penetrates beef more effectively and tenderizes faster through acid denaturation. If your lime juice is straight from the refrigerator, warm it in a small pan for 20 seconds or let it sit at room temperature for 10 minutes before marinating. This improves acid penetration and tenderness. Two-Batch Searing Prevents Steaming:
Crowding the skillet creates steam, which prevents browning and crust development. Even if it takes an extra 2 minutes, sear in two batches. Each piece needs space and direct contact with hot metal for proper Maillard reaction browning. Shred Along the Grain:
When shredding the cooked beef, use two forks to pull apart the meat along the grain (the direction the muscle fibers run). Shredding across the grain makes the meat too fine and mushy. Proper shred size should be approximately 0.5 inches wide with visible texture. Do Not Add Cilantro Leaves Too Early:
Add fresh cilantro leaves as the final garnish, right before serving. If you add cilantro during cooking or earlier assembly, it wilts, darkens, and loses its bright fresh flavor. Save cilantro leaves for the very end. Serve Immediately After Assembly:
Do not let the assembled bowl sit. Queso begins to cool and thicken within 2-3 minutes. Queso is best when still hot and pourable. Rice and meat cool rapidly once the hot queso stops providing heat. Serve within 2 minutes of assembly for optimal temperature and texture. Make-Ahead Strategy for Meal Prep:
Barbacoa and rice can be made in bulk on Sunday and refrigerated separately in airtight containers for 4-5 days. The barbacoa actually improves in flavor after 1-2 days as the spices continue to meld. Fresh queso is best, but you can prepare it ahead and reheat gently (low heat, stirring constantly) when needed. Assemble fresh bowls throughout the week as desired. High-Altitude Adjustments (5,000+ feet elevation):
At higher elevations, air pressure is lower, affecting cooking times. Increase rice cooking time by 2-3 minutes. Increase barbacoa simmer time by 1-2 minutes. Watch carefully for proper doneness rather than relying on the recipe times alone. Flavor Variations & Customizations:
- Extra Spicy: Add another half chipotle pepper to the marinade, or add 0.25 tsp cayenne pepper
- More Lime Brightness: Squeeze in an extra 0.5 tbsp fresh lime juice after shredding the meat
- Richer Queso: Use heavy cream instead of whole milk for extra creaminess
- Add Avocado: Top with 0.5 sliced avocado per bowl
- Add Black Beans: Warm 0.5 cup canned black beans (drained and rinsed) and add as a layer
- Vegetarian Version: Substitute mushrooms (seared portobello mushrooms cut into chunks and shredded, or pan-fried crispy tofu) for the beef; use vegetable broth instead of beef broth
- Cauliflower Rice Substitution: Use low-carb cauliflower rice instead of basmati for keto version (cook the same way: infuse the cooking liquid with cilantro, lime, garlic, and salt)
Beef chuck steak must reach 160°F (71°C) internal temperature to be safely consumed (it is ground meat equivalent due to searing and shredding). Check with an instant-read thermometer at the thickest point. Rice must be cooled to 70°F (21°C) within 1 hour of cooking to prevent Bacillus cereus growth (a food-poisoning bacterium found in rice). If rice sits uncovered at room temperature, cool it quickly in an ice bath or spread it on a baking sheet. Do not leave the assembled bowl at room temperature for more than 2 hours.